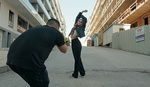
When we learn about lighting in portrait photography, we mostly focus on where to add light and how to shape it, but the presence of light is only made impactful by the mutual presence of shadows. Shadows can be a fantastic tool not just for contrast but to create a sense of drama or to tell a story with your images. This fantastic video tutorial will walk you through the process of lighting a portrait image with carefully crafted shadows to show you just how powerful they can be.
Coming to you from Karl Taylor, this excellent video tutorial will walk you through the lighting and creation of a carefully lit portrait photo to show you how shadows can be a powerful tool for making compelling images. We spend a lot of time working on adding light to a photo, but knowing when, where, and how to subtract it is a subtle skill that can greatly enhance your technical skill and expand your creative voice. This is why so many portrait photographers who work in a studio keep a set of v-flats or two around to be able to more precisely sculpt the light or to add a shot of contrast when desired. Check out the video above for the full rundown from Taylor.


Interesting video and end result. Great job.
Karl mentions he no longer uses a light meter, rather he gauges and balances light directly on his monitor and makes adjustments from there. He does mention his use of a meter in the past when working with film. Many of us have used light meters extensively with film and truthfully, I still use a Sekonik meter, even for spot metering in a complex architectural setting. I wonder if light meters are indicative of our age and process. I feel old.
What I would like to add here because Karl mentions shadow density, and I do not see it spoken or practiced often in video tutorials, is Loop, Butterfly, and Rembrandt lighting, which are based on the inclusion of shadows.
Nor have I heard it mentioned in many of those same videos, the short and long side of a subjects face,
and when/when not to place the lighting on the corresponding side that is unflattering.
Perhaps we have made a turn in photography and lighting is now what feels right, rather than old school principles.
I will fess up and mention that I have forgone all I have mentioned above many times when clients are too anxious in allowing me to make light changes for each of their headshot participants.
I just feel it’s important to keep those original principals in place as they are great starting points.
"Perhaps we have made a turn in photography and lighting is now what feels right, rather than old school principles."
This. I think it mostly has to do with the fact that technology allows us to do this. Back in the film days, it wasn't so easy as to tether to a computer, look at the shots as they come in, and then tweak to taste.
I am still using the light meter for complex studio setups with many strobes. And I can prelight without even pulling out the camera or laptop.
Outside I use it sometimes just for evaluating changes in light patterns when there are many clouds in front of the sun.
--- "Perhaps we have made a turn in photography and lighting is now what feels right, rather than old school principles."
--- "I just feel it’s important to keep those original principals in place as they are great starting points."
It would get very monotonous if every single lighting video every single time brought those up. Not all lighting videos need to feel like lighting 101. Also, many of these photographers have been doing this a long time so it's understandable they'd take the creative approach.
Nice lighting but i feel the final image had been over photoshopped