
Low-light shooting brings its own problems with underexposure, high-ISO noise, and difficulty focusing. But with a few tweaks in Lightroom, you can save those otherwise lost photos and bring them back to life.
Photographing in low light is notoriously difficult. To start with, the autofocus on our cameras hunts, meaning it's tricky to get a sharp shot. Combine that with the requirement for a wide aperture to let as much light in as possible, and you start to struggle to get a decent depth of field. Because of this, photographers often have to extend the shutter speed, which causes camera movement blur if shooting handheld, or bump up the ISO, which can introduce noise, spoiling an otherwise good picture.
If we deliberately (or accidentally) underexpose a scene in order to get a sharp, crisp image, you may think that it was a wasted shot, but Lightroom Classic is now so powerful that we can rework the photograph to make it look like the correct exposure. However, this introduces other problems. Color banding and grainy shadows start to crop up in the photograph, as well as overexposure of brighter sections in the scene. That said, we can fix those too. Let me show you how to do it with ease.
Analyze the Scene

The first stage to editing a low-light shot is to analyze the scene before going any further.
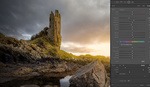
After importing the low-light image, I took some time analyzing the scene to discern what was and wasn't important. I deliberately underexposed this shot so that I could retain the details in the highlights near the window and door. If I had exposed correctly, these areas would've been overexposed and clipped, resulting in a loss of detail in those. But the rest of the scene is incredibly dark, so I need to correct this.
Boost Exposure

The next step is to correct the exposure issues in the image. Be careful, as any bright highlights can be easily overexposed during this step. Aim to reveal as much detail as possible in the shadows without clipping highlights; using the histogram may be useful in this step.
Increase the Shadows

Once the exposure is set, you may want to enhance the shadows specifically so that you can selectively alter the exposure in the darker areas without affecting any of the rest of the frame.
My next task was to enhance these dark areas even further without clipping the highlights in the window and door. Instead of boosting the exposure more, I cranked up the Shadows slider to +50. This concentrated added exposure in the shadowed areas within the frame. Boosting too much, though, would result in a loss of dynamic range in the shot, and things would've looked washed out, which I tried to avoid.
Remove Banding and Noise

Looking closely at the darkest shadows in the image, I noticed there's some color banding and noise that I've introduced by boosting the exposure and shadows through Lightroom. This has to be addressed using some more tricks within Lightroom itself.
Deal With the Banding

I decided to deal with the color banding first by using the Detail panel in the Develop module.
Eliminate the Noise

Next, I remove the noise by using the Luminance slider, adding just enough to remove the noise without ridding the scene of detail.
Taming the Highlights

One last look over the entire image always proves useful. Here, I've zoomed back out after removing unwanted banding and noise,to notice that the highlights needed tending to before exporting my finished image.
Zooming back out again, I gave the whole image one last look before exporting. During this stage, I noticed that the highlights in the window and door were overexposed. This is because I boosted the Exposure slider earlier in the process but hadn't yet corrected these areas. To do this, I used a Radial filter and drew an oval across the brightest areas. I've applied a red overlay (which you can toggle with O) to show you the areas I've affected. I then dropped the Exposure slider to -0.23 and also attenuated the Highlights to -25 in order to bring out the detail in the brickwork and window frames. See below for my before and after.


As you can see, using Lightroom Classic to save an underexposed low-light shot or simply improve it is absolutely doable. It may not be the ideal way to go about things: correct photographic equipment, lighting, metering, and technique go a long way to solve all these issues. But if you find yourself stuck with a tricky low-light situation or you've simply accidentally got your settings wrong, then Lightroom is here to save the day.


I don’t have Lightroom nor any other Adobe $$$$ softwares. I use free softwares like photo.net or Gimp. I make such corrections by editing the curves. In your sample above the highlights at the window are almost entirely destroyed. If I can’t preserve these highlights with the curves, I would first select out the window (and it’s shadow) so that it remains unaltered by the changes made to the other part of the picture. Maybe it’s a bit cheating…
If shooting in tough lighting scenarios, may not be a bad idea to shoot in raw. You'll most likely have cleaner shadow and highlight recovery.
I shoot 14 bit uncompressed raw with my a7riii and can do about 3 stops from 100-3200 ISO pretty clean. If I go any higher I'll run it through Topaz Denoise AI.
Shot at ISO 2500 1/125 f/5.6
Damn, that is clean!
I'm impressed!
I use Capture One with a Sony, and the shadow and highlight correction is way better than ACR, LR or PS with my old Canon 5dMk2
So, you say that you underexposed the shot and that if you had exposed "correctly" the highlights would have blown out. So, being that the highlights were important, you did expose correctly. You then went about bringing out the darker areas in LR.
I do these scenes differently. I would have taken two shots. One for the highlights and one for the shadow detail. I would have had LR load the photos into PS as layers and blended them with "Blend If". It would take a lot less time and produce an image without noise or banding and still offer a superior tonal range than leaning on LR to do the task.
What helps with this is that when I see dark, I grab my tripod. Pardon the pun, but it gives me a leg up.
That’s the best way to do it. it’s like what my iPhone automatically do: It’s called HDR.
Some do refer to working with more than one image and "Blend If" or luminosity masks as manual HDR. The benefit of not using HDR software and doing it this way is that there are absolutely no HDR artifacts like halos, added noise, crazy saturated colors, or inappropriate contrasts. Nobody has ever looked at an image that I've done this way and then asked: "Hey, is that HDR?"