Last year Adobe added the ability to apply a range mask to the adjustment brush tools in Lightroom, but photographers have mostly forgotten about this powerful option. Here is why you should be using range masks more frequently when editing your photos.
All Lightroom users are familiar with the software’s adjustment brush and gradient tools to some extent. These options give users more control by providing a way to add a specific adjustment to a localized area of an image. The range mask, however, allows photographers to take that control a step further. This tool enables you to restrict the application of an adjustment to only a specific luminance or color value. In this video from PHLEARN, Aaron Nace teaches how to use the luminance version of the mask to edit an image in Lightroom.
Nace has a practical purpose for range masks, using the luminance mask to make adjustments to only the highlights or the shadows in the selected area to essentially dodge and burn the image. The mask allows him to avoid the luminance values that he doesn’t want to affect. I will also add that the color version of the mask is a great way to add an effect to a specific part of an image without the need to paint perfectly with the brush tool. For example, you can paint an effect over a subject's entire face, and then use the color range mask to only apply the adjustments to their skin or their hair by selecting those colors. You can also hold shift when using the color picker to apply the effect to multiple colors.
The range mask has been available for a while, but it is still overlooked. If you haven't implemented this technique in your editing, take a look at the video above.


Although it's good that luma masking was added to LR, LR masking is crude. Fairly useless, for the most part. CO too.
It is basically the blend-if-option from PS. I use that fairly often.
What is the difference between using a range mask or simply just using the highlight and shadow sliders? Aren’t those basically a range mask in and of themselves? For instance, if I paint over an area with light and dark areas, and then I increase the shadows slider, isn’t this just going to increase the brightness of the shadow range and leave the highlights alone . . . just like a range mask would? Any thoughts?
The highlight/shadow sliders do a lot more than simply changing the luminance of the corresponding range. They produce a pretty different result you would get from applying the tone curves to the corresponding range for example. There is some function built in that preserves contrast to other parts of the image. That's why you can create some halos by moving the s/h sliders.
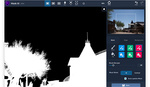
The image shows what happens to a 50% grey background after altering shadows/highlights and replacing the gradients with 50%grey.