
If you look at your camera, you will find a button to change the white balance. You can choose either auto white balance or one of the other predefined settings. But it is also possible to set the color temperature itself. Is there a difference between color temperature and white balance?
I think most photographers will use the auto white balance setting on their camera. Others might use a predefined setting like sunny, cloudy, shade, or tungsten. These settings can give the image a natural look under the right circumstances.
Color and Its Temperature
Color has a temperature. Or better said, temperature has a color. When we look at the definition, it says: "the color temperature of a light source is the temperature of an ideal black body radiator that radiates light of a color that’s comparable to that of the light source." (source: Wikipedia) The temperature is given in Kelvin.
This black body radiator seems like a strange thing, but it’s quite simple. It’s an object that absorbs radiation and thus becomes warmer. Eventually, it starts glowing, just like iron starts glowing when it’s heated. First, it glows red, and when it gets warmer, the color eventually turns white.

A range of temperatures with the corresponding color. I have added the white balance symbols you find on most cameras.
Below 1,000 K, we won’t see any color emerging from the black body radiator. But at 1,000 K, it will start to glow a red color. At 2,000 K, the color is orange, and at 5,000 K, it will be yellow. If it is going towards 7,000 K, the black body radiator will be white and eventually blue when it reaches 8,000 K or more.
It won’t surprise you when I refer to the sun. It’s a glowing ball of gas that is very similar to a black body radiator. It has a surface temperature of approximately 5,600 K, which equals yellow light. We don’t see that yellow color because our eyes are neutralizing the yellow color cast. We want to do the same with our camera; we want any color cast removed.
Setting the Color Temperature
Most of us know about the different possible light colors during the daytime. Daylight is yellowish, but because our eyes are calibrated for that color, it appears to be neutral. Tungsten shifts towards orange, and something in the shadows will appear blue. Each of these colors have a different color temperature. Orange tungsten is about 2,500 – 3,000 K, daylight is about 5,000 – 5,500 K, and a shadow in full sunlight is 7,000 K.
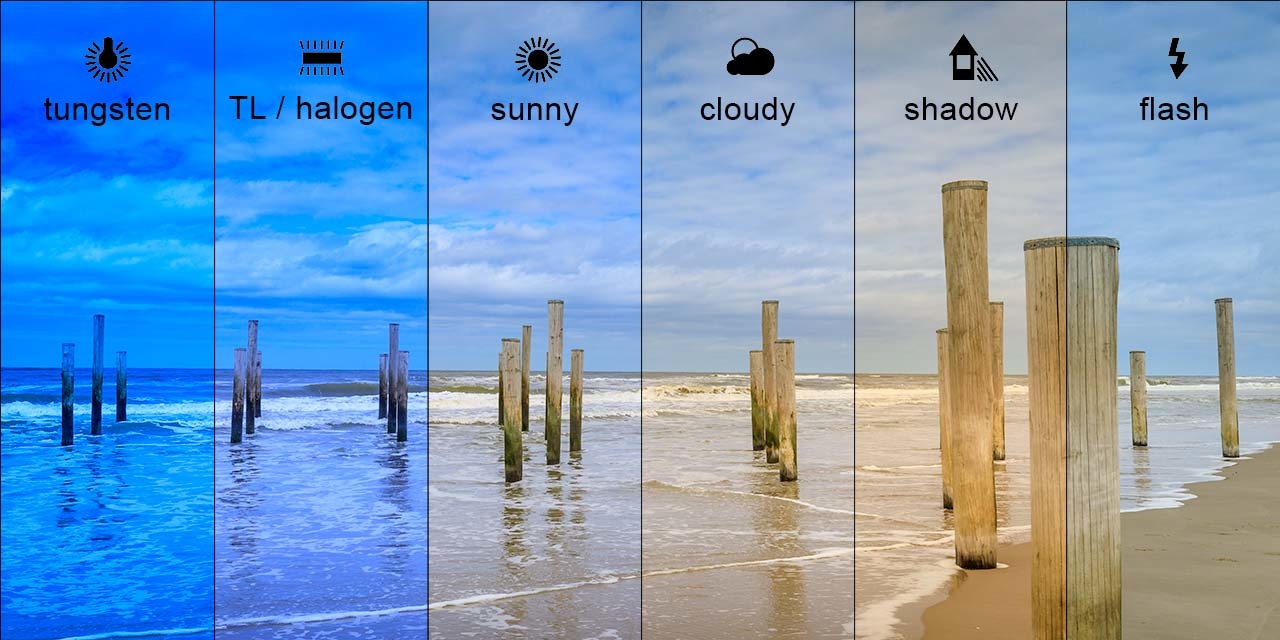
You often find these examples when white balance is mentioned, but these don't tell the complete story. You have to see these settings in different light situations to understand how they work.
These color temperatures can be set on our camera, either with the predefined settings through a custom color temperature settings. The predefined settings are indicated with the symbols sun, shade, cloud, tungsten, K. The letter K stands for Kelvin and allows us to tune in the exact color temperature. Just set the appropriate setting for the right situation, and any color cast is neutralized.
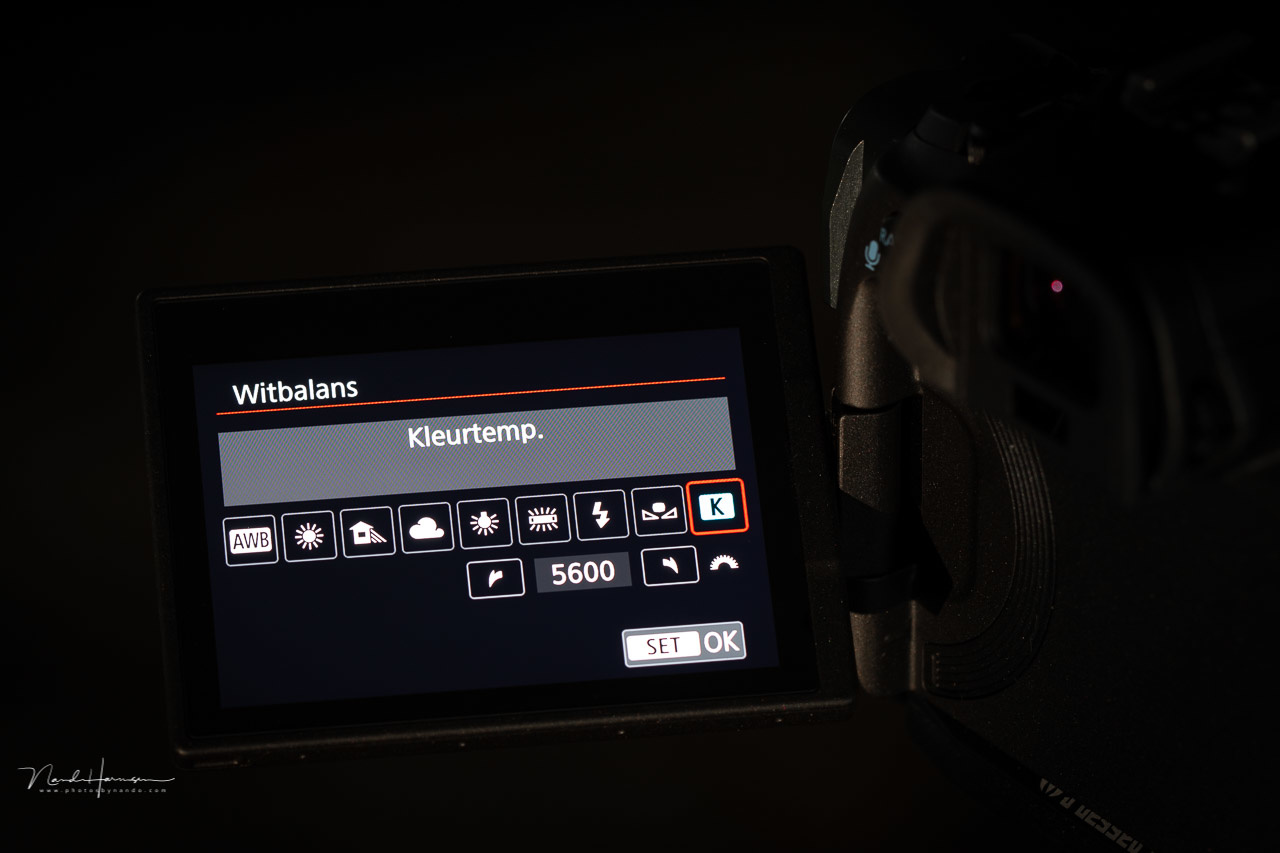
The color temperature setting in the white balance menu of a Canon EOS R5 camera. Every modern camera has something similar, although some consumer cameras lack the ability to set a custom color temperature.
Setting the White Balance
In fact, the last sentence of the previous chapter is telling us exactly the relation between color temperature and white balance. By setting the camera at the right color temperature, we will reach a good white balance. In that case, a white piece of paper will appear to be exactly white in the picture.
I want to show this by a couple of examples, shot with the model light of a Profoto B10 flash at different temperatures and different in-camera color temperature settings. It's a variation of the first example with the different white balance settings during a daytime situation. I made photos of the black and white surface of the Spyder Lenscal card to show the differences.

With a light source of approximately 6,000 K, the color temperature on the camera should be set accordingly. Too cold will give a blue color cast, too warm will result in an orange color cast.

With a light source of approximately 5,000 K. There is a shift in the color cast. There is more orange color cast because the color temperature is lowered.

With a light source of approximately 4,000 K. There is almost no blue color cast anymore.

With a light source of approximately 3,000 K. A tungsten white balance setting erased every blue color cast. But every higher color temperature resulted in more orange.
These examples show clearly how white becomes white when the color temperature setting matches the color temperature of the light. At the moment the match is made, the white balance is set.

The setup with the Profoto B10 flash I used for this experiment. Unfortunately, the flash model light couldn't be set higher than approximately 6,000 K.
Using a White Balance Calibration Card
It can be difficult to determine the correct white balance when different colors of light are present. For instance, the combination of tungsten and daylight makes it difficult to achieve the correct white balance.
Fortunately, every camera has an auto white balance setting. It will determine the color temperature in the frame and set the correct white balance accordingly. The downside to auto white balance is the risk of filtering out a wanted color cast. The red colors during sunset or sunrise are a good example, as these can be neutralized by the auto white balance. The before-after example below shows a yellow photo with an in-camera setting of 5,000 K, the other one has the auto white balance setting.


A lot of modern cameras have different auto white balance options available. These can take a natural color cast into account, leaving those nice, rich colors during sunset or sunrise untouched. These special auto white balance settings might even leave some warm tungsten colors in the frame, instead of turning those warm indoor lights cold and unfriendly.
If a correct white balance is essential, it’s advisable to use a white balance calibration card. Most often, an 18% gray card is used, but this is not correct. The 18% gray card is intended for exposure measurements. You have to use a piece of white paper for calibrating the white balance in the proper way. You could also use a Spyder Color Checker. This card will allow you to make a camera profile to get the color and white balance perfect for the lights you are using.
It is possible to achieve a custom white balance in-camera, not only by measuring a scenery and setting white balance accordingly, but also by fine-tuning the color balance. Perhaps not every camera will offer this possibility, but Canon offers it.

On Canon, it's possible to fine-tune the white balance settings. Perhaps other cameras offer a similar method of customization.
For the photographer that shoots in raw file format, the color temperature for a good white balance can be set in the post. But the in-camera color temperature settings can offer the JPEG photographer a lot of possibilities for fine-tuning the colors.
Is the Perfect White Balance Necessary?
You might wonder if it’s necessary to have the most perfect white balance possible. If you’re photographing subjects for which the perfect color rendition is essential, it will be necessary to have full control over the color temperature and white balance. Using a white balance calibration card or color checker will be imperative.

Although the gray side will work, the often white backside of a gray card is intended for white balance calibration. If color and white balance are imperative, make sure you get the exact color temperature measurement and set the white balance accordingly.
But in all other situations, an exact white balance is almost never necessary. It doesn’t matter if you are off by a few hundred Kelvin. The reason is simple: the light throughout the day is changing constantly, and colors will differ if the day progresses. It’s often okay to see the changes in your photos. It keeps the atmosphere of the moment.
If you would prefer the perfect white balance in any given moment, it might be wise to use a white balance calibration card for every photo you take. But the downside of this would be the loss of all the nice colors that may be present.
To answer the question about the difference between white balance and color temperature: the color temperature is about the color of light, given in Kelvin. If a color temperature setting is used that will render a white subject truly white, regardless of the color temperature that is present, you have a correct white balance.
How do you use white balance? Do you set a color temperature yourself, or do you let the camera have control? It all depends on the subject you shoot, of course. Please share your way of using white balance and color temperature in the comments below.


WTF is daglight and cangle light?
No. But, please, explain this nonsense:
Why does it say,
"3 COMMENTS"
when there is only one comment?
Is the Fstoppers software being clunky and glitchy again? Geez! If a comment or two are deleted, then any half decent software will be written so that the number of comments is adjusted accordingly. This is basic super-easy programming stuff, and yet Fstoppers continues to have weird mistakes and oversights like this in their software. Other sites simply don't do this.
There are 2 components to White Balance:
Color Temperature and Tint
So adjusting the color temperature doesn't ensure the proper, or desired, White Balance, because it still leaves Tint as a variable. This is why simply setting the Kelvin temperature often still leaves an undesirable overall White Balance.
Well, Tom.
Looks like your comment is worth 2, mine - 3. 🤷♀️
This comment thread is so confusing
This is a very thorough explanation of color temperature by someone who obviously doesn't understand color temperature very well.
Matt can you provide a little more info on what is missing or wrong, and perhaps a link to additional info?
1) You can set color temperature based on anything that has no color, as long as the luminance values are extreme. Using a gray card is sometimes easier as depending on exposure, a true piece of white paper may be too bright. In the examples he posted of the various color temperatures on the black and white card, you could set the color temperature just as easily on the black as on the white.
2) You camera is reading luminance values in three channels, red, green, and blue, which make up a "pixel". You can think of this as a 3D 3 axis plot (most people normally think of x,y,and z). White/color balance is essentially shifting those values one way or another. Color temperature shifts along the blue axis - either adding or subtracting blue (which is adding orange) from the image and tint is doing the same along the green axis - either adding or subtracting green ( which is adding magenta). This image from the post is very useful - but not really explained at all. It shows what is added to an image if you set the color temperature to these settings. Adding blue to tungsten (which will be a typical orange looking image) - blue is the opposite of orange so they cancel eachother out. Likewise adding yellow/orange to a shady image (shady images are typically blue because they are lit by the sky - which is blue). Fluorescent lights are a combination of orange and green, so you need to add blue and magenta to the image to make it color correct.
3) The term "warm" and "cool" light is a misnomer. Warmer lights have a lower temperature than cool lights do. You can think of it that if your scene looks "warm" (or you want it to look warm), your color temperature in camera is set too high (your "temperature is too warm"), Likewise for cool - if you scene is very cool (referring to temperature), then your color temperature set in camera is too low. Artistic choices can drive this completely as well. In the sunset example he has shown, which is obviously during "golden hour", you would generally want to move your color temperature down to compensate for the light being especially orange (as is shown in the "auto" example slider). You may not want to go as far as the auto has to keep skin tones a little orange and allow the shade/background light to go slightly blue - a "cinematic" look so to speak.
A black body radiator is a theoretical object that emits no electromagnetic radiation other than thermal energy. Think of it as an object painted in the new vanta-black or other "super black" paints. No color or light at all visible until it is heated enough to starting glowing (~1000K) as the author stated. While that is used as a method of equating light temperature to actual temperature, you could also just as easily said that color temperature is the same as the color of fire. Cold fires are orange, glowing coals are red, and really hot fires burn white to blue.
Golden hour explanation when it comes to color temperature.
It's a perfectly good explanation of color temperature for photographers. Physicists may want more, but I'm not one.
The problem is that the question is supposed to be about White Balance, which includes a lot more than only Color Temperature. You can have two different light sources that measure at 3700K, but are not the same color. One may have a decidedly green cast, the other a decidedly magenta cast. One may have a CRI of near 100%, the other may have a CRI of only 60%, or even 30%.
These are things photographers need to know when setting White Balance.
Thank you for your scientific explanation. I appreciate it.
Unless you're into this theoretical approach, most photographers only need to know how it works on a camera. I do know about color science, but I wrote this from a practical point of view, not about the theory of substracting colors or adding colors in a graph.
I gotta agree with Matt on this. At the very least tint should be added to this. I know far too many photographers and videographers that only adjust Kelvin and then don't know why their images don't look right. To find true white you need to make adjustments on 2 axis, Blue/Orange and Green/Magenta. If all you do is adjust the Blue/Orange (Kelvin) you can easily get magenta or green cast to the image, especially under unpredictable/cheap lighting.
And I would ALWAYS, always recommend using a grey card to set WB instead of white. As Matt indicated, using white can give you inaccurate results if its even slightly overexposed because the camera will not be able to get accurate values for all of the color channels. There is zero difference in the way the camera evaluates true grey vs white, or black for that matter. All the camera is doing when white balancing on grey/white/black is setting the values for the Red, Green, and Blue channels to be identical. If you use white, and one of the channels is clipping due to over exposure, you cannot get an accurate balance.
But you never really answered the question. "Is there a difference between color temperature and white balance?"
Where do you make it clear that WB also includes the tint axis that is orthogonal to the CT axis, and that CRI can also have a huge effect on the colors rendered by a camera? These things aren't about academic theories, they're what photographers need to know when selecting/matching light sources and then setting their cameras or post processing apps to match the light sources
Expo Disc.
Evidently all light is not the same and some light are not pure white. I suppose daylight and tungsten lamps are 100% pure white All other light needs a tint correction in addition to temperature. Of cause, if you use a grey card and adjust color temperature and tint by clicking with the proper tool selected, both will be adjusted. That is tint and kelvin settings. Further setting the camera to auto white balance will set both tint and kelvin, also, but that is not that precise. I suppose color temperature is the kelvin setting and white balance is the tint and kelvin setting together.
Another thing is that surroundings with color, like green grass, painted building, colored walls all mess up the color and create a tint. I don’t know where that fits in but it’s a issue as well. I don’t know, maybe in the end a calibrated screen and manual adjustments are the only way to come close to perfect?
Did I miss something? :)
Bjarne Solvik said,
"I suppose color temperature is the kelvin setting and white balance is the tint and kelvin setting together."
Yes, you are correct. These two settings, together, make up White Balance.
My cameras' White Balance settings allow me to specifically set color temperature to anything I want. However, I have never found a similar adjustment that allows me to set the tint to anything I want.
It's weird that they allow you to custom set A independently of B, but do not allow you to set B independent of A. Anyone have an idea of why that might be?
Traditionally, most light sources used in photography were pretty close to the color temperature axis. Strobes are tuned to be very close to mid-day daylight. Old style theater lights were tungsten based.
It was very rare to need more than around 20-30 mireds filters to make commercial lights balance correctly with available films. Your tint adjustment in Canon cameras allow for a +/- 50 mired adjustment along the green-magenta axis. That's more than enough, even for most fluorescent lights, if you can use long enough exposure times to account for flicker due to alternating current.
Then come along LED light sources, which often have a much stronger tint than traditional lights. They're very efficient in terms of total illumination per Watt, but they tend to have very strong color casts and poor CRI for any particular color LED. Combining multiple colors of LEDs to produce "white" light helps, but there are still a lot of holes in the visible spectrum they don't cover. The game has changed in terms of what the lights we use are outputting, but our tools to compensate for them are still catching up.
Michael Clark said,
"Your tint adjustment in Canon cameras allow for a +/- 50 mired adjustment along the green-magenta axis."
Michael,
I had no idea that my Canon cameras had any tint adjustment in their menus. I always thought it odd that they have a Kelvin temp adjustment, but no tint adjustment.
But you indicate that my Canon cameras do, indeed, have a tint adjustment, and I am thankful that you have made me aware of this. Now I have to search through the menus to see where this tint adjustment can be found!
It's called WB (white balance) correction. In most Canon cameras it's the menu item one line below CT (color temperature) adjustment.
Since it can be set in post, best is to leave on auto most of the time unless playing intentionally with specific color effects. There are two kinds of color renderings, pleasing color and color match. Pleasing color if what ever you want to define as as is or as was the situation. Close color match will most likely involve CMYK and printing, so a card should probably be used for reference to start with neutral colors that will provide a good foundation when converted from rgb.
Is it not true that some light sources, like some kinds of fluorescents, or mixed light sources, like daylight and tungsten, have peaks at several different points on the Kelvin scale, making it impossible to achieve "perfect" white balance?
I think fluorescent is not fit for photography, and others like flashlight and led are not pure light. I would expect blending tungsten and daylight would be ok.
Other things to contaminate the light, a colored dress, wall or anything colored.
Perfect may not be achievable but most can be ok when adjusted?
It's not that they have multiple peaks, it's that their dominant peaks are far off the color temperature axis in the direction of a very green tint. Then there's the issue that as the alternating current powering them cycles back and forth their color output changes from the peak to the trough as they flicker. They're much bluer and fuller spectrum at peak and much redder and limited spectrum at minimum. If you can use an exposure time long enough to allow at least a half cycle (1/120 for 60Hz and 1/100 for 50Hz) then you'll get consistent color from frame to frame that only needs to be adjusted for the green color cast.
Some newer cameras can sense 100/120 Hz flicker and time the shutter to release centered on the peak. Canon introduced it with the original EOS 1D X back in 2012, then the 7D Mark II in 2014. Since about 2016 all of their ILCs have it, even the Rebels. It works very well when shooting under flickering stadium or gymnasium lights as long as all of the lights illuminating your frame are in the same phase.
Thanks, that's really informative. Personally, I have the most trouble with concert stage lighting that might use magenta and orange and more all at the same time, but I guess the results at least have atmosphere!
Yes color on the camera is cooked in the camera by camera settings and both raw and jpeg may look the same. But can one really remember what they have even in raw is what the eyes saw and if you play with the colors you are only a painter mixing your own desires. There is a SpyderCube that has grey, white and black with a black hole. You can yes color pick a grey card to get a color BUT the exposure level and the dark range as you know from being there in the moment determines the actual color mixing of temp and tint. Exp: Grand Canyon sunset with colorfilled skies your camera captures a blue tint deep on the canyon walls but your eyes saw layers of colors all the way down deep or a night with the Milky Way yes 3900 is good but to get the colors of atmosphere gas glow colors you have to have the correct exposure and dark settings. Like I like to share is you can not see the Milky Way and it colors but if your eyes could capture more light it would be up there in all its splendor but a camera is like a microscope showing what the eye can not see.
Raw doesn't look like much of anything until it's been converted. When you look at a "raw" image on a screen, you're not viewing "THE raw image", you're looking at one possible interpretation of the raw image data by whatever application or firmware converted the raw data to produce that preview image. What default set of instructions are used to convert the raw data to a viewable image that your screen can display will affect how it looks. That's why opening the same raw image file can look very different from one conversion app to the next. They're using different sets of instructions to convert the same raw information to a viewable image.
Color is not cooked into the raw image data. After all, a raw image file only contains a single monochrome luminance value for each photosite (a/k/a sensel or pixel well) on the sensor. The relative weight assigned to the sensels filtered with the blue-violet, slightly yellow green, and yellow-orange filters of the Bayer mask (they're not actually red, green, and blue - all of the cute little drawings on the internet that show them as the same colors that our RGB display devices emit notwithstanding) determines the White Balance. These color multipliers can be altered and the raw data reconverted to produce an image with a different color balance. The only thing cooked in is the WB of the preview image attached to the raw file.
The only things cooked into the raw data are the framing, exposure time, aperture, and amount of analog amplification applied before ADC. Everything else can be adjusted after the fact if the complete raw data set is saved.
Black bodies radiate along a specific line in 2D color space, from amber to blue. But artificial light sources often do not emit light that lies along that specific color temperature axis. It may be more green or it may be more magenta than a black body would emit. The magenta-green axis is more or less orthogonal to the amber-blue color temperature axis.
You can, for instance, have two different light sources that are both at, say, 3700K on the CT axis, One, like a typical fluorescent light, will have a decidedly green cast that requires tuning WB towards magenta. The other, say an orange LED, will also be near 3700K but have a decidedly magenta cast that needs compensation towards green.
Color temperature is one component of White Balance, but it is not the only component. Tint, which is the word used to describe the Magenta-green axis is another.
Then there is CRI, or color rendering index. This describes how much of the full spectrum a light source emits. Sunlight, while it has a peak output of around 5600K after passing through the Earth's atmosphere, contains some of all wavelengths along the visible spectrum. Artificial light sources, such as tungsten lights, that act like black body radiators by heating metal filaments, also contain most of the visible spectrum. Gas based light sources, such as halogen, sodium or mercury vapor, or fluorescent lights do not usually emit some of all of the various wavelengths contained in the visible spectrum. There are "holes" along the visible spectrum that they do not radiate. If an object reflects a wavelength that the light source does not emit, then that light source can not render that particular color.
I like the chart. Thatk you. I had one mobile device that kept trying to rebalance the gold out of the golden hour, by the way, auto white balance be damned. I set the white balance to 5200 Kelvin to give all the photos a slightly warm glow and also avoid that situation during my favorite time of the day where I wanted to capture the sumptuous warmth of those orange rays of sunlight.