
It was big news when Adobe introduced a super-resolution function in Adobe Camera Raw. Although this kind of enlargement is not new, many photographers were excited. I know four ways to get super-resolution. Which method do you prefer?
The super-resolution of Adobe makes it possible to enlarge the resolution four times. That may not seem a lot, but it makes a 100mp image from a 25mp photo. Although Adobe has introduced this function as a new option in ACR, many other programs already offered something similar. But I don’t want to dive into the differences. I want to look at four different ways to increase resolution.
Method 1: A Super-Resolution Camera
This is probably the most obvious method, although it might be forgotten by many because everyone is staring at super-resolution by the so-called A.I. software. Having a camera with a huge pixel count is the easiest way.
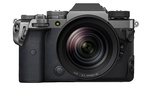
The Fujifilm GFX100 produces 102mp images with one single click of a button. This resolution is amazing.
I used and reviewed a Fujifilm GFX 100 in 2020 during my trip to Lofoten. This camera produces a 102mp image every single time you press the shutter release button. Although this camera is very expensive, Fujifilm released a less expensive one, the GFX100s.
Resolutions of modern cameras are still increasing. Sony has a 61mp camera while a lot of the other brands are reaching the 50mp. This may be only half the resolution of the Fujifilm GFX100, but it is still a lot. I expect more high-resolution cameras will hit the market within the next few years.
Pros
- A super-resolution is achieved at once.
- No software or digital tricks are necessary
Cons
- These cameras are often very expensive
- You need very good lenses to retain the maximum detail
- Camera shake and subject movement is much quicker noticeable
Method 2: Stacking Multiple Images
The next method is the merger of multiple images of the same subject. As far as I know, this was first introduced in a Hasselblad camera. Today cameras from Panasonic, Nikon, Fujifilm, and Sony make it possible to shoot a series of images that are stacked, enlarged, and merged together to achieve a resolution that is approximately four times larger than the native resolution.

The super resolution of the Panasonic Lumix S1 produces very large images in-camera, just by combining small series of sequential images. It manages to reduce ghosting as well if the option is activated.
This is a great function to get a large resolution in a relatively easy way. If your camera doesn’t have that option, don’t worry. You can do this yourself also, with a series of images and the help of Photoshop.
Shoot about twenty images handheld without changing the composition. Place these images as layers on top of each other in Photoshop and align the layers. Next, place the layers in a smart object and enlarge the image to 200%. The magic happens when the layers in the smart object are stacked with the median method. Add an unsharp mask and you have increased the resolution by a factor of four.

One of my first attempts to produce a super resolution by combining twenty sequential photos in Photoshop. It works very well and increases the images resolution by a factor of four.
This is a similar method as used in the cameras I mentioned before. It allows you to enlarge the image without losing detail, which is quite impressive.
Pros
- This can be done with any camera, cheap, expensive, old, or new
- Newer cameras have the option build in
- Can also be used with high-resolution cameras
- The method also reduces the noise level
Cons
- A lot of images have to be shot
- Movement of subjects will be visible
- Takes a lot of processing time in Photoshop
- Parallax can be an issue
Method 3: Super-Resolution Software
Software allows us to enlarge an image without losing detail. We are told this super-resolution software is making use of Artificial Intelligence to invent the missing pixels. And it does an amazing job on most occasions.
The Adobe super-resolution is already explained in a lot of articles and video tutorials. I made one myself for the Dutch audience. But Adobe is not the first one to offer super-resolution. Topaz Gigapixel AI offered this possibility already for years. I have heard also about free online enlargement software. Just upload your image and you get a download link with the enlarged image. Often the maximum enlargement is four times, but some software allows you to take it even further.

The new super resolution function in Adobe Camera Raw (sorry about the Dutch language). This option is relatively new for Adobe.
Pros
- Only one image is necessary
- No parallax errors
- Can also be used for images with moving objects
- Can also be used for high-resolution images.
Cons
- Result is not always guaranteed
- Can produce over-sharpening to emphasize the details.
Method 4: Multi-Row Panorama
If a very high resolution is necessary, it is possible to make a multi-row panorama with a tele lens. With this method, the resolution that can be achieved has no real limit. If the focal length is long enough, a gigapixel photo is well within reach.

A screenshot from PTgui from the multi-row panorama I made. The total size is a staggering 752mp.
I wrote an article about the RRS PG-01 Pano Gimbal Head which is perfect for such extreme high-resolution photos. With this setup and a 100mm focal length on a Canon EOS R5, I managed to shoot a 752mp resolution.
You need to work very precisely and you need some time to shoot all those images. For the 752mp photo in my example, I stitched 50 images in PTgui, each 45mp, and it took me about 10 minutes to shoot all the footage. With a programmable pano gimbal head, it might be quicker.
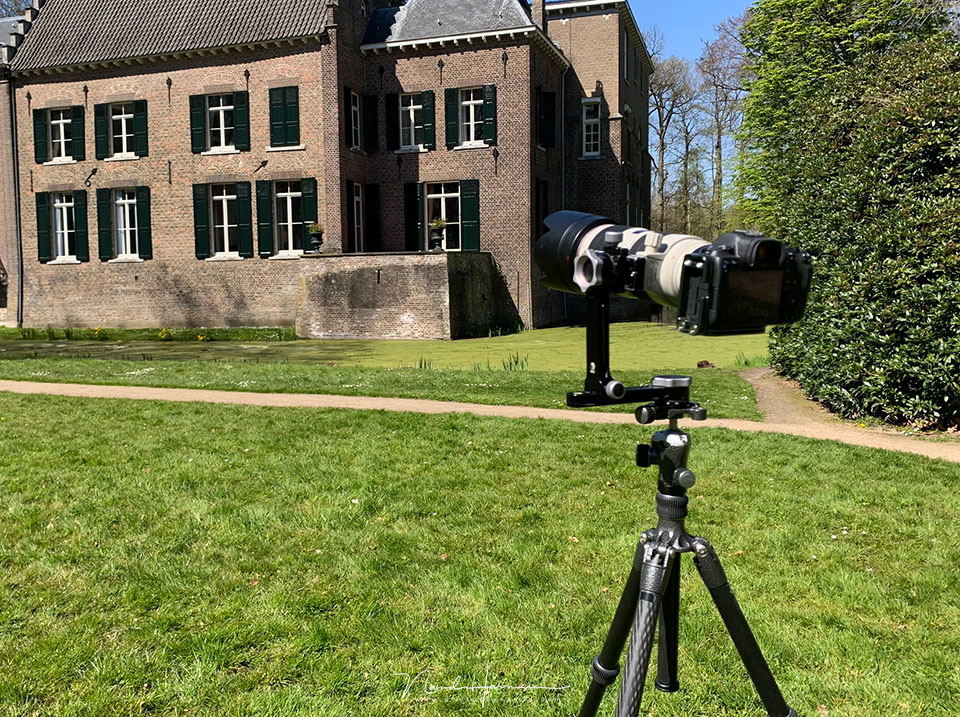
The making of the multi-row panorama. I used the RRS PG-01 pano gimbal head with a 100mm focal length on a Cano EOS R5
Pros
- There is almost no limit in the resolution that can be achieved
Cons
- You need a lot of time to shoot
- Moving subjects can’t be photographed this way, even clouds or changing light can be an issue
- It takes a lot of computer processing to stitch the images
- Depth of field can be an issue when using longer focal lengths
Do You Need Super-Resolution?
These four methods allow you to get a large to a very large resolution photo. Which method suits you best is a personal choice. Perhaps each method has its own use. But it is also possible to combine methods.
The question you need to ask yourself is: do you need a super-resolution? I can imagine these methods can be of great value if your image has a low resolution. But in this case, I am talking about getting a very large resolution of at least 50mp but often much more. When would you need such large images?

Can you image how large a 752mp image is? Here you see a single 45mp image against the multi-row panorama. You might wonder if such a resolution is ever needed.
Perhaps you might say: it allows to get large size prints with 300 dpi. But don’t forget it is rarely necessary to get such dpi values for very large prints. Take billboards, for instance. The viewing distance allows a low dpi value. You don’t need a 300 dpi print for that. Those prints are only used in high quality books, which are rarely larger than A3 size.
I feel these super-resolution photos are often an option to make software or cameras more attractive. Most of the time there is no reason to have such large images.
But perhaps I am mistaken. Perhaps you have a good use for super-resolution images that can be produced by any of the four methods I mentioned. Perhaps there is a fifth method I'm not aware of. Please share your opinion about super-resolution and its use in real life. Remember, I am not talking about cropping a 50mp file into a 12mp image and enlarging it again to get 50mp. I referring to the use of real super-resolution photos.


"The next method is the merger of multiple images of the same subject. As far as I know, this was first introduced in a Hasselblad camera. Today cameras from Panasonic, Nikon, Fujifilm, and Sony make it possible to shoot a series of images that are stacked, enlarged, and merged together to achieve a resolution that is approximately four times larger than the native resolution."
Look, I know a lot of photo blogs have a weird fetish for hating on Pentax, but refusing to even MENTION the company that brought Pixel Shift to DSLRs is f***ing ridiculous.
I was just about to comment on this as well. It was Pentax who introduced this feature and Olympus really made it "trendy" with their E-M5II. Funny how the copycats get all the attention here.
Don''t get angry with me about not mentioning Pentax. I don't hate Pentax and I won't refuse naming it.
I found an interesting article mentioning Pentax K3 II as the first camera with pixel shift, back in 2015. It followed the Olympus that introduced this feature three months earlier.
https://www.imaging-resource.com/PRODS/pentax-k1/pentax-k1PSR_MODE.HTM
The Hasselblad H5D-200c MS with pixel shift was introduced around august 2014
https://www.dpreview.com/articles/4410648565/hasselblad-unveils-pixel-sh...
A sub-method of multi row panoramas is to use a shifting lens. This can be done by placing the shift axis at 45 degrees, taking exposures at the extreme shifts, then rotate the axis 90 degrees and repeat. Maybe take an exposure with no shift also, then stitch together. Requires a lens with shift capability.
An excellent method - avoids the geometric distortions inherent in method 4, but is a bit more limited.
That is indeed another way of multirow panoramas.
I wrote about it in the review of the Rogeti TS-E adapter.
https://fstoppers.com/originals/using-rogeti-ts-e-frame-panoramas-tilt-s...
I purchased super-resolution software to use on my archival pictures from 8 months I spent walking with my cats daily in the Redwoods in 2006. The only camera I could afford that was portable enough at that time was a 5 MP point and shoot. I use Topaz Gigapixel AI for the still images and Topaz Video Enhance AI for the video clips. I get good results with 225% upscaling on the video, although it takes considerable tweaking and dual passes to get best results for different types of scenes. We are lucky to be living in an age of "magic" software.
I knew it was a once-in-a-lifetime opportunity to be with a pair of cats exploring the wild, so I meticulously backed up all those images to three identical sets of CDs At the time, super-resolution was first becoming known as one of the tools NASA used to analyze the launch video of the ill-fated Challenger mission.