Do you know what keywords are and the best way to add them to your photos? What about what options to select when you are exporting your images? Have you ever heard of the painter tool? In this final part of my three-part series on Lightroom for beginners, I will cover the final steps to take after applying your final edits to your images.
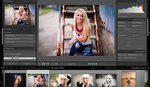
In Part 2, I covered the basics of editing an image and syncing your edits across multiple photos. When you are completely finished editing your images, there are still a number of steps to take before finishing your collection. Every action we take in this final part will be done in the Library module of Lightroom. My first step is to look over my images one final time. I am doing two things while I do this. First, I am looking for anything I missed and making sure that I am happy with each of my images. Secondly, I am rating and color labeling my images. Each photographer will be unique in how they do this, but for example, if an image is to go in my personal portfolio, I will give it five stars. Is it something I want to share on Facebook? If so, I will give it a blue color label. What about something I would consider putting in my client’s printed album? Those images get green labels. Each number and color mean something to me and I always keep clear what they are by having them written out on a note card in front of my computer.

Keywords
My next step is to apply keywords to my photos. When I first started out, adding keywords was one of those things that I didn’t mess with, and I regret it now. Essentially what I am doing is adding specific words to each of my images that make it easy for me to find later and also help my website’s SEO when those images are uploaded to my gallery. Recently, I needed a good photo of a wedding ring. Since I’ve labeled all of my ring shots with the keyword “rings,” all I had to do was type it into Lightroom’s search bar and I could immediately see every ring image that I’ve taken. Keywording your images will be incredibly important over time!
There are two methods I use when adding keywords to my images. First, you need to make sure you are in grid view in the Library module. In grid view, any adjustment you make to one image will also be made to all other selected images as well. This is unique to grid view and is very important that you understand. If I have ten images selected, but am specifically labeling one of them with two stars, then all ten selected image would have a two-star rating applied to it. This works for keywords as well. Keeping this in mind, I first start by selecting all images. On the right side of the screen is a box that says, “Click here to add keywords.” Since all of my images are selected, I type in this box basic keywords, such as names, locations, and what type of shoot it was. Any general term you want to apply to the whole group will be added here.

When all of my general keywords are applied, I can then add keywords to specific photos. I want to first make sure all images are deselected. Next, if you are still in grid view, there is an icon below your images that looks like a spray can. This is called the painter tool. Selecting it will open up a list of selections next to it, and you will want to select keywords. Then, in the final box that appears, you can add a specific keyword you will want to add to certain photos. What the painter tool does, is essentially allows you to apply specific data onto an image as you “paint” over it. Sticking with my wedding ring example, I could select the painter tool and choose to make it apply the keyword “rings.” I would then find any image that I wanted to document that it had a ring in it, and clicking on that image with the painter tool will apply that keyword to whatever images I select. If there is a string of images all containing rings, I could simply drag the painter tool across the images and my keyword would be applied to all of them. This is a very fast way to apply keywords to small batches of photos.

Sort and Rename
After I am all finished adding keywords to my images, I want to rename them. You can, of course, rename on export, but it can start to become confusing if a client wants to refer you back to an image and they have a different name for the image than you do. Renaming is easy, but you will want to make sure a couple of things are in order first. The first thing I check is that the images are in the order I want. Next to the painter tool, there is an option to sort by a number of categories. Sorting by capture time is usually the go-to for me. Images can be dragged to different positions in the order if you want to customize where some images are sorted too. Next, you need to consider stacking your images. If you have ever taken a photo from Lightroom to Photoshop, and then back to Lightroom, you are familiar that what happens is Lightroom makes a copy of the image when it is applying the changes. This leaves you with two of the same image. The best way to approach this issue is simply to stack them so that the original is stacked underneath the most current edit, and only the most recent version will be exported. Select all of you images in grid view, then on your drop-down menu, select Photo, Stacking, and Collapse All Stacks. If you ever need to find your original again, you can select the option to Expand All Stacks. Now that your photos are sorted properly, you can finally select all images, and in the Library drop-down menu, select Rename Images. You can rename your images how you want, but keeping it consistent is a good idea. I apply a custom setting that starts with the name of the client, the type of session, followed by a numerical sequence.
Exporting
Finally, when all of the above is finished, you are ready to export your photos. The simple way to do this is to select all of your images, and then choose Export from the File menu. This opens a fairly overwhelming dialogue box about how and where you want to export your images. For now, keep it simple. Choose where you want your images to end up in the Export Location box. We’ve already renamed our files so in the File Naming box you only need to select Filename. Next, to keep it as basic as possible, in the file settings box use JPEG as your image format, sRGB as your color space, and keep your quality at 100%. Leave the rest of the boxes unchanged. This is only a basic way of exporting, but as you learn what export settings are needed for different images such as for Facebook, print, or for your website, you can adjust and save those specific settings as an export preset later.
One last thing worth investing your time in is the Publish Services box. When in the Library module, it can be found on the left side of the screen. Here you will see a number of tabs, and even more can be installed. These plug-ins are convenient ways to export to specific services or locations. I use Pixieset to deliver my images to my clients. Instead of exporting, and then adding a second step of uploading the files to Pixieset, I can simply drag the images I want to the Pixieset plug-in, select Publish, and I am done. There are plug-ins for Facebook, Adobe Stock, Smugmug, 500px, as well as several others. These publishing services don’t take long to set up and are a huge time saver in the long run.

When I started this series, I wanted to have a convenient place for a new Adobe Lightroom user to quickly learn the basics of processing an image from import to export. In Part 1, I covered what Lightroom is, how it basically works, and how to import your photos. Part 2 then covered making actual adjustments to your image and doing it in an efficient way. With this final part, we have now covered all of the essential steps to fully process your photos. Lightroom is an immense, powerful software. There will always be new things to learn, but this three-part series should be enough to start anyone off on the right track.