
An underrated tool in Lightroom's arsenal, the radial filter is a powerful editing feature that can be used to enhance sunsets, mimic reflectors, and draw focus to subjects. Take a look at how using the radial filter could transform your image editing workflow.
Adobe Lightroom Classic has many tricks hidden up its sleeve. From keyboard shortcuts to menus visible only when searched for, there's plenty to miss at first glance, but some of the best features are hidden right in plain sight, and few are more versatile and useful than the radial filter. Positioned at the top right of the Develop module, the radial filter works by making adjustments to the image based on the radius of the rounded imprint it makes.
The radial filter can change to any shape (within its rounded structure) and be placed anywhere in the photo. It's non-destructive, as most Lightroom tools are, and can be altered at a later date even after making other edits to the shot. There are many variables you can change within the filter itself, covering color, tonality, and details such as sharpness, texture, and clarity. This makes it helpful as a tool to refocus the eye through the frame and enhance more interesting sections that are already present. Let's first take a look at how we can guide the viewer's eye in the frame using the radial filter and a couple of slider adjustments.
Refocus the Eye

The radial filter is used here to increase the brightness in one specific area. Boosting the exposure and whites sliders and turning on the mask overlay, we see the areas the radial filter is affecting in red.
There are two methods we use as photographers to draw a viewer's attention to a particular portion of a photograph. One is through focusing, and the other is through the use of brightness. Here, we have a photo of a woman wearing a necklace. The shallow depth of field guides the eye through to the center of this necklace to its sharpest point. However, the image is rather dull overall, so here, I'm using a radial filter with +0.31 on the exposure slider and +21 on the whites slider to brighten the necklace in a bid to draw attention to this area further.
Add a Vignette

The radial filter is a great tool for introucing vignettes around the edge of the frame, whether light or dark. This helps put focus on the main subject and stops the eye from floating out of the frame.
Although a post-crop vignette can be added in Lightroom Classic under the Effects panel, the radial filter is much more flexible. For starters the radial filter can be placed anywhere in the frame and contorted using the transform handles into any round shape, whether a perfect circle or a small, thin strip. The radial filter also gives greater control over the style of the vignette in terms of adjusting the blacks, shadows, highlights, or whites to varying degrees. You have to scroll down the editing panel and make sure the invert button isn't ticked; otherwise, you'll be affecting the inside of the circle, not to mention all the myriad adjustments when it comes to color, texture, and clarity. If you want to create a bright vignette, then boost the exposure slider so that it creates a whiter shade, rather than darker.
Mimic Reflectors

Our portrait was taken under open shade with the sun camera left. The shadows are soft and flattering on our subject's face, but due to the bright patch of grass behind and some highlights on the water in the distance, our focus isn't solely on the subject.
Portraits can be transformed with some good placement of the radial filter. We can even attempt to mimic the use of a reflector, even if one hasn't been used in the final photo. To do this, we need to place a filter over our subject's face (and/or torso) and increase the exposure and shadows sliders. Reduce the feather until only the subject is affected (keyboard shortcut O to check the overlay) and resize as appropriate. By boosting the shadows slider, we are lightening the darker areas around the subject's face and hair, thereby giving the effect of having used a reflector. If you want to mimic a gold reflector, then move the temperature slider to the right for more yellow warmth.

Take a look at the before and after using the slider below. Note how the brightest part of the image is now our subject, and although we didn't use a reflector when taking the photo, the adjustments we made using the radial filter have gone a long way to replicating the effect of what a real reflector would have done.

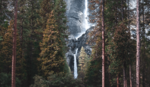
Create a Sunset Flare

Inreasing the whites and exposure slider here, the radial filter has enhanced the already-present sunset poking through the trees. In order to increase the warmth in the photo, I've also boosted the temperature slider so that it looks more orange.
Golden hour is the most beautiful time of the day where the sun hangs low in the sky and fills the air with warm yellows, reds, and oranges. But not every sunset photograph is created equal, and even though you may be shooting directly at it, the results can be a little underwhelming. That's where the radial filter can step in.
In order to enhance the glowing flare that we naturally see when shooting into the sunset, we'll need to place a radial filter over the brightest sunlit section of the scene. Bump up the temp slider, and if the photo warrants it, increases the saturation slider as well. Make this section brighter by increasing the whites slider, and if you find the highlights details are clipping or disappearing, you can reduce the highlights slider or enhance the clarity slider for better midtones contrast detail.
Other Advantages of the Radial Filter
There are many more upsides to using the radial filter for editing photos, including hue adjustment for color alteration, moiré control (which can be useful for patterning issues), and you can even overlay color of your choosing. It's easy to use and can be compared with the unedited version by toggling the on-off switch on the tool panel. It's a versatile and underrated tool that can really add some punch to your shots and could even make a change to your current editing workflow.


Thanks for this article. Very helpful. Is this procedure available in Photoshop??