
Modern DSLR and mirrorless cameras are capable of shooting razor sharp footage in spectacular 4k 60fps and up. But how do you give your footage a cinematic feel without purchasing pricey anamorphic lenses and professional cinema cameras? Fstoppers is here to help with five great hacks to achieving a cinematic feel to your video without spending a small fortune.
2.35:1 Ratio
Breaking down what makes a video clip feel cinematic, the first thing to notice is the letterbox shape of the screen. This ratio is typically 2.35:1 rather than the 16:9 you will likely shoot in camera. The ratio comes from using anamorphic lenses which compress the shape of the recording in camera, then stretched out in post.
To hack this look, simply lay out black bars on the top layer on your Premiere pro timeline, or adjust the frame size in the sequence settings to 1920x817 (HD) or 2840x1634 (4k).

Use The Right Frame Rate
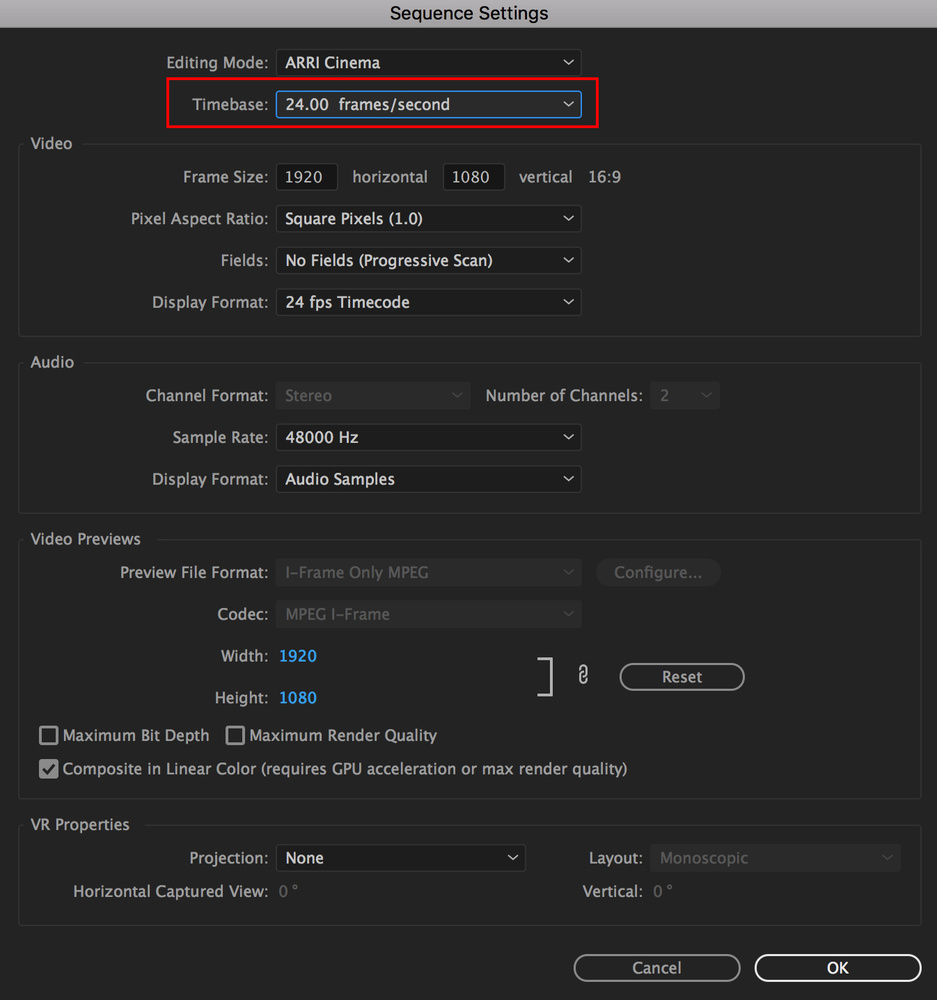
When all of cinema was shot on film, the typical frame rate was 24 frames per second. So make sure the timebase is 24fps in the sequence settings. This doesn’t mean you have to shoot at 24fps in camera. Shooting in 60fps gives you great slow motion flexibility in post which can add extra filmic gloss to your finished video, just make sure your shutter speed is one over x2 of your frame rate, i.e. use 1/50th shutter speed for 24fps shooting, and 1/120th for 60fps. This will create the right amount of motion blur that the human eye is used to seeing in cinema.
Film Grain
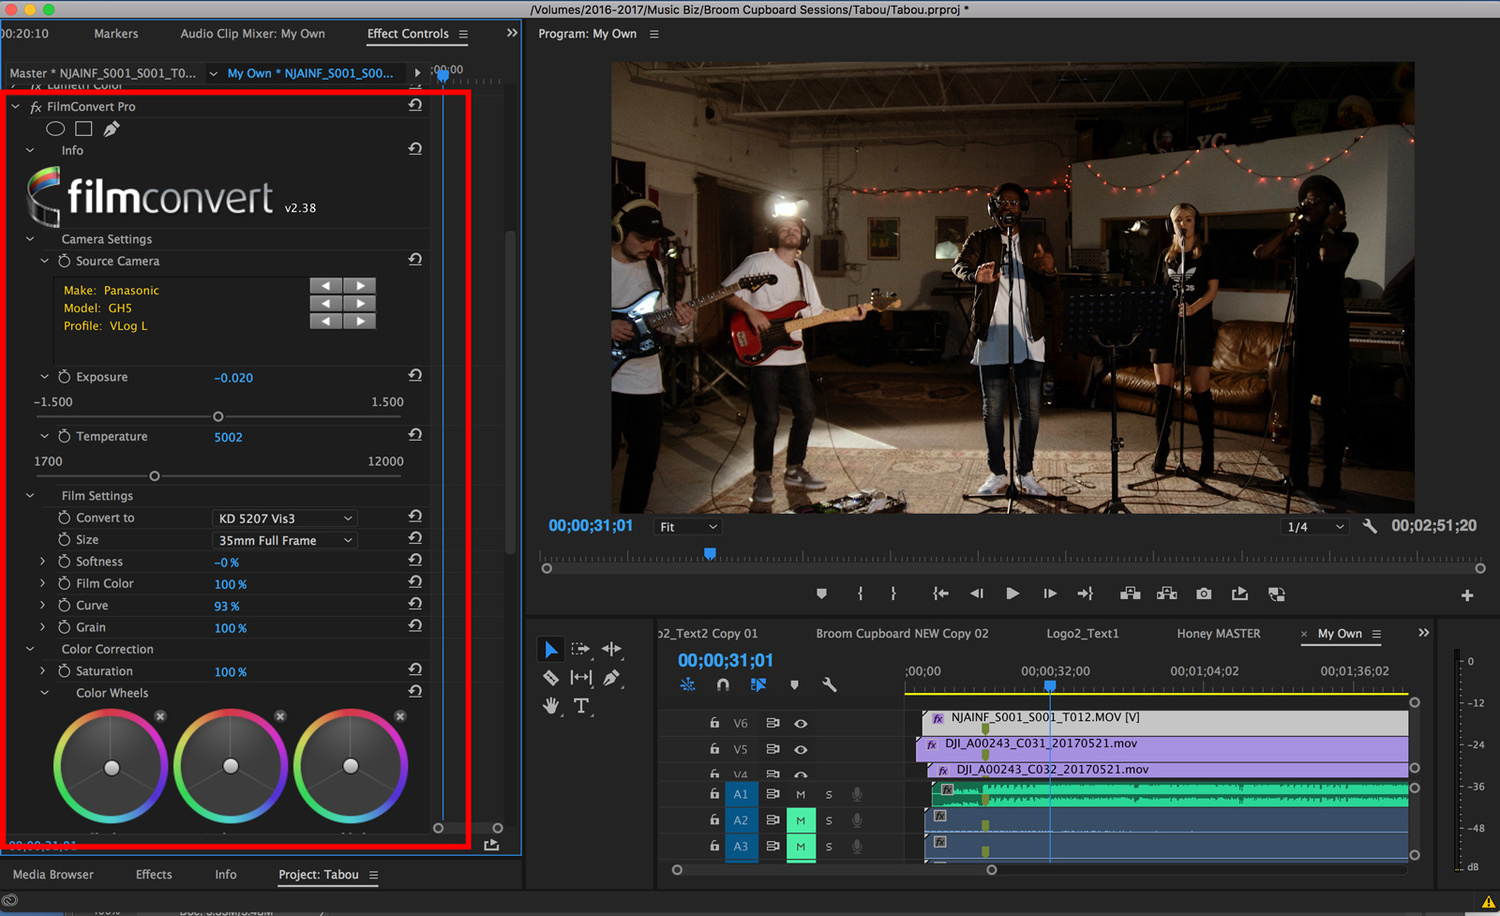
The clarity and sharpness of modern DSLR cameras is contrary to a filmic look, so you have to hack this in post. The easiest way I’ve found is to use the incredible FilmConvert plugin which provides some super easy grading options that are based on real film stocks which can be paired with a multitude of grains. There is even a softness setting which is very powerful when used sparingly to take the harsh sharpness off your digital footage.
Flares and Bokeh
Flares and oval shaped bokeh are distinguishing characteristics of cinematic footage, as seen in every movie made and inspired by JJ Abrams. This is a “side-effect” of anamorphic lenses and can look beautiful when used well. Whilst oval shaped bokeh isn’t easily hacked, you can get some nice flaring characteristics using this neat trick with some fishing wire, or purchase some flare overlays. If you are going to use overlays, a word of caution…less is more!!
Reverse Keylighting
This is one to remember whilst shooting and can be accomplished with one or no lights. Have your keylight on the opposite side of your subject and shoot on the dark side. Your keylight can be a window, or artificial lighting. Whilst more lighting can be added to create more shape and depth, this is the easiest and quickest way to get that cinematic look.

While no amount of post production hacks will replace the sheer cinematic beauty of an anamorphic lens attached to a film camera, these few hacks will help you experiment with the look when your project requires some cinematic gloss. As a final tip, once you’ve added an effect in post, walk away from your screen for half an hour, then go back and rewatch your footage. Fresh eyes are the best tool you have to add the magic ingredient of subtlety when adopting a stylized look.


Thank you for taking the time to write this article. The information here is super useful for someone like me who is trying to learn video.
Some of this info is not what you actually want except in very special cases.
According to the DCI, standard ratios are:
1.85:1 = flat
2.39:1 (and NOT 2.35) = scope
16:9 = HDTV
1.9:1 = full container
and corresponding resolutions are in 2k or 4k
flat = 1998×1080 or 3996×2160
scpoe = 2048×858 or 4096×1716
HDTV = 1920×1080 or 3840×2160 (i.e. Full HD & Ultra HD)
full container = 2048×1080 or 4096×2160
Therefore if you're shooting FullHD 1920x1080 or UHD 3840x2160, and want to export a scope image, you need to crop to 1920x804 or 3840x1608 (=2.39)
The 2.35 ratio is an old historical name coming from screening 35mm anamorphic before 1970. After that, 2:39 has been and still is the scope standard.
And for frame rates, you should create media at exactly 24 fps ONLY if you're asked to do so by your client. Otherwise, most of the time it's 23.976 fps that you really want. Mostly for compatibility issues.