Photoshop offers a ton of customization opportunities, letting you configure and alter it to fit your workflow. While the default options are a great starting point, there are five preferences I’d consider must-change for the best experience. Want to know how you can make Photoshop work better for you right away?
These recommendations are going to assume a few things: you’re working primarily on images, you’re using a mouse instead of a trackpad, and you have enough screen space to work comfortably with an additional panel or two showing.
If instead you’re using Photoshop for graphics work, digital painting, or just find that you need a different set of options, consider setting up a workspace via Window>Workspace>New Workspace. A workspace saves your panel positions, and you can also have the workspace save your keyboard shortcuts, menu modifications, and toolbar setup.
Zoom
Skipping around a panorama is made a lot easier by having quick access to zoom
The first change I have to make is to re-enable zooming with the scroll wheel. Available under Preferences>Tools>Zoom with Scroll Wheel, this is such a simple quality of life change. To navigate across the image, zooming in and out via a quick flick of the scroll wheel is second nature. Especially when combined with the quick redrawing implementation of GPU-accelerated zoom, it just feels right and easy.
If you work with panoramas, retouching, or other precision work on high-resolution images, this is a must-have. My preferred mouse, the G502, has a very well-damped scroll wheel, which can also be toggled to a clickless wheel. Both of these modes work well in combination with scroll zooming.
Cursors
Still, within the preferences panel, I also make two changes to the cursor options. I prefer mine set to a full-size brush tip for painting and a precise option for other cursors in lieu of the little skeuomorphic icons. While the precise option takes a little character out of some of the tools, by replacing the little eyedropper or other tool icon with a simple crosshair, I find the precision really comes in handy. You can get a better sense of what you’re actually selecting, instead of trying to guess what’s being covered up by the icon.
For the full-size brush option, I find that I can more accurately gauge the “spill” of a soft brush with this enabled. The normal brush cursor feels just too inaccurate. When painting with a large, soft brush, I’d rather err on the side of caution and add an extra stroke than have to redo the entire pass thanks to a too-small cursor. This tradeoff is easier to understand in practice, so I’d suggest giving each a try when brushing on a blank document with a soft brush.
Actions
The next tweak I’d suggest is scrapping Photoshop’s default actions and adding at least one of your own to prevent them from being restored. So many of the default actions are irrelevant, yet the overall panel and functionality are so useful once you start adding your own actions. In a recent post, I went into more depth about actions, including my favorite action I’ve set up.
For this post, I’d just suggest deleting the defaults and recording a short, simple action. Not only will this help you get a feel for the panel, but it’ll also prevent the annoying reappearance of those defaults that happens after each restart.
If you’re looking for some suggestions, try recording any process you find yourself repeating across a series of images. For instance, you might be working with retouching a batch of images in an unusual color space. If that’s the case, open a sample image, then start recording yourself converting the profile to RGB, then adjusting the mode to 16-bit, and duplicating the background layer. After saving that action, you now have a one-click process that saves a trip through two menus, a couple of panels, and some downtime.
Layers
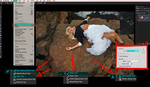
Speaking of panels, did you know that a number of panels have their own little preferences? Take the layers panel for instance: it features two huge quality of life improvements, but they’re buried under an almost hidden menu option. To make these changes, make sure the layers panel is showing, then click the hamburger menu button for that panel. Then, go to panel options. This little pop-up menu will then let you adjust the size of the layer’s thumbnail and the thumbnail’s contents.
If you’re like me and don’t take the time to label your layers, you can find yourself 20 minutes into an edit and searching for that one layer you need to duplicate. By changing to a large thumbnail, it’ll be a lot easier to spot; this is particularly notable on high-pixel-density monitors. For instance, I run my 4K panel without scaling, and even on the highest setting, the thumbnails are still tiny (if anyone from Adobe is reading, can we get some even bigger options?).
The second change I make in this panel is actually in service of the first. Consider this example. Here, I’ve made a quick selection of a single building, then duplicated it to its own layer. By default, the thumbnail shows the contents of the entire canvas, even if 90% of it is blank. When you’ve changed it to “Layer Bounds,” however, each thumbnail is mapped to just the actual contents of that layer. Besides improving readability at a glance, this also serves as a great check on your selection. If you know you selected only a small part of the frame, but the thumbnail is drastically zoomed out, you might need to double-check your selection.
Shortcuts
Lightroom and Photoshop go together like peanut butter and chocolate, in almost every way. The only problem is that there are a number of shortcuts that just don’t line up. Consider a commonly used tool like the crop function. In Lightroom, you’re hitting R. In Photoshop? You better be reaching for C. This is just awful for muscle memory, and while you can’t fix it on the Lightroom side, you can at least adjust Photoshop to better align with Lightroom’s shortcuts.
By going to Edit>Keyboard Shortcuts, you can then tweak the shortcuts for the menus and tools. When you’ve got them set up how you like, consider saving your changes for easy re-use in the future. I’ve been able to sync one set across my desktop and laptop easily via Dropbox with this feature.
Photoshop is an incredibly complex tool with a number of hidden facets. Have you found any changes that are essential for you?
Alex Coleman is a travel and landscape photographer. He teaches workshops in the American Southwest, with an emphasis on blending the artistic and technical sides of photography.
a wired gaming mouse or one of these new logitech litespeed wireless mouse things are a must for precise working. a normal wireless mouse, or especially apple mice slow your workflow by fractions down. a mouse with low latency and huge precision makes working so much faster.
CMD (CTL) + Spacebar is the superior method to zooming in and out. Just point and drag. When combined with CMD + 0 to makes it fit, the speed combo there is unprecedented.
I can understand using shift + scroll when to pan sideways, however psd has built in quick throw with the spacebar.
Making your own actions is a must. Some shortcuts aren’t as flushed out as they could be, and some are only recently implemented. Just under 2 decades ago I set up actions for layers to delete, add, group, duplicate, and assigned function keys for each. After all this time, I’ll never be able to undo that muscle memory. There is a LOT of power to boost your production with actions. If you do any repetitive task, shorten it up, even if the actions are temporary.


I love my G502. I added a high-quality gaming mousepad, and it's a fantastic experience.
a wired gaming mouse or one of these new logitech litespeed wireless mouse things are a must for precise working. a normal wireless mouse, or especially apple mice slow your workflow by fractions down. a mouse with low latency and huge precision makes working so much faster.
Yeah, love my G502. Wireless was a big upgrade, but it feels a little overpriced given the wired versions pricing.
Yeah, right on the money with these. Thanks!
CMD (CTL) + Spacebar is the superior method to zooming in and out. Just point and drag. When combined with CMD + 0 to makes it fit, the speed combo there is unprecedented.
I can understand using shift + scroll when to pan sideways, however psd has built in quick throw with the spacebar.
Making your own actions is a must. Some shortcuts aren’t as flushed out as they could be, and some are only recently implemented. Just under 2 decades ago I set up actions for layers to delete, add, group, duplicate, and assigned function keys for each. After all this time, I’ll never be able to undo that muscle memory. There is a LOT of power to boost your production with actions. If you do any repetitive task, shorten it up, even if the actions are temporary.