
Editing software gets more efficient every day. While competitors like Luminar continue challenging the supremacy of Adobe, there are also free options available. I was surprised that Darktable was ahead of LIghtroom in some features.
Can We Compare Two Such Different Programs?
Comparing Darktable and Lightroom in its capabilities as a photography library wasn’t all that hard. Although some of the comments of the article emphasized the unexpected depth behind Darktable’s Lighttable, both programs worked quite similar.
In the case of the editing process, it’s a little more like comparing apples with oranges. Lightroom and Darktable operate very differently which is actually why this topic is so interesting to me. Darktable is much more complex and works like a mixture of adjustment layers from Photoshop on a Lightroom-like surface.
Apples and oranges can both be eaten. They are healthy and taste sour. Comparison is hence possible. Both programs are made to make photographs look good, both programs work non-destructive and both of them offer different modules. A thin but stable foundation for comparison.
Disclaimer: I tested Darktable a lot during the last few weeks, listened to the last article’s recommendations, and took a bit of information from everywhere. Yet, I’m not an expert. In Darktable, there are a lot of different methods (I’d say infinite) to reach your editing goals with only slight differences. Lightroom on the other side is quite linear when it comes to its workflow.
Whenever I did not achieve to reach my goals with Darktable, I bet there is a solution. Yet, usability is one of the most important features for any modern software. So here is my opinion.
Round One: Make the Crop
The first step in editing my photographs has always been resizing a photograph and – god forgive me, but after all those years I still suffer from slightly skew horizons – level the photograph. I am used to a quick and easy two-click solution in Lightroom.
The Crop module in Darktable offers me some more options and gives me a little more information about the changes. Besides the angle and aspect, I can also adjust the grid in more detail. Moreover, when you right-click on a dial, a smart map appears and offers you more control about small or bigger changes. In Lightroom, I can’t use the slider for the smallest adjustments, but need to type a number instead.
The Crop module seemed quite impressive – until I used it. Again, I guess there will be a solution, somehow. But the crop drove me nuts. Instead of taking ten seconds to adjust the size and angle, it took me minutes. The operation was slow and buggy, often resulting in strange angles that I didn’t plan.
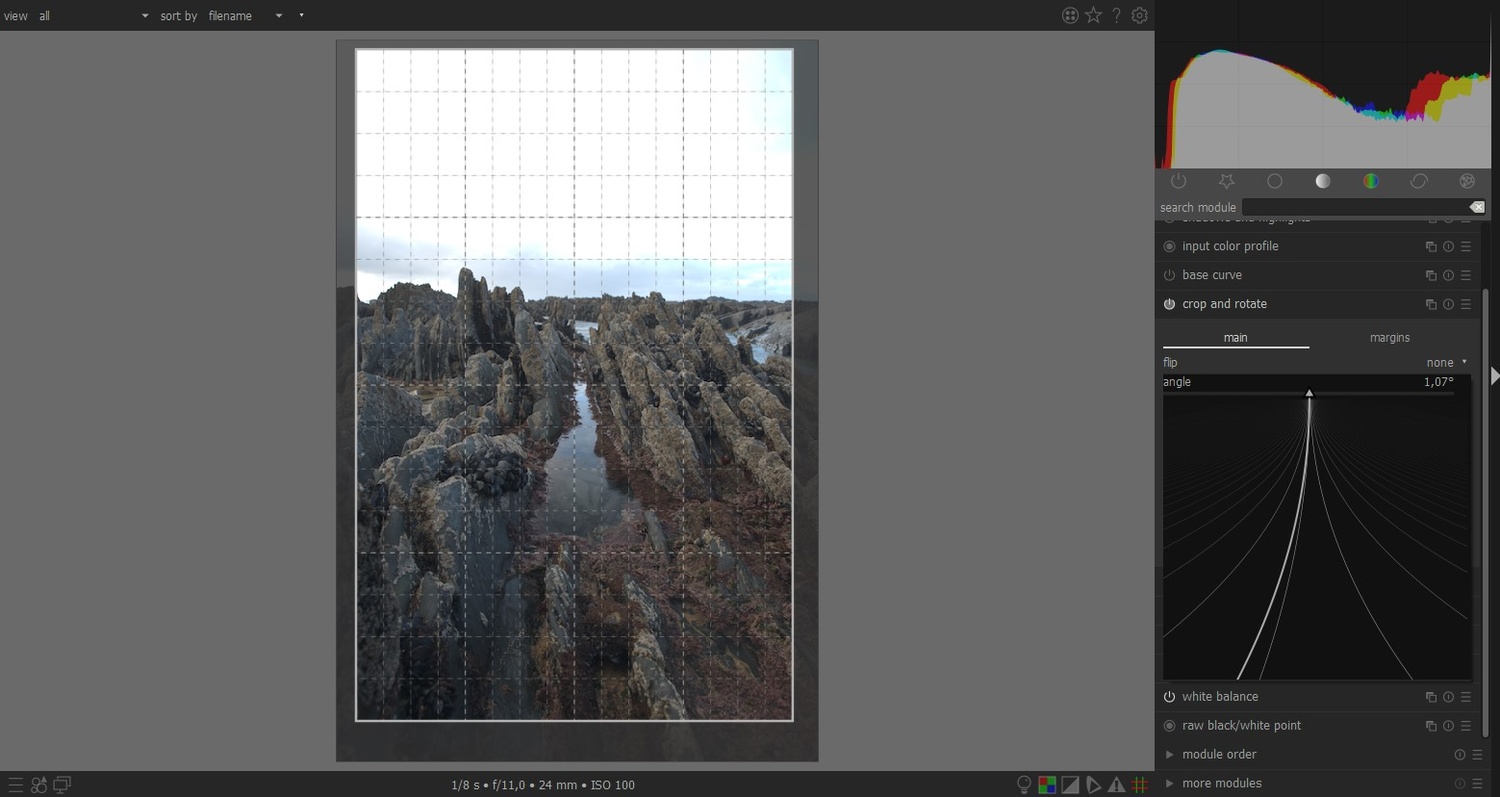
A unique way to shift values with your mouse isn't enough: It needs to run smoothly.
Round one clearly goes to Lightroom, although the ideas of Darktable seemed great.
Round Two: Shadows, Highlights, and Overall Exposure
While cropping an image is done in one module alone, setting the exposure is not that easy in Darktable. Here, you will come across the huge difference between the two programs. Adjustments in Darktable work as layers. There is a default option for the order of the modules and you should really not change them if you’re not an expert.
Also, there is some issue with the color space. While some of the modules still work in the LAB space, others work in RGB. The topic is quite complex and there is a lot of development at the moment.
However, different modules bring you to the same result. In the end, you will have to open more than one module to achieve what the Basic Adjustment panel in Lightroom does. I found myself using Exposure, Filmic RGB, Base Curve, and Shadows and Highlights to get a proper exposure in every area of my photograph.
Four modules for what can be achieved in the Local Adjustments alone? Not too handy, especially as scrolling between the modules requires pointing at the scroll bar. Probably there is a way around it, too, but I couldn’t find it quick enough.
At least the Tone Curve of Darktable is quite straight forward, but as you might know, a tone curve can never replace the Basic Adjustments. There is also a Basic Adjustments module for Darktable, but I won’t recommend it.
Darktable is definitely more complex (i.e. complicated) than Lightroom, but once you have an idea what you’re doing, it’s also amazingly flexible. Every editing workflow results in a different outcome. I find it quite exciting and deliberating, at least.
After playing around with the modules, I only faced one major and unsolvable problem. When I tried to edit a severely overexposed sky, whatever I tried in Darktable turned the blown highlights purple. Color Adjustments couldn’t help to fix it and so I needed to leave that photograph unedited. It didn’t happen to any other image, but unfortunately, it was the first picture I tried.

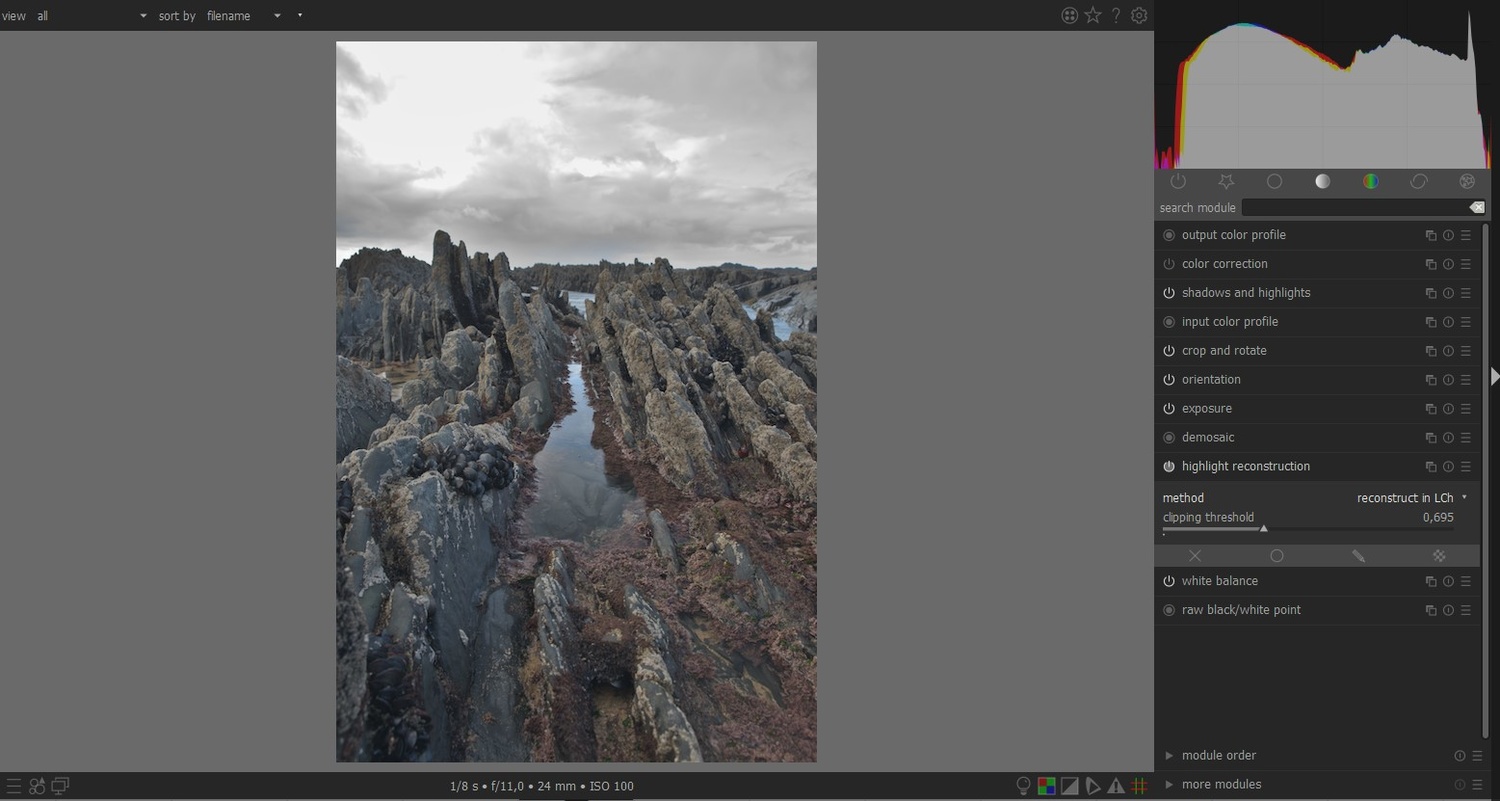
Round Two still goes to Lightroom. In my opinion, a quick and easy way to adjust the exposure is more important than the flexibility which Darktable offers. Still, I’d never say that Darktable doesn’t work well. You just need to read the manual, watch videos, and ask the really helpful community for help. When you’ve got a deadline to meet, you’ll probably work a sweat as a Darktable beginner.
Round Three: Make It Pop
Whenever I edit a really promising photograph, I like to make it pop with local adjustments. Lightroom does a pretty nice job here. Brushes, gradients, radial filters are all yours. I thought that’s all you need. Before I met the masking options in Darktable.
Darktable gives you the full range of masking options: Paths, gradient, radial, brush, and also parametric masks which go far beyond the range masks of Lightroom. Once you created a mask, you can easily put it on every module.
After my issues with cropping an image, I would have never expected that masking could be so intuitive. You smoothly change the feather of your mask by hitting Shift and scrolling. Scrolling alone will change the mask's size (or even the shape of the gradient), and let alone the paths…
Let’s admit it, we all had to learn how to create proper paths in Photoshop and we only accepted it, because there was no alternative. Creating a path in Darktable is as easy as it can be – and should be. A few clicks and you’ve got a pretty shaped area to edit, that’s all.
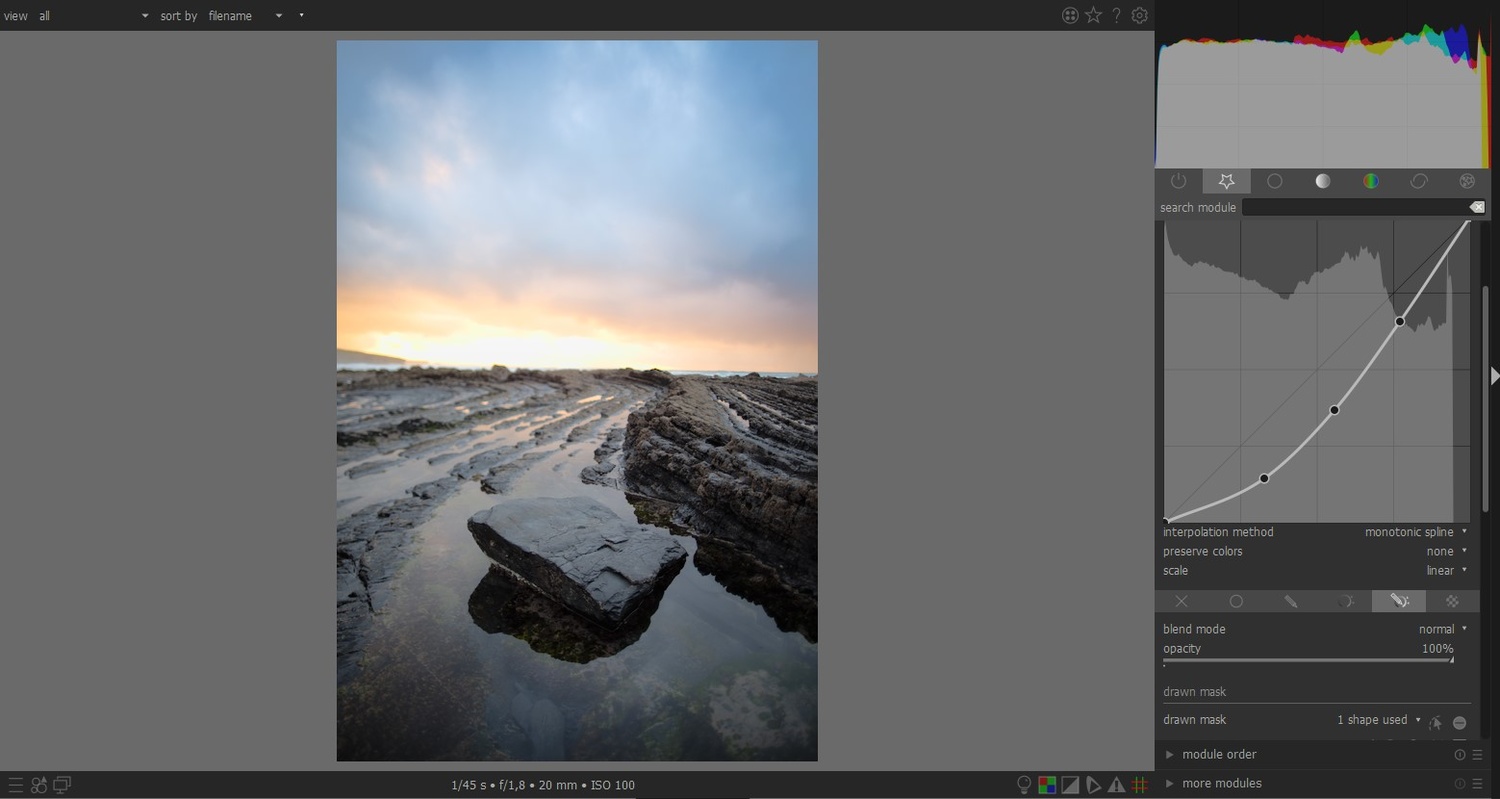

As you might have guessed from my enthusiasm: Darktable clearly wins the third round, even though Lightroom already performs well in local adjustments. Darktable offers the same or even easier usability and yet more flexibility. This was a turning point for me.
Round Four: Spot Removal and Cloning
I spend a lot of my time outside and my camera does, too. I took photographs in the desert, needed to change lenses at the beach, and generally prefer to clean my camera instead of not making it dirty in the first place. Sometimes, it results in a temporarily bad state of my sensor and I need to remove a lot of spots in post-processing.


Content awareness is one of the strengths of Adobe’s editing software and I don’t expect free and open software to compete. Yet again, Darktable performed better than expected. Spots are easy to remove and you won’t detect my lack of cleanliness in the final image. Just every now and then, the spot removal copied another spot into my sky. In these cases, I had to shift the source by hand, which was no problem at all. It also happened to me in Lightroom a few times in the past.
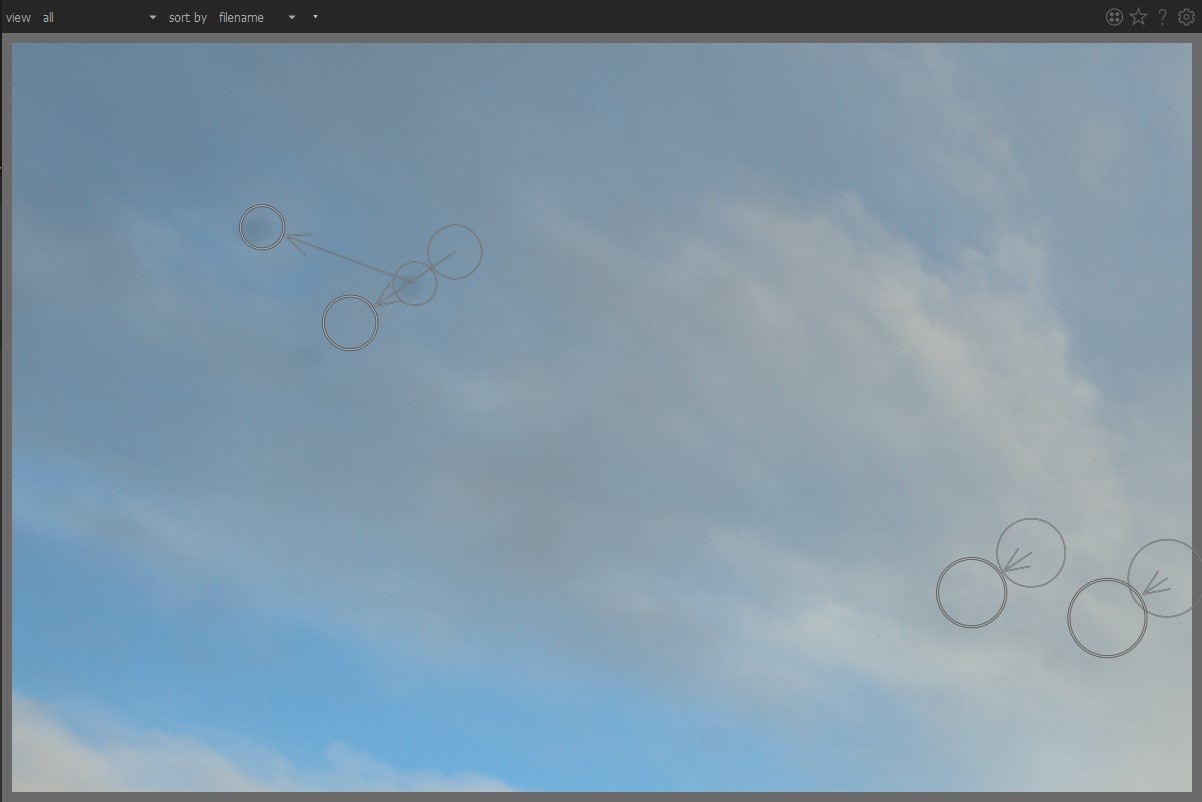
When software chooses the wrong source and copies another spot into the sky.
But what happens if I want to get rid of bigger parts of the photograph? Again, Darktable impresses me. The result of my 15-seconds cleaning up the beach look quite compelling.


Only one thing bothers me: I’m used to navigating through a photograph in Lightroom using the “hand” tool by pressing Space. In Darktable it didn’t work, but probably you will find it in some preferences and shortcut options. I won’t go as far as giving a penalty to Darktable for that.
Hence, round four is undecided.
Round Five: Colors
Only recently, I started to work a lot more with colors in my photographs. Lightroom offers a few handy tools: The HSL panel and the Color Grading, formerly known as Split Toning.
Darktable’s Split Toning module works with colorizing darker or brighter parts of the image, just like the former Split Toning module in Lightroom did. Since the update to Color Grading, Lightroom is a little ahead here, but it lacks the capability of adding masks.
Yet, I use split toning only to add a final style to an image, the real magic happens in the HSL part, where you can shift the hue, saturation, and luminosity of a certain color area. Quite easy to use, you might think? Then you haven’t tried Darktable’s Color Zones, I guess.


I went from “Uhh, that looks interesting” to “Oh my god, this is brilliant” within a few seconds. Color Zones doesn’t work with conservative sliders, but with a handy colored curve for each of the three options. It makes working on colors so much more intuitive and even more flexible than the HSL panel. Both might result in quite equal effects, but if I ever go back to Lightroom, I’ll really miss this option.
Round Five clearly goes to Darktable because of its surprising usability and quick calculations.
Closer Than I Thought
It’s really difficult to make a final decision here. On one hand, Darktable opens almost infinite options to edit your photographs. On the other hand, it lacks usability, where I need it the most. Basic adjustments and crops are needed for almost every photograph. Still, it surprised me with fresh ideas and editing concepts. I didn’t expect many features to work so smoothly and even outperform Lightroom in terms of usability. Local adjustments and masking or color grading is quick and fun.
Here’s a quick recap.
What I liked in Darktable’s Darkroom
- Endless opportunities by copying and redefining modules
- Masks can be easily edited and added to modules
- Paths are created quickly
- Different options to shift sliders
- Many modules operate quickly
- Some modules are very user friendly
- Most modules offer a lot of options
- Spot removal and cloning work accurately
- Color Zones are a game-changer
What Could Be Improved
- The Crop module makes me angry every now and then
- Basic adjustments generally work but are far more complex
- Many modules require a lot of research to understand
- Too many modules can be intimidating in the beginning
- First steps are harder than in other programs
What about your experiences with Darktable? Did you suffer? Or did your first steps even encourage you to switch or stay? And what’s your favorite module and workflow? Before I feel comfortable writing my final roundup, I’ll give Darktable another week or more and look forward to any suggestion.


Recently I switched to the new darktable workflow that does basic filmic+exposure control, discourages base curve use, and used LUTs for my Fuji film settings.
And I also had issues recovering contrast in highlights as you did. In my case I found out the exposure module (automatically added always by the app) was clipping highlights, and no additional highlight recovery or tone curve module would be able to recover them. To fix it, I just disabled the exposure module first, tweaked the highlights, and then moved the exposure module up to the end. Maybe you could try that? But yes, I found that very very annoying too.
However, the thing that confuses me a lot is the need to ctrl+click an image just to select it in editing mode, the not-sure-why this selection is achieved differently on different views, and being unable to compare two images or before/after side by side while editing an image.
Thanks a lot for the advice. I'll gave it a try, but it seems this photograph is hopelessly lost in Darktable. Of course, it's also not the best exposure :D
i don't use it but isn't the darktable snapshot tool, the nearest equivalent to LR's A-B comparator tool?
Wow, I thought snapshots only permitted comparing to stages in the history of the same image, but you are right, it seems to allow comparing two separate images. What I couldn't figure out, though, is how to lock and zoom both images. Somehow zooming with the mouse wheel only zooms the right-hand image. I am possibly doing something wrong, but it must be unintuitive, if at all possible.
I have been a Lightroom user for many, many years. It replaced about 14 pieces of software. I was/am enamoured with the product.
However, I'm not prepared to have my photos under the control of a software as a service subscription, so I'm stuck at ver 6 perpetual licence. Adobe's financial success by going down this route will undoubtedly inspire other companies; it's simply a matter of time.
That leaves open source if you wish to have long term control over your images. I've been dual booting Ubuntu for many years. I will maintain LR v6 for my older images but since 2019, all my new photographs are being handled by darktable.
It's a beast of a program. Immensely capable but overly complex. I think Adobe made a wise decision with LR to keep a basic, easy to understand editing workflow. darktable offers so many options for doing the same thing that it becomes an uncontrollable temptation to throw all 80 modules at every image.
I have finally settled on a very basic workflow to deal with this issue. I do all my tonal editing in just one module: RGB Tone curve. I have abandoned all the other modules that can control brightness, contrast, darks and lights. I can do this because I create multiple instances of Tone curve and use each instance with its own mask. Basically, I edit my images by making a series of local edits, rather than trying to globally edit the whole image. The masking system is similar in approach to Photoshop layers and my inspiration for this approach is Bruce Percy's tutorials on using Photoshop curves and layers. I have translated his approach into darktable and it it works great.
Obviously, I still need other modules for sharpening, noise reduction, local contrast, colour control and the rest of it but I have also stripped this down to a minimal set of modules managed using the favourites system which allows me to hide all the unused modules away out of sight. Once you figure out a custom workflow that suits you, it's reasonably easy to create a user friendly experience. Just figuring out that workflow is the challenge!
Interesting to hear your struggles with the crop module. I have no such issues, it is pretty much as fluid as the LR tool. I suspect what you are experiencing is not typical but the result of some kind of system configuration or conflict on your system. Worth asking the community whether others have similar issues.
Thanks for posting this. I have tried Darktable on and off a few times but never put enough time in. I will give it another try with my next pictures.
Thank you for an even-handed and thoughtful article. Most reviews of Darktable merely scratch the surface and dismiss Darktable as a bad Lightroom clone. You did not do that, and even discovered a few of its gems, like Color Zones. Kudos for that!
Your pink highlights are caused by partially blown color channels, as you correctly mentioned. I find the best way to deal with these in Darktable is within the filmic module, on tab two "reconstruction". There, you lower the threshold until it attacks the blown portion of your image, and can then find-tune how highlights should be reconstructed. Here's a detailed description how filmic works and what you can do with it: https://discuss.pixls.us/t/darktables-filmic-faq/20138
It's quite the marvel once you understand how it works. That said, recovery of blown highlights is just not a strong point of Darktable in my opinion. While you can get it to do the right thing with filmic, it is nowhere near as straight forward as the highlights slider in Lightroom.
Anyway, thank you for your article. Should you happen to stick with Darktable for a while, a follow-up article about its scene-referred workflow, the tone and contrast equalizer, and the upcoming channel mixer would be really cool, as these are the things Darktable truly does differently from other tools, and arguably better.
I suppose the filmic module will completely turn over my work flow.
Yesterday we had a great sunrise with the typical "Föhnfenster" (The Föhn is a warm dry and falling wind that dissipates the clouds over the mountains.). The 'base curve' module converts the RAW data to the look of the in-camera JPG. The resulting photo looks quite o.k. but somehow it is not always what one experienced.
If you take a look at the image below, you'll see that the camera is pointed directly to the bright spot where the sun would appear in a few minutes. What happens to your eyes/brain if you do so? The irides of your eyes contract, the "f-value" gets small. You'll see the horizon, but all things in the shade get very dark. The filmic module used without much fiddling on the sliders delivered what I regard is close to what was my impression of the scene.
Nice photo!
Thank you! I pass over this bridge every day, the view is sometimes just incredible. In the back are the Alpes with Eiger, Mönch and Jungfrau.
I've really enjoyed your articles on darktable. I've tried to use it myself with mixed results but I really think it's the result of me and not the software. I just need to overcome the learning curve. Lightroom just feels more natural to me because that is what I learned first. More articles like this would definitely scratch an itch for me.
Hey, thanks for the comment. It's the same for me. I am planning to get more into the details of Darktable, but it'll take some time until I feel comfortable, writing the first tutorials. Too much questions are still open.
Hi Nils, I really wonder what your issues with the crop module are. Did you use the right mouse button to straighten it out?
Overall I feel you should get to know darktable a little better before doing any comparison to other software that you know much better. E.g. I don't think that talking about layers in darktable is correct to do so. The photography in the chapter "Shadows, Highlights, and Overall Exposure" has, as far as I can tell from the small image, values which will never work: highlight minus 68.5%. No wonder it looks weird. Long before you reach -50% you begin to notice artefacts. And moreover "shadows and hilights" work in LAB colour space. It is more limited than RGB colour space.
The filmic and base curve module are not meant to be used together. One works in RGB the other in LAB colour space.
You can achieve similar results with different modules: Yes, that may be a little confusing but as there are different methods to manipulate image data we have different modules. The newer normally do a better job than the older.
I think your series is interesting, but it would benefit if you get to know darktable better.
Hey Jan,
nice to see, you are following this series. I don't think that working more with Darktable would change my opinion about it. My review focusses on usability and possiblities alike. As you might have read: Whenever something didn't work out, I admitted that I guess that there is a way around it. I also know which modules work in RGB and which work in LAB as many commenters were posting some links below my last article. I read them all. I tried to fix the issue with the Highlights for more than an hour, using the whole repertoire of web-research. While nothing worked for me (not in RGB not in LAB not in Both), I think it's fair enough to give some credits to Lightroom. I never looked something up and to me, it's clear what to do within seconds.
Still working on a roundup for next week ;)
Hi Nils, sure I follow. this series. I like to read your articles. And of course there is always something to learn. I bet you would change your mind if you worked more with darktable. But of course if you already got Lightroom and are used to it you have your tool. Nevertheless I think it would be a fairer comparison if you knew both programs equally well. But I see you got an open mind and I am interested to see where this all leads to. Thank you! Cheers!
I always find it interesting that Darktable (or insert software name) and Lightroom/Photoshop comparisons are written from the perspective of an existing Lightroom/Photoshop user/expert.
No one seems to even think of the new inexperienced photographer's perspective, so Lightroom/photoshop are still held up as the be all and end all. It is however very clear that the Adobe pricing/licencing model is not well liked. Which is why we keep getting these 'comparison' articles from people who are clearly dissatisfied with the Adobe set up and are actively trying to escape from it.
Having read a few of these it is apparent that most photo editing software is quite capable, but requires several hours of work putting in to achieve any degree of proficiency with.
Surely it would be better to look at the support available free from online tutorials and communities in order to make a better judgemental call?
I like this article, but would love to see reviewers be a little bolder in their conclusions. In my opinion no one should be steering newbies toward Adobe if they themselves are taking the time to see if they can replace it.
Surely the best advice a reviewer can give for a newbie is take your time before committing yourself to any third party photo editing software applications and take some time to look at what your camera manufacturer gave you for free first.
The cost of third party software varies from free to use (but also feel free to give something back towards the project, time, participation, promotion, or even money) to potentially many thousands in outlay in whatever currency you use, during your period of use.
The advice to any existing disgruntled third party photo editing software user has to be different, and could vary from:-
- Look at more tutorials
- Realise that what you get out of any photo editing software depends on how much effort you put in.
- Every software works slightly differently so change comes with a learning curve.
- Software can't always make a silk purse out of a sows ear so improve your in camera front end.
With the number of very capable photo editing software applications available having grown since Adobe launched its subscription model the future may not be as bright as Adobe once hoped.
Interestingly, I haven't seen any article linking the decline in Camera sales to the change in pricing/licencing strategy from Adobe. My guess is the licencing model is designed to take the most money Adobe can from its existing users base, with either a flat or declining user base.
So just maybe Lightroom/Photoshop has already entered its death throes.
I was one of those a couple of years ago so decided to avoid Adobe as I’d never been there in the first place and I’m using C1 pro and Affinity for my edits. It does everything I need.
Hey Malcom,
thanks for your comment. I think that I have been quite fair with Darktable and at every possible moment, I have mentioned that the possibilities of Darktable are limited by my skills and knowledge. I also didn't draw any conclusion if you should buy Lightroom or be happy with what the great community of developers gave you as a free and open option. (But I'll surely write about that, soon)
And I completely disagree on the linkage between subscription price and camera sales, but that's another topic and probably we both lack data to proof ourselves right.
Hi Nils,
As I said I like your article.
I was just struck by the fact that every such article I've ever read has been written by an Adobe PS user/expert and the first premise of all such articles seems to be to compare the software being reviewed against what was (past tense) an industry standard.
I believe Adobe PS to have been a past industry standard as no one in my local 30+ strong Camera club (ranging from professionals to newbies) actually admits to using it. They've all moved on many years ago and newbies are steered away from Adobe PS by fellow members recommendations and club tutorial meetings on other software applications. There hasn't been an Adobe PS tutorial at the club for many years but there have been visiting Photography College Lecturers/Professional guest speakers who are ambassadors for other software editing progams.
Whilst I've never used Adobe PS, I have used and can still use, Canon Photo Professional, Olympus Workspace, GIMP, Fotoxx, Darktable, Picasa, Snapseed and have recently purchased Affinity after trialling it against Luminar. Unfortunately Luminar would have entailed a computer upgrade. The software I choose to use depends on the amount of work required to achieve my desired end result, which in turn is driven by the initial quality of the photograph taken, the device it was captured on and the media it may be displayed on.
Whilst there is no proof that the Adobe PS licencing model is linked to taking as much cash as possible from its existing declining user base, from my perspective Adobe is no longer recommended and is therefore not growing its user base. Add in the recent debacle where it lost the users of its Mobile application's data and the picture for the future of Adobe PS doesn't look as good as it used too.
Adobe PS is also no longer at the bleeding edge, but is arriving late to the party(ies) already started by its competitors.
Usability tips:
- you can use 'a' key to temporarily switch from tool to generic behavior eg. from changing mask size to zoom with mouse scroll
- in 'crop and rotate' module i use right click on image and drag straight line, also it's possible to adjust crop directly on image, i haven't had any issue with it
For purple highlights
- it's possible that the camera white point is set to high in profile, you can adjust it in raw white/black point module
- another way is set different option for the highlight reconstruction in that module
- also filmic has own reconstruction
Hey Ami,
thanks for the tips!
I played a lot with the highlight reconstruction and also the filmic reconstruction, but couldn't figure out why everything went purple when I tried to reconstruct the few available data in the blown out sky. The photograph is badly overexposed, we don't have to discuss on that. But still, Lightroom is able to recover it with one or two sliders.
Cheers
.
Using LR and Darktable, too. I just use Darkable for JPG. For RAW, LR is still the best to me.
User interface of Darktable can be difficult or strange for some new users. I remember that I didn't like to use Darktable pretty much at the beginning. But it doesn't take so long to get used to it, and I am no longer using Lightroom at all now. Darktable's advanced and detalied features of some modules are very interesting even though I don't use them so much, but if someone needs any of them, there they are. Especially for the RAW files, cooperation of GIMP and Darktable on a non-destructive basis is a big hit and very useful workflow for me.
Hi Nils,
I think you did you did a nice job in comparing the two programs. As you said, there are a lot of nuances with DT that make the job easier once you get through the learning curve.
For example, you can easily correct a skewed frame within DT by right click and holding the mouse while dragging across the horizon. Release the button and the photo will level. If it doesn't work out, then try again. It’s very painless.
With regard to exposure, the two critical modules are exposure and Filmic. The basic process is to adjust the overall picture with the exposure module and then use Filmic to adjust the photo's dynamic range by moving the black and white relative exposures to avoid clipping highlights and shadows. There are other controls within the module to adjust the overall look and saturation. To be honest, users can get confused by Filmic, but I've found it pretty easy to work with once you get some practice under your belt.
As some others have pointed out, Filmic and the base curve are not intended to work together – you use one or the other – and Filmic is the recommended option.
There are actually several easy approaches for dealing with the blown sky highlights. First, I suspect part of the problem may be that you enabled both Filmic and base curve. But after that, you can adjust Filmic so the entire image fits within your dynamic range. If your photo was properly exposed then you’re probably ok at that point. Otherwise there is a highlights reconstruction option within Filmic and also other options within a separate highlights reconstruction modules that will correct that color fringing.
In addition to color zones there is a color balance module that is “one stop shopping” for saturation, contrast and color adjustments for the shadows, mid-tones, and highlights. This can be very useful for basic color and tone adjustments as well as color grading.
I think you really put in an effort to evaluate the programs, and not just conclude that DT stinks because its not LR. Your central point that it takes a lot to master DT is spot on. The complexity of the software could be enough to frustrate new users or lead them to believe the program isn’t up to snuff. I’ve been using it for over a year and am still learning its capabilities. Looking forward to seeing your wrap-up.
Hmmm I'll have to give this program a go again. I have tried this program on 4 different windows PC's and on two Linux distros. Every single time i have had some pretty bad performance issues with it slowing down pretty hard and/or crashing. I'll try it again because if I can eventually fit this into my work flow I could finally ditch windows forever. I REALLY wish I could get Capture One and affinity products on linux. That would be the dream.
Hi Nils,
You can recover the highlights in your blown photo by going to the highlight reconstruction module, selecting "reconstruct in LCh", then adjusting the slider to get rid of the magenta. The magenta results from one or more of the color channels having no information. You can check which channels are blown by clicking the toggle button at the bottom right of the center panel.. You may also have to adjust the exposure down to get the highlights back.
Finally, I got it, and I bow to the master! It isn't even too complex. Thanks a lot! Also for your info. I already thought it was something like that even though I didn't know how to deal with it. I even tried to get rid of the magenta by adjusting the channels accordingly.
Basically, besides the mandatory modules, you just need the filmic module, the exposure module, the white balance. Cheers!
Having started out on Lightroom and now giving both Capture One Express (yet to decide if I want to purchase Pro) and Darktable a go. Unfortunately, I'm finding Darktable extremely complex and not at all logical. It definitely needs a lot of time and patience to be able to understand it. Right now its just confusing as hell. Whether or not I have the stamina to persevere with it is debatable. I like open source software but don't understand why some of it hasto be so overly complex. At least Lightroom was dead simple for a newbie to get started with.
«…extremely complex and not at all logical.»
If one is coming from a darkroom background —and I mean a literal darkroom, not a title for yet another raw editor— then the logic becomes quite clear. Also, when one understands why the fixed —well, not anymore; one can now change it, but I do not recommend it— workflow pipeline, it also becomes quite logical.
The old workflow was to do the things in an order such that minor changes in one module further down, will not cause modules further up to misbehave. E.g., raw de-noise occurs before de-mosaicing, profiled de-noise happens after. All exposure or luminosity corrections come before any colour correction. Augmentation comes last, (borders, watermarks, etc).
The new workflow puts the RGB modules first, (as appropriate), and the Lab modules last (as appropriate), and avoids the conflicts by selecting “Filmic Workflow” from the [ more modules ] hamburger menu.
As for complexity, darkroom work was always complex, but most jobs only needed the simple things. I suggest do all the basic edits of all images first, then go back and put pizzazz only where appropriate after. That simplifies quite a lot of the workflow, (another reason for the “fixed” workflow pipeline).
I will write a more detailed comment later. Right now, I have to go.
Do note, my issues with Darktable are just my own experience and not the usual ‘if I can’t use it it must be rubbish’ sort of comment. I’d love to explore it more, it’s just I’m struggling to make sense of a lot of the tools and the wary they behave. Darktable does show that we shouldn’t become complacent with commercial software as we may find the industry standard brand shutting out many users due to their changing business model. It’s certainly forcing me to move away from the Adobe way of doing things.
Btw, I usually do basic edits, including the curve tool, followed by a colour edit and that’s about it as I like to keep editing to a minimum.
Hello Nils,
Thanks for this. One issue that I don't see addressed here or really anywhere. Suppose you're a current LR user (Classic or Cloud) and paying the subscription. You'd like to migrate to Darktable but once you stop paying Adobe, you lose access to all your edits. If you have a few ten thousand images accumulated over the last decade, that thought makes you physically ill. Sure, you have your originals but without all your edits so what?
Yes, you could do one big round of exporting all your images in LR as jpegs (or whatever) with your final edits. But if you want to tweak something, you start all over in Darktable, or you're stuck keeping your LR subscription.
So the issue: is there a way to import one's LR edits and workflow into Darktable? I imagine that's going to be very, very hard, but this would solve a problem for many who then might be tempted to take the leap.
Tell that to Ansel Adams. It's not like he ever re-edited any of his works years later from the original negati…. Wait,… er,… oh….
Nevermind.
The thing is, what you are describing is precisely the issue with the subscription model. At least in the darkroom, I was able to note what paper, chemicals, dilutions, temperatures, times, height, bulb, lens and F-number I used to make a print and almost perfectly reproduce it every time. Yeah, I made it sound hard, but, unless there was a lot of post-processing, it was actually quite easy.
Until they stop producing the paper/developer I used to use, or they changed the chemical nature due to new environmental safety reasons, or they move from incandescent to LEDs, or something which causes my old lags to no longer be relevant.
The thing is that you can stay in the subscription model until Adobe finally upgrades to 32-bit floating point pixel pipeline (like all of their competitors), and the old records simply cannot be used anymore, (unless they preserve the 16-bit integer model for pre-upgrade images, leaving themselves bloated and slow), and bite the bullet then, or you can bite the bullet now.
The option of staying with the subscription model simply because of ancient edits is not a good argument.
1) How often will you re-publish an old image?
2) How hard will it really be to reproduce it with the new methodology?
3) How much better will it be the second time around with fresh eyes?
Ansel Adams did that many times with his images. So do I. So do many other photographers. It is not an unusual thing to do, but we will not be doing it to tens of thousands of images; we will be doing it to a few images every once in a while. It is no big deal.
[ASIDE]
As for the subscription model, it is not a new idea which Adobe brought to us. It has been done that way in the *NIX world for decades. The thing which Adobe got wrong, is that the software is supposed to be free, and one pays an annual subscription for primary support.
If one surrenders the subscription, one no longer gets primary support, but they can continue to use the software to their hearts content. Adobe turned this on its head by adding cloud service as part of the subscription, and giving —by all accounts which I have heard— lousy support, (with primary support costing extra).
Buy your cloud storage separate from your tech support contract, and keep your software, your data, and your edits. Yes, Darktable allows one to edit from an external source, and sync changes. ( [copy locally ] & [ re-sync local copy ]).
[/ASIDE]
I use the iOS app Darkroom. I don’t have the space on my iPad to keep all of my photos and the way this app stores edits means, once I’ve archived all my photos and deleted them from my iPad, I cannot access the edits anymore. It literally means once I’m done editing, there’s no going back. At first it annoyed me but it’s a good way to stay disciplined and to build confidence in my editing ability.
"Free and Open Versus Subscription" Maybe little off topic but I use Photoshop CC on a WIN 7 computer and Adobe just advised me they no longer support any of their programs on a WIN 7 computer. Coincidentally, all my PS CC programs on 2 different WIN 7 computers no longer work. When I went to re-download the programs to fix the problem, I am no longer able to. This is a huge disadvantage of the subscription model.
Hey Nils,
Nice job with this article, and thank you for taking some time to dig into darktable a little bit and having an open mind. All too often I read these articles and the conclusion is "darktable isn't lightroom and thus it is bad."
I hope you continue to explore darktable. There is a new release coming out on the 24th with even more new goodies.
You're right that we need better organization (and to hide by default) the darkroom modules. We're working on that and in the new version, there are module groups so you can choose a scene or display referred group of modules, or even customize the groups to suite you own workflow.
Hey, Nils, once again, a GREAT article. Of all the articles I have read about darktable written by people unfamiliar with it, these have been the best.
Nevertheless… (You knew it was coming, didn't you???) 😉
ROUND ONE
«…right-click on a dial, a smart map appears and offers you more control….»
Quite right. With Dt, there are several other ways to adjust a slider.
Slide it. (The obvious, put here just for thoroughness).
Mouse over it and scroll-wheel, for a more precise control.
As above, but while holding the [CTRL] key for even more precise adjustments.
Right-click on a dial, type in a precise number, then hit [ENTER].
«…adjust the size…»
Bear in mind that the crop tool typically has the aspect ratio set to “Original” by default. One can choose a set aspect ratio (from the many offered), or select, “Freehand” to crop at will. (Since I typically know where my images are going, I think that the pre-sets are great!)
[ASIDE] One can create their own pre-set if it is not seen, but there is no manual directive for that. I figured it out myself, and created a “DCI” pre-set of 256-135 (1.90 ratio). [/ASIDE]
«…adjust the …angle….»
As one person already pointed out, one can [RMB] and drag a line across the horizon. Additionally, one can use the keystone function, to get horizontal, vertical, or both sets of convergence fixed, and straight.
Furthermore, there is the “perspective correction” module, which will find and suggests horizontal and/or vertical lines for you to do auto correcting. It also does perspective correction based on the lens you used, if you choose to do that. (Full freedom of the user).
ROUND TWO
«…setting the exposure is not that easy….»
It is, if one goes in module order.
Raw black/white point (which may be where your pink skies came).
Invert.
White balance (which may be where your pink skies came).
Highlight reconstruction (which ought to have fixed it).
Chromatic aberrations
Hot pixels
Raw denoise (which I rarely use, but then again, I almost always shoot at sensor sensitivity).
Demosaic
Denoise (profiled) (which I tend to use in wavelet mode).
Denoise (bi-lateral filter) (which I have only had to use twice).
Rotate pixels
Scale pixels
Lens correction
Perspective correction
Orientation
Crop and rotate
(We are still not there yet) Liquify
Spot removal
Retouch
Exposure
Now one does not have to use all of the previous modules, but thus far, this is the first module for all intents and purposes to actually affect exposure. It has indicators for over & under exposure, (third icon on the bottom-right of the image block). If all modules above this one (in the module list, not my list) are turned off, this one will set your “initial exposure” before any “post-processing” tampering.
When one chooses the default filmic workflow, “exposure” module will only be the eleventh from the bottom. (Remember to ensure that other modules above it are turned off, first).
Once one gets this exposure right, —do not worry about contrast nor DR at this point— the rest becomes just as easy. (BTW, it does not matter which order one does their edits, they will still be processed in this order, unless specifically changed, which I do not suggest).
«…some of the modules still work in the LAB space, others work in RGB.»
Some modules will always work in Lab space, because Lab space is ideally suited for some modules. That aside, when working in the filmic workflow, they make every reasonable effort to put the RGB modules before the CIELab modules.
If one chose the “filmic workflow” from the [ more modules ] hamburger menu, then most of the modules which do not work well with a filmic workflow will be hidden, if one does not choose, “show all modules.” Why do some of them still show? To give the end user their freedom to choose, when there is no filmic equivalent to achieve the goal. Even then, they tend to come close to the end of the pixel pipeline in the workflow.
«…scrolling between the modules requires pointing at the scroll bar.»
Yes, you are correct. There is a way around it. Preference→miscellaneous→interface→“mouse wheel scrolls modules side panel by default” checkbox. The reason to NOT do this, is to prevent scrolling to cause the mouse to go over an option, then start scrolling those option values instead. If one closes modules when one is done with them, this is a non-issue.
ROUND THREE
«…change the feather of your mask by hitting Shift and scrolling. Scrolling alone will change the mask's size….»
…And [CTRL]+SCROLL will change the opacity.
ROUND FOUR
«…navigating through a photograph in Lightroom using the “hand” tool by pressing Space.»
Not sure what you mean here, since it has been years since I used Lr. …but if you mean moving around the view while zoomed in 1:1 (or whatever amount), then simply [LMB]+ drag, (unless one has a specific tool active, in which case, hold the ‘A’ key).
ROUND, …er,…. “What could be improved”
«Many modules require a lot of research to understand…. Too many modules can be intimidating in the beginning.»
One can limit the number of modules seen by
Using the favourite option,
Using the burger menu of the “more modules” to select a workflow to use.
Create one's own “workflow” setting, and save it.
«First steps are harder than in other programs»
Not if done from bottom to top, having started from a clean slate, (by selecting “0 original” in the history list), or turning off the upper modules first.
Again, and I cannot stress this enough, GREAT article once more! Thank you, Nils Heininger.
I don't use Lightroom. I just came here to say how much I love the header image for the article.
Finally someone who got what it's all about. Thanks for the credits! ;P
To straighten the horizon in Dartktable you only have to right-click-and-drag after selecting the Crop module. Depending on whether you are trying to straighten a horizontal or a vertical line, Darktable will do it automatically.
Your complaint regarding achieving basic exposure is (IMHO) dictated by the fact that you are too used to Lightroom, and go search the Shadows and Highlights sliders even when there is no need. In my day-to-day Dartable editing workflow, I use the Shadows and Hightlights module maybe once each 20-30 images.
Lightroom is easier to use, and limited: it's like using a point-and-shoot camera compared to a pro model. The only feature missing in DT is builtin panorama stitching software (for that I use Hugin). I use DT since 2 years and can recommend you a decent workflow if you like.
Thanks for another informative article! I also appreciate learning from the comments as well!
I think I read in the comments on your first article on these programs that the newest version of darktable (v3.4?) will be released on or around Christmas this year. I hope you'll be taking a look at it to see how it compares to the version you are testing now to see if they've addressed some of the things you've commented on.
I look forward to more articles from you on this!
Have a great Holiday as well!
Handling exposure in darktable is pretty easy... in particular with the scene-reffered workflow. These are the first 3 steps I do on an image in general:
* Correct exposure until middle gray is where it should be (don't care if it blows your highlight)
* adjust WB
* in filmic adjust the black and white point. The most important thing to understand is that until filmic the values (i.e. the DR) are basically unbounded. filmic does the tone mapping to squeeze the DR into that of your display. If the exposure correction blew your highlights, move the whitepoint to the right and you can bring them back.
Further adjustments:
* Add local contrast (with parametric mask on mid tones, allowing for some more aggressive settings).
* boost contrast in color balance module
* color grade using color balance moduel
* sometimes use contrast equalizer for sharpening
* geometric corrections like cropping or perspective correction. (It is hard for me to understand your cropping issue... works smooth and fast here)
* lens correction is applied automatically.
That's it for many images
Magenta highlights are not a problem in general. For my cameras they do not occur when highlight reconstruction is set to clip channels or reconstruct in LCH with the slider on 1 (as the tool tip points out, this should not be changed in genaral). Possibly, these magenta highlights indicate that some wrong parameters are baked into darktable for the spcecific camera.
Hi Nils,
One of the problems with reviewing opensource projects is that they have their own upgrade paths and timetables which are always dependent on the stability of the upgrade. In that, they won't release normally until the upgrade is considered stable. Unlike the Beta testing which goes on with some commercially purchased applications and operating systems.
Any way the latest Darktable upgrade might just have given you your histogram in tethering.. apparently it was dropped in version 3.2 due to lack of time.
https://www.darktable.org/2020/12/darktable-340-released/
Almost every OSS project does beta testing. The Beta for Dt 3.4 had been out for sometime.
With Dt, a new release comes out every Christmas. The exception was the 3.2.1 release, which came out early, due to Covid-19 keeping developers at home, pushing the 3.4 release up to this Christmas.
As for timetable, most OSS have a mostly fixed timetable for release. With Ubuntu, a release comes every six months, in April, (the xy.04 releases), and in October, (the xy.10 releases). They even have the LTS releases on a schedule of every two years, (the xy.04 releases, where xy is a multiple of two).
But, yes, at some point, new features for a new release are frozen, and they concentrate on stability of the features they have, for the upcoming release. Features that did not make it into the current release because they were not mature enough at the time of feature freeze, are put off until the next release. No stability, it is dropped. Why would anyone release software with a known instability issue?
OSS development is not much different at all from commercial software development, save for open code review.