One of the biggest hits at a wedding reception (or any event) is the photobooth. It’s an area where guests can gather around and make ridiculous faces, dress in silly props, and have an overall great time. When running a photography business that shoots events, we are always asked if we offer photobooth services, so I think it's a natural evolution to want to incorporate one into your packages. When I first found the booth from Photobooth Supply Co, it instantly stood out from all the other options.
Why Open Air
The main standout feature of the booth is the fact that it’s an open air booth. Most photobooths I see are the standard closed in structures that you see at shopping malls and bowling alleys. The problem with these closed in structures is that they only fit a finite amount of people.

While it can be fun to try and see how many people you can fit inside these closed structures, taking a decent photo of four or more people can be pretty difficult. With an open air booth, this isn’t an issue. You can easily adjust the zoom on the lens to incorporate a larger area. Not only do you get to fit more people, but others get to see how much fun everyone is having and it encourages more people to get involved. The only downside is that you lose that private enclosed area to make out with your date.

When 50 professional photographers get together
Initial Assembly
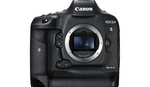
Upon receiving the booth in the mail, everything was shipped between four boxes. Items such as the Canon SL1, kit lens, Surface Pro 4, and cables are not installed inside of the booth. This means that everything needs to be assembled before you can get going. The good news is that Photobooth Supply Co not only provides a step by step PDF manual, but they also provide a step by step video that you can follow along with. The entire process was pretty easy and straightforward. Taking my time and watching the video as I assembled everything, it took me right at an hour to get everything put together. The good news is that once the main compartment of the photobooth is put together, you can leave it that way between events. The only reason to take the camera and laptop out is if you plan to ship or fly with the booth. Another great aspect about the initial assembly is with the Surface Pro 4. There is a lot of work that goes into setting up the main photobooth software in order to have it work properly. Thankfully, the laptop comes completely set up before you even turn it on. The software is loaded with all the settings adjusted to what they need to be and there is a folder of different templates for you to use. Even the printer is setup for you before it’s shipped out so all you have to do is plug it in. So after the initial assembly, everything is pretty much ready so all you have to do is turn it on and start using it.

Build quality
The build of the entire setup is rock solid. The entire booth is made of powder coated steel and the outside of the booth is smooth with no protruding bolts or rivets. This leaves the booth with a very sleek and modern look.

The front of the booth has a small opening for the kit lens of the Canon SL1 to see outside. This is another standout feature of the booth because a lot of other available booths simply use a small web camera.

The large opening on the front of the booth is where users have access to the touch screen on the Surface Pro 4. This is the brains of the operation and gives the owner the ability to make any needed changes to the functionality of the booth. This is also the place where users have the ability to start the booth and see themselves before an image is taken. As you can see below, the tablet fits right against the inside of the booth and has very clean look to it.

The poles that connect the main compartment to the base plate have a set of rubber o-rings on them. These allow the poles to insert into one another with little to no play between each other. There is also a small key and groove on the poles that make it so things cannot freely rotate during normal use of the booth.

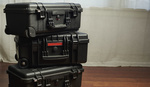
The case that houses everything is also very helpful. Everything has a nice pre-cut slot within the foam padding. My only issue with this is that the layout of everything is not in the order of assembly/disassembly. For example, the first thing you see when you open the case is the base plate on a sheet of foam. Once you take the base plate out, you take out that sheet of foam. The next pieces you need are the poles, but the poles are under the section of foam that holds the Alien B400 flash. So you have to move that section of foam over in order to get to the poles. It’s not a huge deal, but would have been nice to have all the pieces come out of the box in the order they are need for assembly.

Customization
The ability to customize the user experience is another area where this photobooth shines. The main software that is used to control everything has so many different aspects to it that it would be impossible to go over them all in this review. One of the stand out features that really drew me to the booth was the social media aspect. You can link the booth to facebook, twitter, email, and SMS. With Facebook you can have the booth setup to auto share each image directly to your page or you can give the user the option to login to their facebook page from the booth and share the image directly to their personal account. You can even prompt a user to give your facebook page a like as they are posting the image.

When it comes to the user experience, pretty much everything is customizable. There is a voice that talks to the user giving them a count down as well as saying things like “great shot.” You have the ability to turn these off or even to record your own audio clips for the program to use. You can decide how many images each session takes as well as the layout for the photo strip. In addition to the photo strips, you can also give users the ability save the series of images as a GIF file. The software will also save the GIF file as an MP4 video file so that they can be shared on social media accounts that don't support the GIF format.
In Use
Actually using the booth for an event was surprisingly simple. It took less than five minutes to setup the booth and another five minutes to get the backdrop setup. The night before I had made a custom background to be used on the photo strip and that took about 30 seconds to change over and from there all I did was start the booth and let people enjoy it. When clients use the booth they are presented with a screen to either take a photo or a video. This screen has no X to close the program or exit back into the settings, so you don't have to worry about a client accidentally closing the booth software. Once activated, the software guides users through the entire process and it’s easy enough that my seven-year-old nephews figured it out without guidance (you can see them at the end of the video).

When an event is over you are left with a folder for that event on the tablet. This folder holds a digital copy of every photo strip that was taken as well as another folder that has each individual image as it own file. If you allowed users to create GIFs or record video, all of these are stored as well. Another great thing about the booth is if you have it setup for users to input their email address to have images sent to them, but you don't have any internet at the event, there is a queue that is created so that you can run through and send all the emails once internet is available.

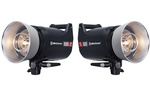
The modeling lamp from the Alien B400 even makes a great selfie light for people as they wait
Why not DIY
Although this booth looks and functions very well, it comes at a price. $6300 for the base model and $9300 for the Printer+ version. I know what you are thinking too. For that price I could build my own. I know you are thinking that, because I thought that same thing. I even started down that road. I priced out tablet computers, camera, lights, and printer. I even received quotes from machine shops for the assembly structure and the price for my DIY version quickly started to rise. Thankfully, I was able to realize that the cost of making my own booth and having it look even close to as nice as this one, was going to cost me as much or more then buying one from Photobooth Supply Co.

Another thing I realized after getting the booth, is that I would have missed out on the support from Photobooth Supply Co. Not only does this include great help and resources in assembling the booth, but it also includes access to free education. This education ranges from business classes to marketing classes and they even supply free promotional tools.

What I Liked
- Open air booth that looks modern and sleek
- Build quality
- Easy to assemble and use
- Laptop came with all the needed software already loaded and setup
- Social media integration
What I didn't like
- Wish the carry case was organized so pieces came out in the order they were needed
- The price is relatively high, although cheaper than an equivalent DIY option
Conclusion
The photobooth from Photobooth Supply Co is a great looking and great handling booth. They are super easy to use and the social media integration not only makes your life easy, but can also land you more clients. Although the price may seem high, most photographers invest just as much money in gear upgrades and additions in a single year. Unfortunately, these upgrades very rarely help the photographer increase their income. If you are in the market for a photobooth, I highly recommend taking a look at Photobooth Supply Co.


Surface Pro 4 - $1500 for a nice model, could probably get by with a lesser model. Canon SL1 + kit lens $500. Alien Bee B400 - $300. Umbrella $30. Pelican case $250. I'm at roughly $2500 there.
That leaves almost $4000 for the "metal box on a pole". I still don't see how your DIY method is going to cost that much. Just thinking out loud here.
If you have the time and resources you can for sure build something yourself for cheaper. If you need to pay someone to design, fabricate, and finish the product then the price adds up quickly. That's assuming you get an ideal design and build first try. Like most products, you are paying for the research and development that went into the design. Plus the added benefit of the marketing and business resources they have. It really boils down to your available time and resources. I have complete ability to clean my house, but to me it's worth paying someone to do it for me so I can use my time elsewhere.
I totally agree Matt. I checked out their website hoping you could buy the metal box on a pole piece but it looks like they only sell replacement parts to existing customers. Most of us already own a strobe, a laptop, and honestly a 4+ year old DSLR is plenty good for a photobooth. It sucks they require you to buy all that gear you probably already own.
They do offer the shell only for $2750.00. It's not very easy to find on their site though. =) http://www.photoboothsupplyco.com/products/basic-shell-only?variant=1380... There is an alternate version from another manufacturer called a T-11 v2 for around $1100-$1400. You can get it plus the printer stand for $1900. There are many other photo booth kiosks out there that offer all kinds of things for around the same price as these full packages. Check out the iClick from Limelight and the Infinite by Photo Party Station.
I'm pretty sure mid range Android laptop would do the same job for a fraction of the price of SurfacePro. Another $1k in savings :)
What Software do they use on the Surface Pro? And which Surface do they provide?
Social Booth from Photo Booth Solutions: http://www.photoboothsolutions.com/socialbooth/
This seems fine for someone just starting out. But it's laughably overpriced for established photographers sitting on an older tablet and camera.
The large group shot shows the deficiencies in the system. Every open air photobooth I've done winds up having some shots with 20+ people. The ones in the back row are so underexposed. Would the strobe keep up with moving everyone back? Would a larger diffuser topple over?
A good photobooth design has to use the inverse square law to account for light fall off. I personally like my lighting source to be off to the side a bit more although I do use a very hard light source directly over the camera from time to time (it's a cool look). The trick to it is you need your light far away from the background. If you set your key light say 20' off the background or the ideal standing location then the single light will light everyone fairly even because the fall off is not so great. The problem with a setup like this is that your camera has to be the same distance as your light which then requires you to zoom in which often lowers your dof. There is a very specific sweet spot between the location of your camera and light to give you the best lighting while maintaining the best DOF.
That's exactly my point. That little 160 W/s Alien Bee is not going to keep up if you move the subjects back and stop down to f/16.
I adapted what you guys do and put everything on one steel stand on wheels: 3x4 softbox, camera with super clamp and ball head, 2400 power pack super clamp on J-hook low for better center of gravity, head, tablet and projector on platforms.
I had to come up with this when a client requested instantly moving from 14th floor river view terrace for drinks to 2nd floor ballroom for dinner.
I cover cabling with black velvet and no one notices anyway when there's a 250W modeling light in their face.
I agree that it is a beautiful product, but it is exorbitantly expensive. I had a "box on a pole" made to my specs by a fabricator and painted by an auto body shop for $400. Total price with a DNP DS-40 printer: $2900.
Mine was built with a Rebel T3, Surface Pro, B400, and I even added a USB speaker to make the voice prompts audible.
Everyone in the world needs to make money, but I feel like buying this would be the equivalent of walking into a car dealer and asking them to charge you more than sticker price.
My DYI Open Photobooth even since I added changed the speed light for a $60 mono light strobe and umbrella for consistency. $300 Tablet, $10 software. it works. my old Canon 60D. made out of cheap wood from home depot.
What software and what type of tablet do you use?
it's an android base software. slrbooth I use an LG GPAD II 10.1 Inch, with an OTG Cable . to make the connection between the camera.
Rudy, that looks awesome! Any chance I could tap you up for a few more details on this?
Sure no problem.
I paid $50 for my shell from ikea, $100 for the new hydrolic standwith extender, $1000 for the sinfonia printer, $40 in misc parts and it's all housed inside. I'm not a fan of placing the printer on the table. Half the magic of a Photobooth is that the pics are taken then come out of the machine. Plus it goes up and down for the kids. Excuse the mess I didn't set up the prop table yet.
nice. looks pretty cool.
Love the review and the product. Great review Jason!
Hi Jason. At the end. Is it worth it? Didnt mention anything about the printing. Those post picture are very ugly photobooth. I rather pay for a very nice design. Thx