If you haven’t taken the time to create presets for editing your photos, you need to. Here is a complete guide to creating and organizing your own presets in Lightroom.
Creating presets that fit my specific needs is one of the best improvements I’ve made to my editing workflow. When you start out, it’s normal to play around with several sliders until you find what you like. However, if you are ever going to be efficient at editing, it’s crucial that you optimize your process and stop taking the time to readjust every slider for each of your photos. There are three fundamental ways you can use presets to improve your post-processing speed.
First, you should be applying a basic preset to your images on import. This allows you to have a much better starting point for your photos. Second, you will want to create a handful of presets to do a broad range of things from adjusting several sliders to specific actions such as raising your shadows. Lastly, you should create brush presets as well. Brush presets allow you to quickly do things like dodging and burning the way you prefer without changing the settings every time you use them. I will show you how to do all of these things, but first, we should cover a few of the basics.

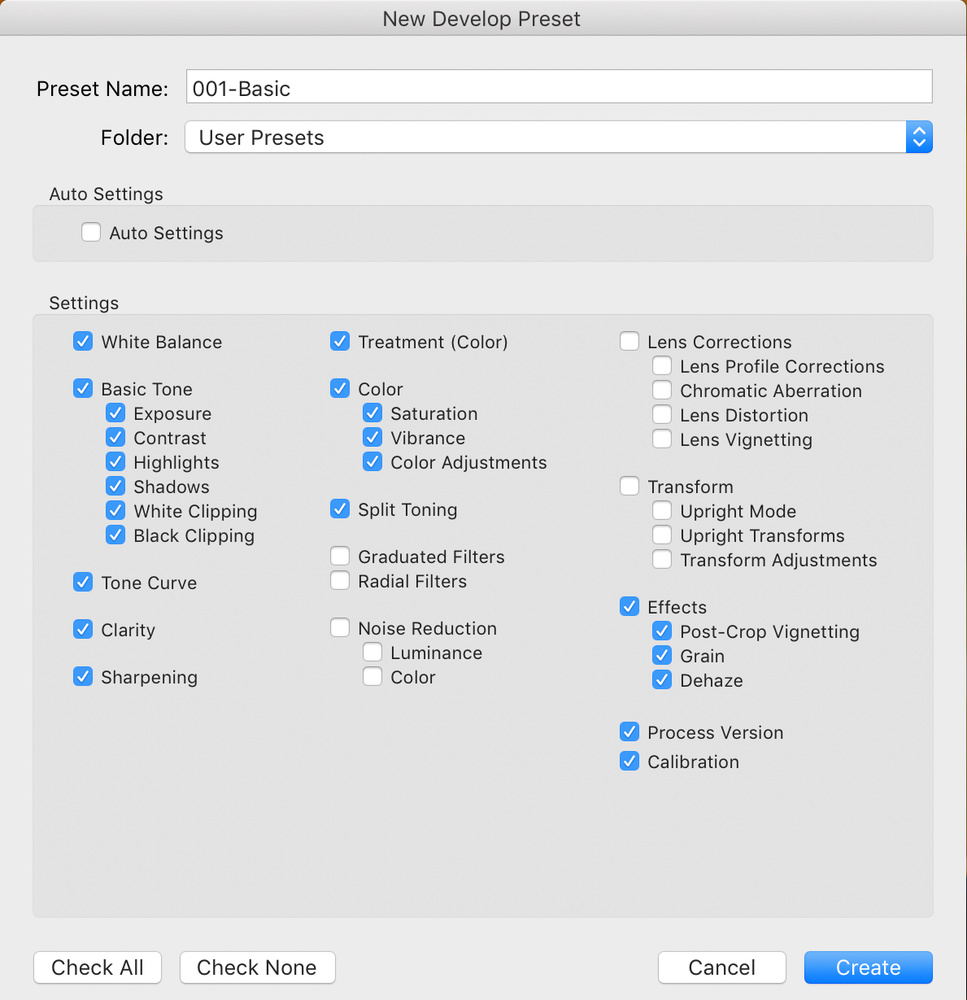
If your presets are arranged in a way that is without structure than they are likely to become another tool that you don’t use. The best way to organize your presets is to name them with numbers first. I use three digits to keep things in order, followed by the name of what the preset does. For example, my most basic preset is named 001-Basic. The rest of the 001-009 series are other general adjustments. I then group all of my presets into groups of tens, so 010-019 are black and white presets, then the next ten are for color adjustments, the following are for split tones, and so on. This allows your presets to be easily found and easy to use.
Let’s start with your most basic preset. It will become the starting point for your future edits. This could be a preset that you have purchased or one that you design on your own. If you want to make your own, then there are several ways to go about it. To create my base, I pulled up several photos from different sessions, edited them, and then wrote down the numbers for each slider on a sheet of paper. Most of us edit the majority of our images similarly. Of course, every photo requires something unique, but we all tend to move towards the same general baseline. I found this to be true for me. I averaged out the numbers that I wrote down and used them to create my starting point.
 I tried out these averages on a few images and perfected them with minor changes. When I was happy with it, I set this as the preset to apply to future imports. To do this, I added the edits to an image, and then under the Develop menu, I selected “Set Default Settings.” Now, Lightroom automatically applies these adjustments to every photo imported into Lightroom. One thing to note is that the default option only applies to a specific camera. If you are shooting with multiple cameras, you will need to set the default settings for each of them individually.
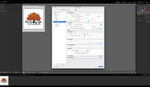
 While you have these edits applied, you should go ahead and make a preset out of it. At the top of the presets menu, there is a plus sign. Selecting this will open a dialogue box to create a new preset. First, you will need to name the preset using the numerical method that I mentioned above. Next, you will need to select which options to apply the changes to. For all of your presets, it’s important to choose only the boxes that are necessary for the change. For example, your primary preset will likely apply to most of your settings. You might have another preset, though, that changes only the contrast. When you make the contrast preset, you should only have contrast selected in the settings and nothing else. If you leave all of the boxes checked, it will adjust the contrast, but will also undo all of your previous edits. Selecting only the minimum amount of options will make your presets stackable. It might sound obvious, but it is a common mistake I’ve seen made.
As the need arises, you can fill out the rest of your user presets. The best way to go about this is to make a list of adjustments that you make often. Don’t come up with anything too crazy that will never get used (like many of the presets out there). I know that at certain times of the year I like to adjust the shades of green away from the intense colors typical in my area. I have a preset for that which I apply to any image where I feel that the greens become distracting. I often find that I think that someone’s skin tone is too cool, so I have a split tone preset only to adjust the color of the highlights. Find things like this that you often notice, and make a preset for it. You’ll be surprised by the amount time you save.
 The last thing that you will want to do is create your brush presets. These are very easy to make. When you open the brush tool, you can adjust the sliders how you want. When you have the desired settings, click on the name of the preset and towards the bottom, select “Save Current Settings as New Preset.” Name it using the numerical method I outlined earlier. Even though Lightroom comes with several of its own presets, I don’t prefer them. I made my own presets for things like teeth whitening, skin softening, dodging, and burning. When I created my own presets, I found that I used the brush tool much more often than when Adobe’s presets were the convenient choice.
Creating presets performed wonders for me in both editing speed and accuracy. I still make minor tweaks to all of my images, but 90% of my work is done quickly with my presets. It will take a few days to get used to, but after a short time, it’s normal to look at an image and know what presets need to be applied. The combination of utilizing quick settings that fit my style, as well as the purchase of a few helpful tools, have allowed me to cut my editing time to nearly half of what it was before. If you want to improve your editing workflow, using your own unique presets is a great place to start.