
Creating drama with your edits can be challenging, especially if you are short on time and don’t have the resources to sit in Photoshop all day editing a single photo. Using this technique has simplified my workflow and enabled me to make images stand out with very little effort.
Sometimes it can be difficult to know how good an image will look once it is finally edited and you might spend hours editing just to find out it isn’t up to your standards. A trick I’ve found to be very helpful is simply thinking outside the box with Lightroom’s Radial Filters. At first I started using this technique to do quick 5 minute edits on an image to get an idea of what they would look like without having to take an image into Photoshop to create luminosity masks, blend layers together, paint light, etc. If I liked the result then I might mark that image to be edited further using more time consuming techniques.
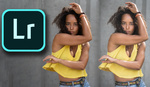
Over time I started using this technique more frequently, especially on photos that I categorized as “social media quality” but not portfolio worthy. The difference being the shots I put into my portfolio are more selective, oriented in landscape, and have an entirely different approach than photos I edit for Instagram. This technique is absolutely fantastic for doing quick edits when you need content for your social feeds, but is also powerful enough to create portfolio worthy images. Let me start off with what we are working with:

The first thing you should notice is that this shot already had quite a bit of mood but it’s extremely flat and has no range in light. This is a prime example of a shot that I might skip over when going through my selections; I saw the unedited photo and thought it was too lackluster to put any time into. Going through my images again, I spent 2 minutes just doing a very quick and dirty edit to notice the potential in the image.
Basic Edit

Basic Edit
The first thing you should do is your typical basic edit which will always be different based on the photo and your style. I tend to edit very lightly in most cases but as you can see here I have the Clarity all the way to 48 which is extremely high for me, sometimes you have to break your own rules though!

Darkening Your Image
The next thing I want to do is darken the entire image. This way when I add the radial filter, I can basically use it as a controlled light source to create the range that I want in my image. You will likely come back to this step to create the right balance in your image so don’t worry about how dark it is initially. For now I just dropped the exposure down by 1 stop.
Add Radial Filter

How to Zoom Out of Your Photo
The first thing you’ll want to do is zoom out to 1:8 or 1:16 in Lightroom. Once you zoom out, select the radial filter icon to create your filter. The settings don’t matter at first because we can edit them any time but let’s start out with +1.00 Exposure, Feather at 80 and make sure Inverse is selected.

Shaping Your Filter
The key is to make sure the shape of the filter is quite long and narrow, this is to resemble how light would naturally hit an object. The next step you want to do is to position the “light” where you think it looks best.
Creating Your Light

Adjusting Your Light
Once you do that you can zoom back in and change the settings of the filter to what looks best to you. A few tips for this are to make sure you have some amount of negative de-haze. This helps create a glow effect to make the light look more natural. Typically I adjust the whites/highlights more than I do any other settings because those are the areas that would get affected by light the most. It just so happened in this example that adjusting the shadows gave me the desired result. Another important tip is that I typically have the center of the filter off screen to mimic the light source being out of the frame (as the sun would be). I didn’t do that here because I wanted the effect as close to El Capitan as I could get which results in my whites being far too bright which we can easily fix!
Refine Your Light

Select Erase Brush Within the Radial Filter
While having your radial filter selected go to the Brush tab located next to New and Edit. Do not get this confused with the Adjustment Brush in Lightroom. Once you have it selected go down to the bottom of the menu to select the type of brush and choose Erase. Pick your desired settings; I usually use a large brush size, a decently high feather, and around 50 flow for this. You can turn auto-mask on if you are trying to avoid a pronounced area in your image.

Results of Erasing Areas of the Filter
I gently went over areas in the image that were too bright with the erase brush and brought back some of the detail in the sky. This part is totally up to you as you might be trying for a very high-key look where the highlights are blown out. You can use this to control the light from the radial filter even further if you desire. An amazing part of this tool is that if you decide to erase an area of your filter and then move the filter around, the area you erased remains unchanged.
Final Results

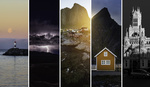
Above is the final image. One little change I made after adding the radial filter was to bring down the saturation of the blue sky. I found the bright blue to be distracting from the image overall. You may have to go back and forth to find the correct amount of light you want to apply to each of your images depending on your subject. Try moving the radial filter around, adjust the settings, and ultimately get creative with your edit. Here’s a few more edits I’ve done using radial filters to bring to life some of my images just using Lightroom:
Other Examples


I’d love to see some of your results in the comments or simply let me know if this helped out your creative workflow. Thanks for reading and feedback is always welcome!


This is a very useful article Alex. Thank you! I'd really like to see more stuff like this on Fstoppers.
Thanks Michael, going to try my best to keep making them!
I'd never understood the radial filter until now, thanks a lor Alex!
It actually has lots of uses if you get creative with it! Thanks for the kind words :)
Brilliant....
Great tip, keep up the great work!
Nice! I can see this being very useful. Awesome tip.
This is a great tip, I'd never thought of using them that way, thanks for sharing!
More soon! :)
I´m also a fan of the radial filter, generally use it on the PS Camera Raw, it adds a "mood" with just a few tweaks.
Nice input, Alex!
Thanks Pedro!
Very informative and well written. I am puzzled as to why you (or the editors of Fstoppers) would title this a LR edit, limiting your audience to LR users, when it works identically in PS. Hopefully others like my self know this is generally true, will read the article and benefit from your excellent tutorial.
Generally speaking more people have Lightroom than Photostop, and those that use Photoshop likely have access to Lightroom or know that PS has the capabilities. Technically I could have omitted the Lightroom part but I felt like it was very much a Lightroom tutorial, and hope that anyone with only photoshop knows that it applies to them. Personally I like using titles like that because many people look for tutorials using software they have, googling things such as "Editing with lightroom" or "Masking with photoshop," etc. Hope that explains some reasoning behind making it a little more specific.
Thanks for the kinds words and personally hope you gained something from it even if you only have Photoshop :)
Nice one mate! Any chance of a youtube video showing how the last photo was edited?
Actually I made a video with that exact image in it but it's not the entire process.
https://www.youtube.com/watch?v=XcdI47TbRWk
If this isn't enough, let me know as I'm thinking about doing an editing series.
Do more videos on this! its cool tip! :D
Cool tip, added some drama here too. Haven't used the radial filter before.
Awesome! Would love to see more Jens
Thanks
Very cool. I especially like the part about extending the filter beyond the frame. Not sure I've ever done that, but I'll definitely try it out now; thanks!