
A dramatically cascading waterfall is one of the most iconic scenes that can be captured by a nature photographer — by any photographer. Here are some tips to get the most out of such a scene, no matter the scale of your subject.
Waterfall photography usually includes a specific protocol: a wide angle lens, slow shutter speed, and shooting from far away to show the surrounding landscape. That arrangement can produce good results.

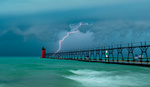
The above image was taken with a relatively fast shutter, 1/160s to be exact. Most commonly, the approach to waterfall photography is to set your camera up on a tripod. Typically one would then wait for either dim ambient light or use a polarizing or neutral density filter to capture the movement at a slower shutter speed. Selecting a fast shutter speed for a waterfall to freeze action can be a nice departure from the "generic" approach.
You have options to make your work stand out. Your own approach to photographing waterfalls could vary, depending on the following:
- Your choice of shutter speed
- The conditions presented to you
- Your artistic vision and goal
- The focal lengths of the lenses you have on hand

While a more conventional waterfall shutter speed of 1/2s was used here, a less common focal length of 100mm was also employed.
You may have come across a small waterfall as part of a creek system, perhaps one that stands only a couple feet tall. This presents a totally different set of challenges from the sprawling nature scenes you typically see. And it also provides the potential for a unique waterfall image, one that is not taken wide angle.
In order to make this compact flowing beauty appear larger and more interesting, you should get as low as possible. This might even include submerging your tripod (*Note: Use common sense when bringing your person and gear into or around water. Make sure to secure your gear and clean and dry off your tripod legs after submerging them, especially in saltwater). You might also try a longer focal length from the standard wide-angle lenses used for landscapes. In the images below, I employed my 50mm Nikkor prime lens. A shutter speed of five seconds allowed for the smooth, glossy look that so many nature photographers strive for (and that some despise!).

Cell phone shot showing the setup

Zoomed in on a smallish waterfall, 50mm lens cropped. 5s f/20 ISO50
After close examination of the image above, it might be obvious that those are sticks and not branches poking out through the water. This made for an interesting capture and possibly even pleasantly tricked the viewer's eyes with an illusion of scale.
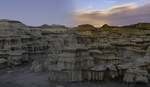
Let's say you'd like to show a little more of the scenery. If you were to back up a bit and not crop the photo as I did with the above image, you might end up with something like this:

It's no Icelandic mountaintop, but it will do.
Summary
When you approach a waterfall, you have many options: adjusting shutter speed, framing, or focal length, to name a few. For your standard large-scale waterfall capture, you can always take the more traditional approach. But if you ever encounter a smaller waterfall, getting low and using a longer lens can provide a distinctive approach to an impressive image.
Do you have any additional tips for capturing waterfalls? Please share them in the comments section below.


It is strange you didn't mention that waterfalls are best captured with overcast skies, to avoid blown highlights in water and ugly shadows of sticks and branches. Less light also helps getting longer exposures.
I was focusing more on creating a unique compositional approach. But everything you said is true, thank you for sharing your tips.