Removing ambient noise, like air conditioning, computer fans, or even modeling lights in Adobe Premiere is a breeze if you have access to Adobe Audition. It only takes mere seconds.
When I'm working or filming tutorials on the go, I don't always get a chance to remove unwanted ambient noise out of the room. This is especially true if you're editing on the go, like when you're working out of hotel rooms or inside your car. Technology then has become my saving grace, more specifically using Adobe Audition in conjunction with Adobe Premiere.
In a couple of short steps, I have the ability to remove air conditioning noise, wind noise, or even my computer fan in about thirty seconds - if I wasn't slowing it down for the tutorial. If you like to shoot tutorial videos or behind the scenes videos, the video above is for you. Consider it your saving grace!
If you don't feel like watching the video however, here's the basics of how to make that happen.
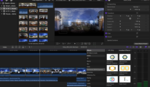
1. Right Click your footage in your timeline.
2. Select Open in Adobe Audition.
3. Make a selection of the area that you want to remove.
4. Press Control + P on a Mac to select the noise you want to remove.
5. Press Control + A to select your whole timeline.
6. Press Control + Shift + P to remove your selected noise from the timeline.
7. Press Control + S to save your changes, which will automatically replace the clip in Premiere with your edited audio.
And done! It's really that simple!
I hope that comes in handy for those of you editing video!


"if you have access to Adobe Audition"...
Your title is misleading. You're better than this.
It was late, I was exhausted. But, I hope that you learned something regardless. ;)
Is this the same as profiling the noise through Audition's noise reduction effect and then applying that profile to the entire selection? That's how I remove noise (learned it back when Audition was essential Cool Edit Pro). If it is the same, does this method give you the dialog box to adjust the noise floor and decibels you want to decrease the noise? I'll have to try these shortcuts tomorrow when I'm back in the office.
The way you showed this was quick and simple, but not always the best way to do things. If you have a very tricky noise that covers a range of frequencies, then you might end up with too aggressive a cleaning pass resulting in robotic or underwater sounding voices. This is especially the case with broadband noises, like wind or a fan. Sometimes, a multi-pass technique is required, where you tackle the low, mid, and high frequency separately, and apply a varying amount of noise reduction. I made a tutorial about that a while back...and I hope it's okay to share it here. https://www.youtube.com/watch?v=tMC1OJl2v_k
To be fair he did say quick method which suggests not the most effective for troublesome audio. Sometimes it's good to know the simple method for the not so noisy audio. Thanks for sharing the more advanced method.