Most landscape and cityscape photographers prefer to have images that are void of tourists, traffic, and other distracting elements in their scenes. One way to remove these eye sores is to meticulously clone them out in Photoshop, but what if there was a way to get a scene to look empty with a single exposure all in camera? Today I explore using a 15 stop neutral density filter for the first time.
How to Increase Your Shutter Speed
Neutral density filters are specialized filters that increase the number of stops necessary to correctly expose your image. Why would you want to added extra stops? Lowering the amount of light entering your camera will allow you to use longer shutter speeds, and longer shutter speeds increase your ability to smooth out moving water, remove people wandering through your scene, and even cause clouds to have a dreamy motion effect. No matter what effect you are looking to achieve, if you want longer shutter speeds, especially in bright situations, adding a neutral density filter is the best solution. The strength of the ND filter you need depends on a few things including your ISO speed, your aperture setting, and how long you want your shutter to remain open.
Let's first explore how changing your ISO affects your camera's exposure. By lowering your ISO setting to say 100, your camera's sensor will be much less sensitive to light. This in turn will allow you to drag your shutter longer compared to an equivalent exposure with a higher ISO setting. Next we can stop down our lens's aperture to reduce the light entering the sensor even more. If you shoot at f/8 instead of f/5.6, you can drag your shutter twice as long. Most lenses can stop down to f/16 or even f/22 but this comes at a cost. Your lens will actually become less sharp due to diffraction as you stop down past a lens's "sweet spot" which typically is around f/5.6 — f/11. So while you can definitely slow your shutter down by stopping down all the way to f/22, the image quality in your photograph might actually be worse than if you shot the same photo at f/8.
In an ideal world, most landscape and cityscape photographers are going to want to shoot at their camera's lowest ISO setting and set their lens to f/8 to maintain the maximum sharpness that produces depth of field necessary to keep most of the frame in focus. However, without introducing a neutral density filter to your camera, the resulting shutter speed for a correct exposure will typically be between 1/60th of a second to 1/8th of a second if you are shooting in daylight. In order to blur out distracting elements, you are probably going to want an exposure that requires a shutter speed of anything from 1 second up to a few minutes. If you just want to blur moving water, you can probably get away with exposing your scene for a few seconds, but if you want to blur slow moving clouds, you might need as much as 5 to 10 minutes to get the required effect.


The before and after above show the difference between a 1 second exposure and a 30 second exposure. Landscape photographer Elia Locardi took these images in his Photographing the World 3 tutorial, and as you can see, he was easily able to smooth out the water and streak the clouds in the sky by using a 30 second exposure.
My Attempt at Long Exposure
To be 100% clear, I am not a landscape photographer by any stretch of the imagination, but I do enjoy taking photographs of cities and iconic landscapes when I do travel. So when the filter company Polar Pro sent us a few of their new Quartz Line Neutral Density Filters, I was curious what sort of results an amateur landscape photographer like myself could get in a real world situation. As mentioned in the video above, Charleston doesn't have any of the amazing topography you might find in an exotic mountain location, so I decided to photograph one of the most iconic landmarks in my city which is called the four corners of law. The only problem with this location is that it is filled with tourists, carriage tours, and of course slow-moving local traffic.

The two specific filters Polar Pro sent us were the ND100k which is a 15 stop neutral density filter and the ND1000PL which is a 10 stop neural density filter with a polarizer attached to it. Since I wanted to see what an extremely long shutter could do in this busy scene, and there was very few reflections to polarize, I decided to use only the ND100K filter. Before attaching this crazy 15 stop filter to my camera, I wanted to see what the longest shutter I could achieve with just the camera itself. Since the Nikon D850 has an extended ISO of 32, I was able to squeeze a few extra stops out of this camera than other camera's that only go down to ISO 100. Next I set my Tamron 24 - 70 2.8 lens down to its smallest aperture which is f/22. With these two settings, the longest shutter speed I could get while maintaining a fairly balanced exposure was about 1/8th of a second. As you can see in the before and after images below, there was no way 1/8th of a second was going to be enough to remove all the people and cars from my scene.


All of the photographs I wound up taking with the 15 stop filter were around 4pm. I thought this would be bright enough to give me a long shutter speed but I didn't anticipate the shutter speed to be around 8 minutes at f/8 and ISO 32. If you want to achieve this same effect later in the day, you might want to use a less dense filter leading up to the golden hour, and then around sunset and the blue hour you can probably get away with achieving long enough shutter speeds with your camera alone. All that being said, had the light in this scene been harsher without the partial cloudy skies, I think my exposure could have been in the 2 to 4 minute range. Of course without any clouds, my skies would have been extremely blue and quite boring. It's also interesting to scroll back and forth between the two images above to see how little color cast was introduced by adding the ND100k filter. We did a big neutral density filter shoot out a while back and from the looks of this test, the Polar Pro filters would have stacked up quite well against the other filters in that video.
As you can see in the after image above, having a shutter speed of 8 minutes wasn't quite long enough to completely blur out the cars stopping at the intersection. To try to blur out even more of the traffic, I decided to stop down to f/16 and increase my shutter to 14 minutes. The resulting photograph gave me the results I was looking for although it still isn't absolutely perfect. There is a sense of contentment getting a photograph like this all in camera without having to blend multiple frames or trying to clone out dozens of distracting cars and people. To give the final image an interesting effect, I wound up adding a black and white film effect to the 14 minute exposure with one of my favorite Photoshop plugins: Alien Skin Exposure X3.

14 minute exposure, f/16, ISO 32
All in all, I think a 15 stop neutral density filter is something every landscape photographer should own. Slowing your shutter down to 4 minutes or even 16 minutes is simply not possible without one, and it's a pretty pretty cool trick to have up your sleeve when the situation calls for something a bit different. It's also pretty cool waiting a significant amount of time and then getting that pleasant surprise after the exposure is complete. It kind of reminds me of developing film and finally seeing how everything turned out. As I mentioned in the video, I plan on exploring time-lapse photography with extended shutters to see what sort of effects you can get with moving photos so stay tuned for that. Feel free to post your own super long exposure photos in the comments below as I'd love to see what is possible from those who do this more often than me.
You can get you own PolarPro ND100K 15 Stop filter by clicking here.


Another good trick for removing people from photos is to take a bunch of photos of a few minutes and stack them using median.
It will remove any minority discrepancies (moving elements) and replace them with the majority (static elements).
Of course you don't get cool LE skies that way though :)
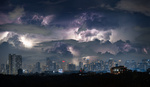
10-stop ND filter at around sunrise. (Austin Texas) 24mm, f/11, 200s, ISO100
They both have advantages and disadvantages. Time to hit the youtube videos! ;-)
I was surprised by the small price disparity between sizes. I've been thinking about a 15-stop ND but will wait for a use. It's kind of annoying to buy something "just in case" only for prices to go down or technology go up before you actually use it. I have ND's from 1-stop to 10-stop to get me by.
Just did the same approach taking this photo in Cartagena Spain. I wasn't going for completely removing people for the shot but I wanted to minimize the impact of the people walking by while also blurring the fountain water.
Good article
Just curious Patrick, I see that you were using the D850, Did you close the viewfinders window using the little shutter button? Not sure that would make much of a difference. Do you recommend covering the Viewfinder window with a piece of tape, if you don't have the D850? What about Time-Lapse?
I didn't close the view finder or put tape over it. I always knew that's what the viewfinder shutter was for but I forgot to use it. All in all I don't think the exposure was affected by the ambient light entering the view finder at all.
How do you calculate the exposure after attaching the nd filter? Do you derive it from the base exposure value obtained without lens or the camera does it for you? sorry for this dumb question.