
My biggest post-processing challenge in photography is image noise. Unlike studio photographers who can precisely control every aspect of lighting, I've been photographing most of my campaigns handheld in natural light for more than 15 years.
I'm a travel photographer shooting regional lifestyle photography for different agencies all around the world. Because of how I shoot and travel, including the desire to be less conspicuous for my own safety, working with strobes generally isn't appropriate for me. My primary light source is the sun in the golden hour, and my style is very breezy, natural, and spontaneous, which means I sometimes shoot at higher ISOs.
Why Shoot With High ISO?
Simply stated, higher ISOs dial up the sensitivity of your image sensor. When the right combination of aperture and shutter speed isn't enough to achieve a proper exposure, bumping up your ISO to handle low-light conditions is a given.
The purists will argue: Why not add some artificial light to the mix, instead? Higher ISOs degrade the quality of your photo.
But controlled lighting is not always an option. Flash photography is often banned or unfeasible in certain environments. Can you imagine popping off a flash during a sacred wedding ceremony or climbing a tree in the wilderness to set up a nice rim light for a perched eagle?
Many wildlife photographers, wedding photographers, photojournalists, and lifestyle photographers can relate: when your job is to capture — rather than create — authentic moments, there will often be some trade-offs to achieve the shot.
The Problem With Higher ISOs: Image Noise
Shooting in low light with higher ISOs will introduce noise in the resulting image. Intentionally applied grain, like what you get from nostalgic old-school film, can be a beautiful aesthetic choice.
But unwanted noise can be quite extreme, and the detail in your photos will suffer. Some high-end cameras certainly handle noise better than prosumer models, but every high-ISO photo could be improved upon with the help of noise reduction tools in post-production.
Discovering the Best Noise Reduction Software
A few years ago I started a side project photographing musicians in Madrid. The shots were very casual — at night, in the city center, discovering locations on the fly, making use of ancient architecture, and using whatever ambient light was bouncing around the streets.
Shooting artistic portraits helped stretch my creativity beyond the commercial photography I shoot in the day, and since the photos were designated for low-res Instagram posts, I was able to focus more on the mood and feeling rather than precision output.
Then, the career of a jazz singer I regularly photograph took off, and suddenly, the work I had produced was being printed onto full-size posters and shown on Spanish TV. Awesome! But that meant reprocessing some of those low-light high-ISO portraits to a cleaner commercial standard suitable for high-resolution display.

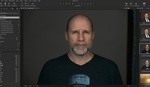
This is what image noise looks like at ISO 6,400
As a lifelong Adobe fan, I've had limited experience with other photo apps and plugins. Between Photoshop and Lightroom, what more could you need?
Unfortunately, I learned Lightroom doesn't quite cut it when you're working with heavy noise. My goal was to achieve a silky-smooth background (which required pushing the Luminance slider way up) without losing texture in the details. Here was the result in Lightroom working with my ISO 6,400 portrait, which needed to be prepped for a large-format print:

Lightroom effectively turned this ISO 6,400 portrait into a watercolor painting.
I needed something more powerful than Lightroom. A photographer friend recommended DeNoise AI by Topaz Labs to solve my noise issue, and I gave it a try. I only needed a light touch of the noise reduction and sharpening sliders before the noise was fully corrected. As you can see, the DeNoise AI results were quite good:

Even at ISO 6,400, Topaz DeNoise AI was able to achieve a smooth, noiseless background while retaining excellent textures.
The noise reduction output with DeNoise AI was exactly what I was looking for: a smooth, noise-free background without obliterating skin and hair texture. Here's a comparison alongside the Lightroom output and the original noisy image:

I used the minimum-strength noise reduction required to smooth the background in this photo. In Lightroom, the skin and hair texture were destroyed. In DeNoise AI, the details are perfectly retained.
Further testing with DeNoise AI showed that it continues to outperform Lightroom's noise reduction even with less extreme noise issues. This tight crop of an ISO 1,250 photo looks sharper and more defined after running it through DeNoise — note the skin texture, the sharp hairs of the mustache, and defined lip.
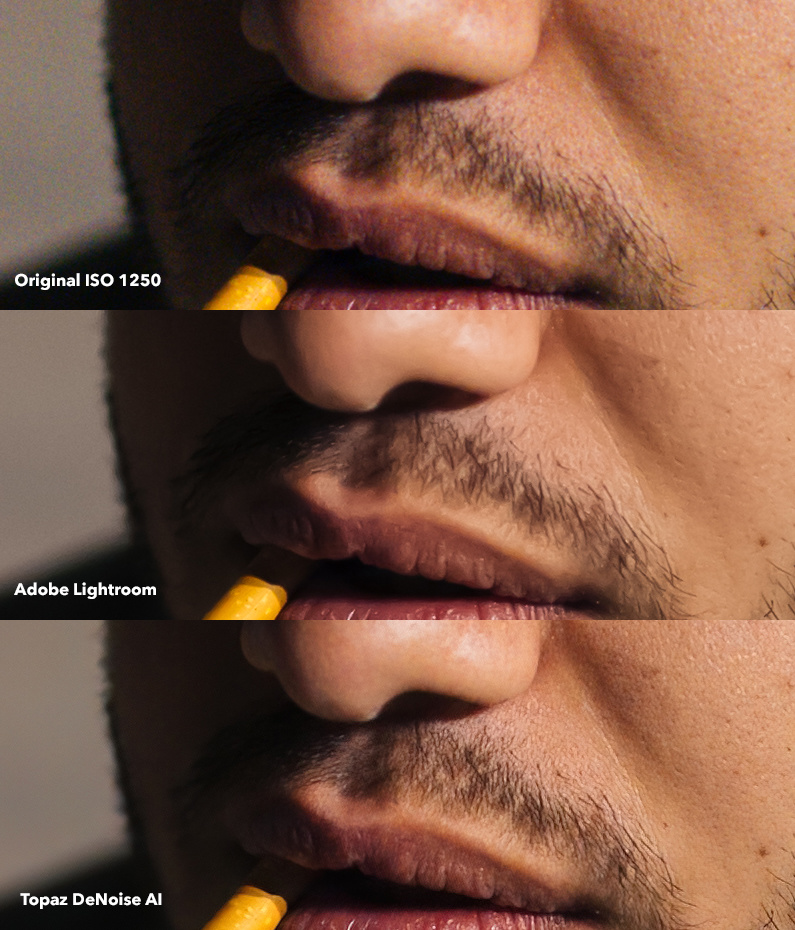
Even at less extreme ISOs, Topaz DeNoise AI outperforms Lightroom with its AI-powered technology.
I was so impressed with these results that I looked no further. DeNoise has been my go-to noise reduction application since discovering it last year.
I reached out to the CEO of Topaz Labs last summer to chat more about the technology and ended up partnering with them to supply ongoing images and feedback for all of their AI-powered photo editing applications. When they recently asked me to check out their latest beta of DeNoise, I decided it was high time to take a deep look at other popular noise reduction solutions. Do other applications offer better noise reduction, more intuitive editing options, or a better workflow? Let's find out. On to the challenge!
The Image Noise Reduction Challenge
For this challenge, I'm going to work with a terrible photo — a handheld indoor snapshot taken at ISO 6,400 from a Canon 6D. I chose to use my family's rescued parrot for this example so we could test noise reduction possibilities on the most challenging elements: eyes and feathers with a heavy blanket of thick color noise.
I'll share my results below, but you're welcome to see for yourself. For testing purposes, you can download and work with my cropped TIFF file, a cropped JPG, or the original CR2 raw file. All of the applications reviewed below offer free trials, so you can try them all out and see which works best for you.
Test Image: ISO 6,400
I'll attempt to get the best results from each application under the following guidelines:
- Increase noise reduction strength until noise is substantially removed from the background
- Sharpen, if available, without introducing artifacts

Noise Reduction Challenge Image: 1/1,600 sec at f/4.0, ISO 6,400, 85mm
Adobe Lightroom
Website: Adobe Lightroom
Price: $9.99/mo USD
Pros: Robust industry-standard raw photo editor
Cons: Noise reduction can soften details at higher ISO, software is only available by monthly subscription
Lightroom is my default raw image editor, and it's served me well for many years. While generally, the noise handling does just fine, I've found that increasing noise reduction to accommodate heavier noise muddles up the image.
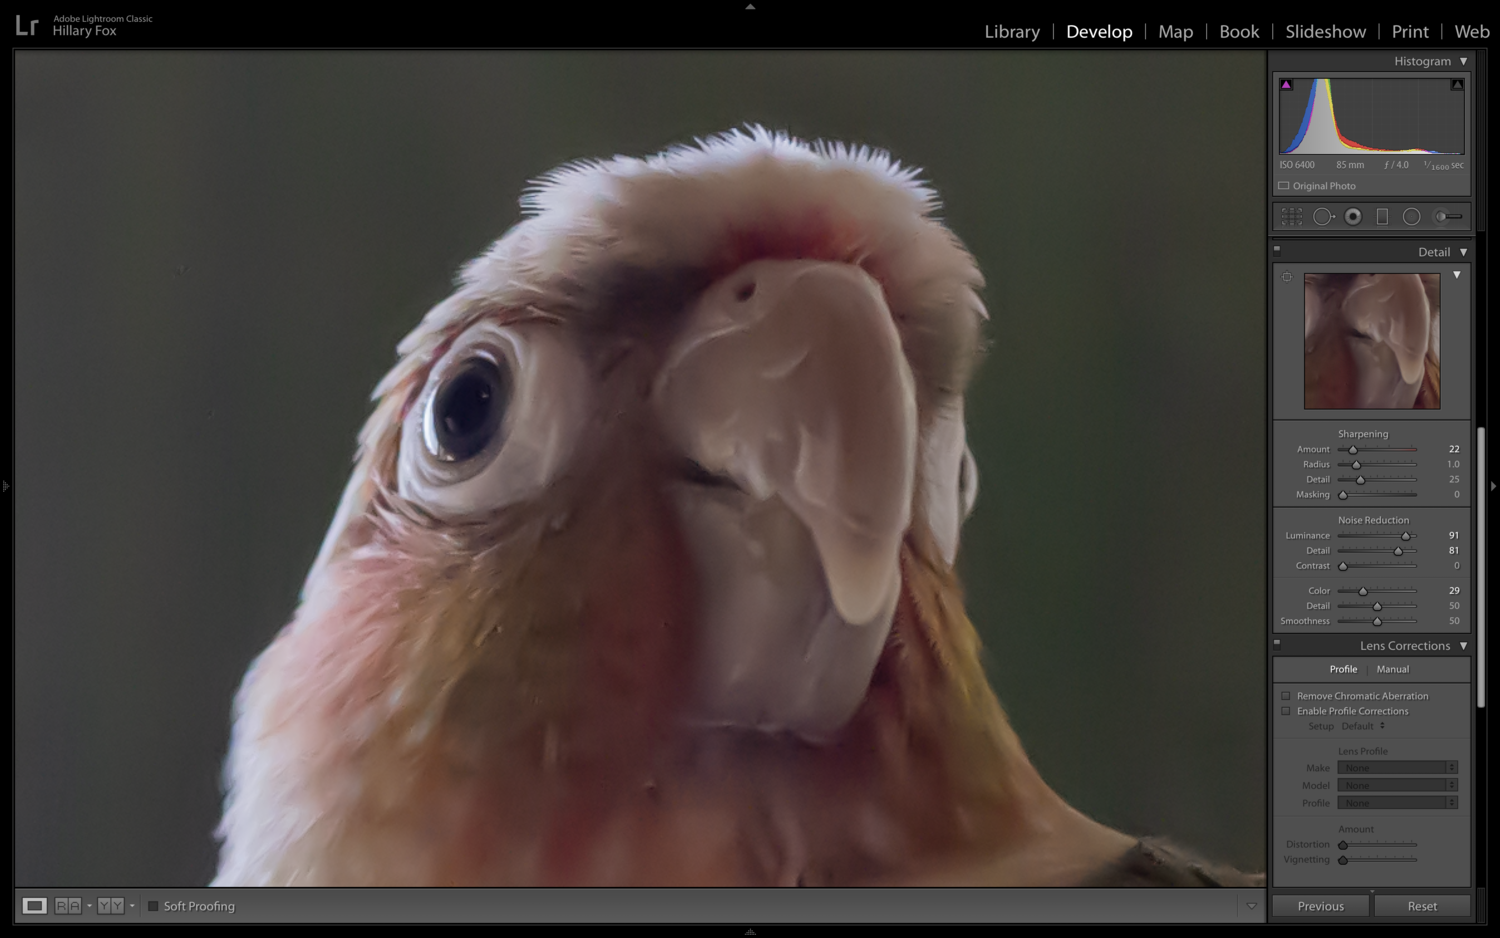
Adobe Lightroom Interface
Working with the raw CR2 file with some minor exposure adjustments, I had to pump up the Luminance slider quite high to smooth out the noise, and the result was a more buttery texture in the foreground. Sharpening was limited before artifacts became too extreme. Here's the final output:
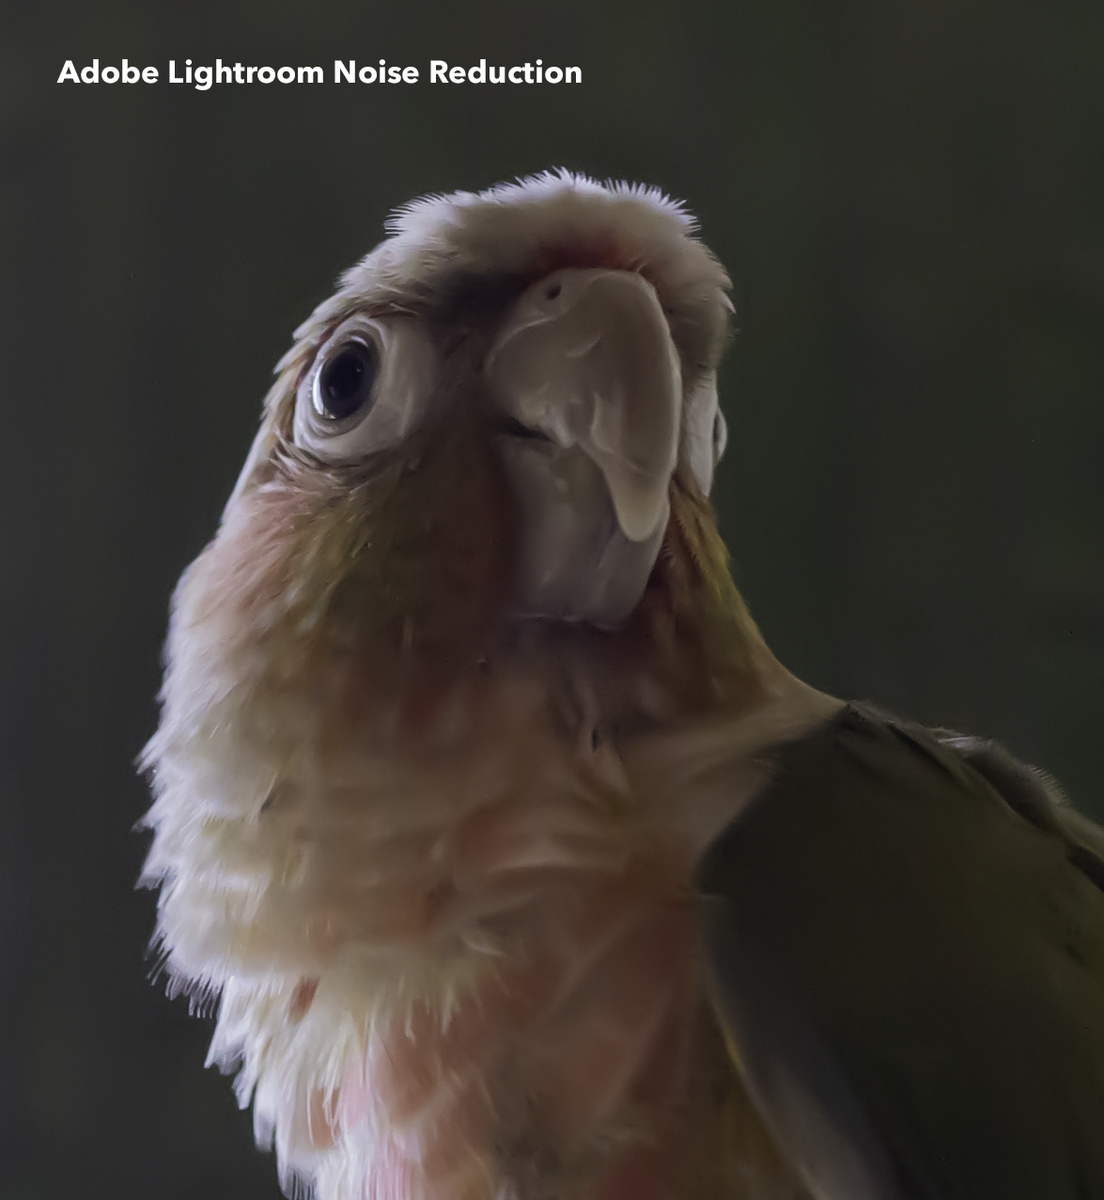
Adobe Lightroom Noise Reduction Output
Topaz DeNoise AI
Website: Topaz Labs DeNoise AI
Price: $79.99 USD
Pros: Cutting-edge AI-powered software with exceptional noise reduction, easy-to-use interface
Cons: Resource-intensive application can run slow on less-equipped computers
DeNoise AI can be launched as a plugin or a standalone application. I loaded up a TIFF from Lightroom and made my adjustments.

Topaz Labs DeNoise AI Interface
I only needed about 30% power on the noise reduction slider before the background was clean. I was able to ramp up the Sharpening slider to 100 without any artifacts to help bring in detail from the feathers. Using the Recover Original Detail slider, I brought back some of the texture. As always, I was impressed with DeNoise AI. The results are sharp and clean. Take a look:

Topaz Labs DeNoise AI Noise Reduction Output
DxO PhotoLab 3
Website: DxO PhotoLab 3
Price: $129 USD
Pros: Feature-rich raw photo editor
Cons: Prime noise reduction tool is difficult to visualize, making precision output a challenge to achieve
DxO can also handle raw files, so I launched the original CR2 file and got to work.

DxO Interface
Working with DxO is a little tricky. I adjusted the curves since the original raw file was quite dark and used their PRIME mode for the best noise reduction algorithm they offer. In the screenshot above, these were my final adjustments just before export. As you can see, the full-screen preview doesn't reflect my final output below — the noise reduction effects are displayed in that tiny thumbnail to the right. It was difficult to fully gauge my adjustments. I used a touch of Lens Sharpness and Unsharp Mask, and the final output came out better than Lightroom, but on closer inspection, you'll see some strange artifacts around the perimeter of the bird and an overall blockiness:

DxO Noise Reduction Output
Neat Image
Website: Neat Image
Price: From $39.90 USD
Pros: Noise reduction tool with detailed adjustments for refining output
Cons: Low-quality output for higher ISO photos, nNo support for raw files
Neat Image is a standalone app, and while it doesn't work with raw files, I was able to launch a TIFF.

Neat Image Interface
Once you set up your profile and switch into Advanced mode, you'll find Neat Image has a wide variety of noise reduction tools. Dialing down any of the Frequencies sliders reintroduced noise, so I kept them ramped up to 100%. I tweaked the Sharpening levels to try to improve the thickness of the detail, but this is the best output I could get:
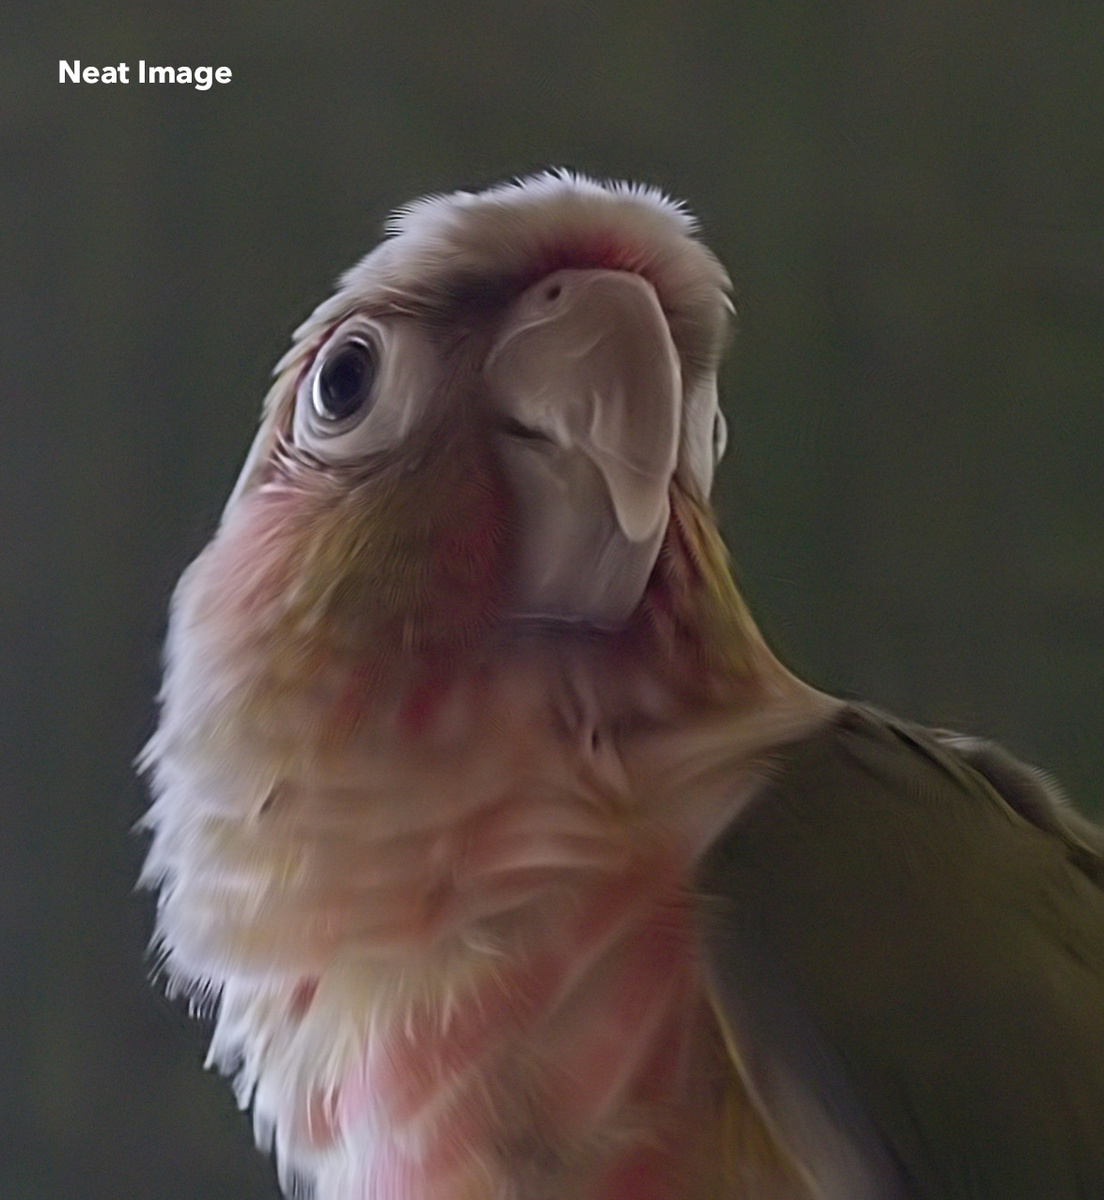
Neat Image Noise Reduction Output
Dfine 2
Website: Dfine 2
Price: $149 USD (Included in Nik Collection 3 plugin suite)
Pros: Minimal plugin for quick and easy noise reduction
Cons: Poor-quality results with high-ISO photos, limited options to refine output
Dfine 2 can be launched from Lightroom as a plugin, so I imported a TIFF.

Dfine 2 Interface
The options here were surprisingly limited (no sharpening tools), and the output quite poor. The entire image looks like it's underwater. I had hoped that the output would be better than the preview. Nope. Dfine 2 couldn't maintain any detail with its noise reduction tools:
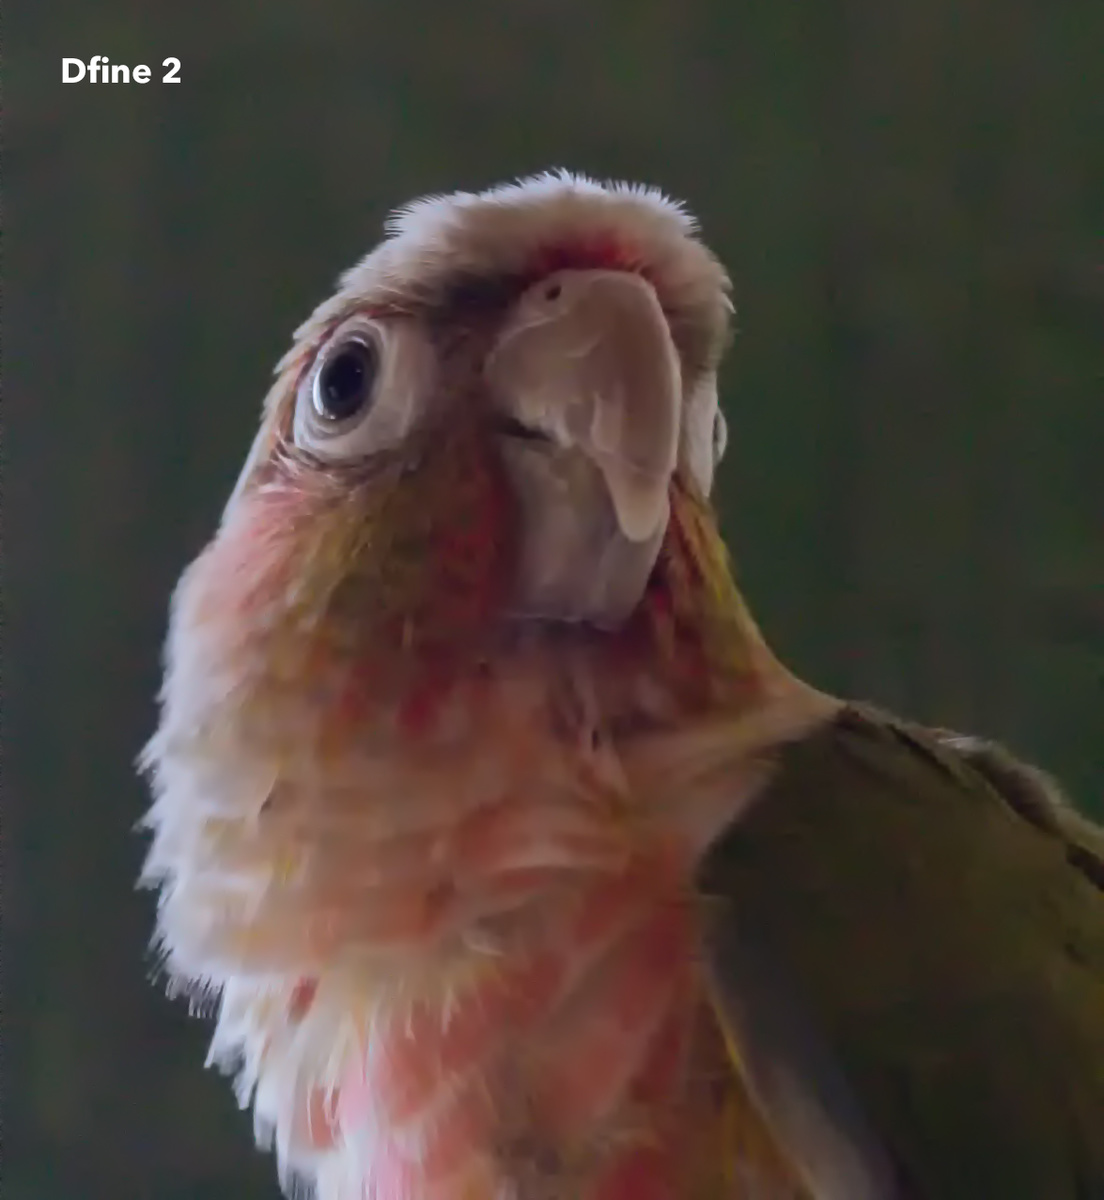
Dfine 2 Noise Reduction Output
Capture One
Website: Phase One Capture One
Price: $349 USD or $24/mo
Pros: Powerful industry-leading raw photo editor
Cons: Noise reduction capability is not as powerful as other features
Capture One by Phase One is what professional photographers use as the most common alternative to Lightroom. I work with a big team of commercial photographers in South Africa, and they all swear by Capture One for its raw handling and superior color output. I loaded up a raw file and gave it a shot.

Capture One Interface
Capture One's noise reduction tools are similar to Lightroom's, but the results fell flat. The details across the image were muddy and the noise wasn't entirely removed. From what know of Capture One's user demographic, I suspect Phase One hasn't felt the need to advance their development into noise reduction. Why would they need to when their users are typically meticulous studio photographers shooting at native ISO? Here's the output:
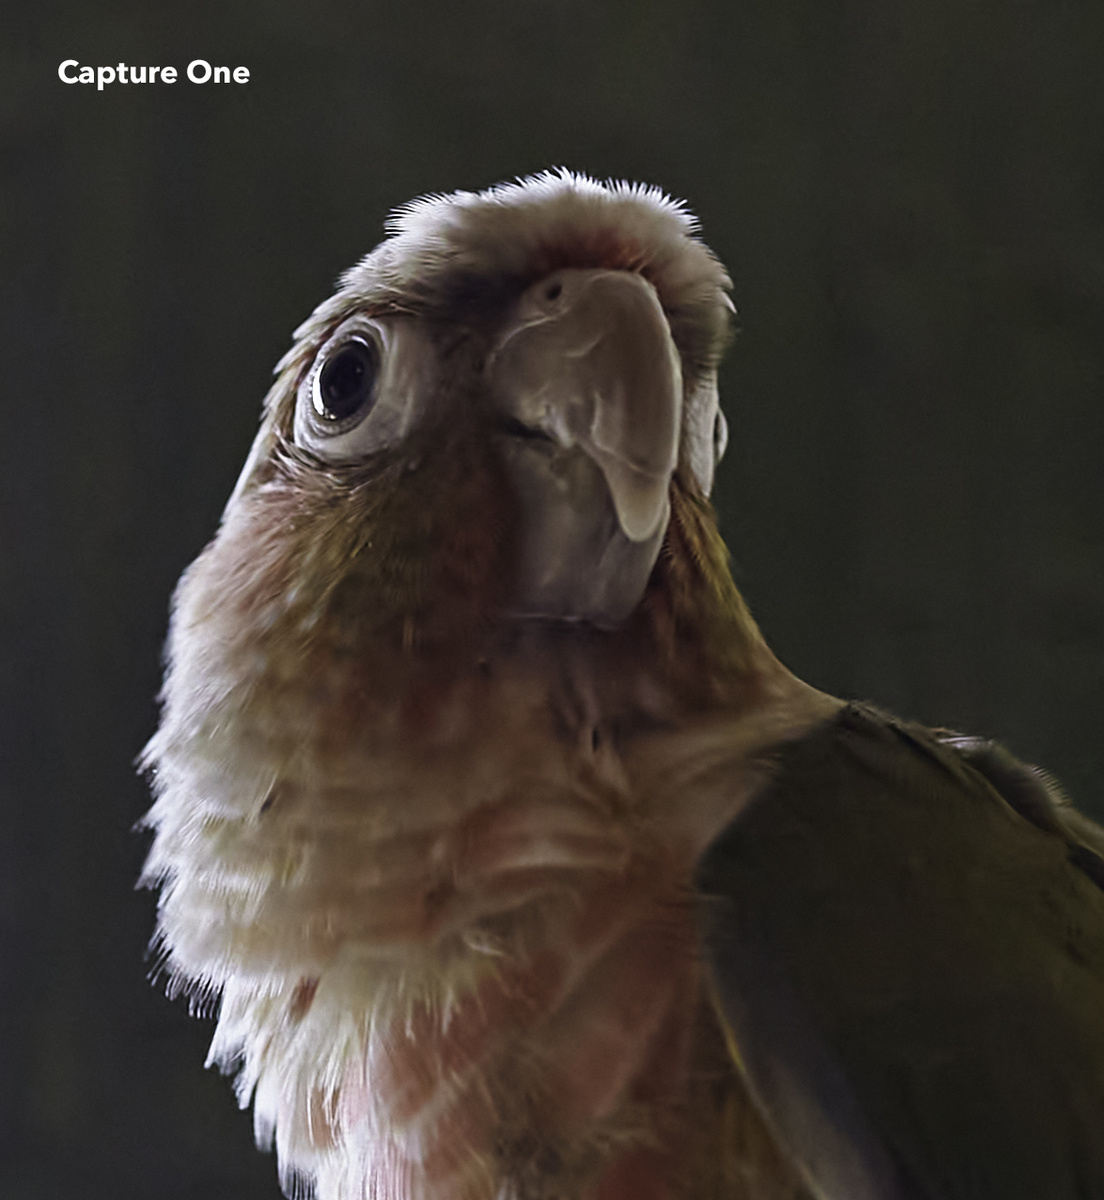
Capture One Noise Reduction Output
Conclusion
We had a wide variety of results with the noise reduction challenge. I'd love for our audience to decide the winner! You'll see our targeted problem areas in our original photo to compare the output across all these applications:
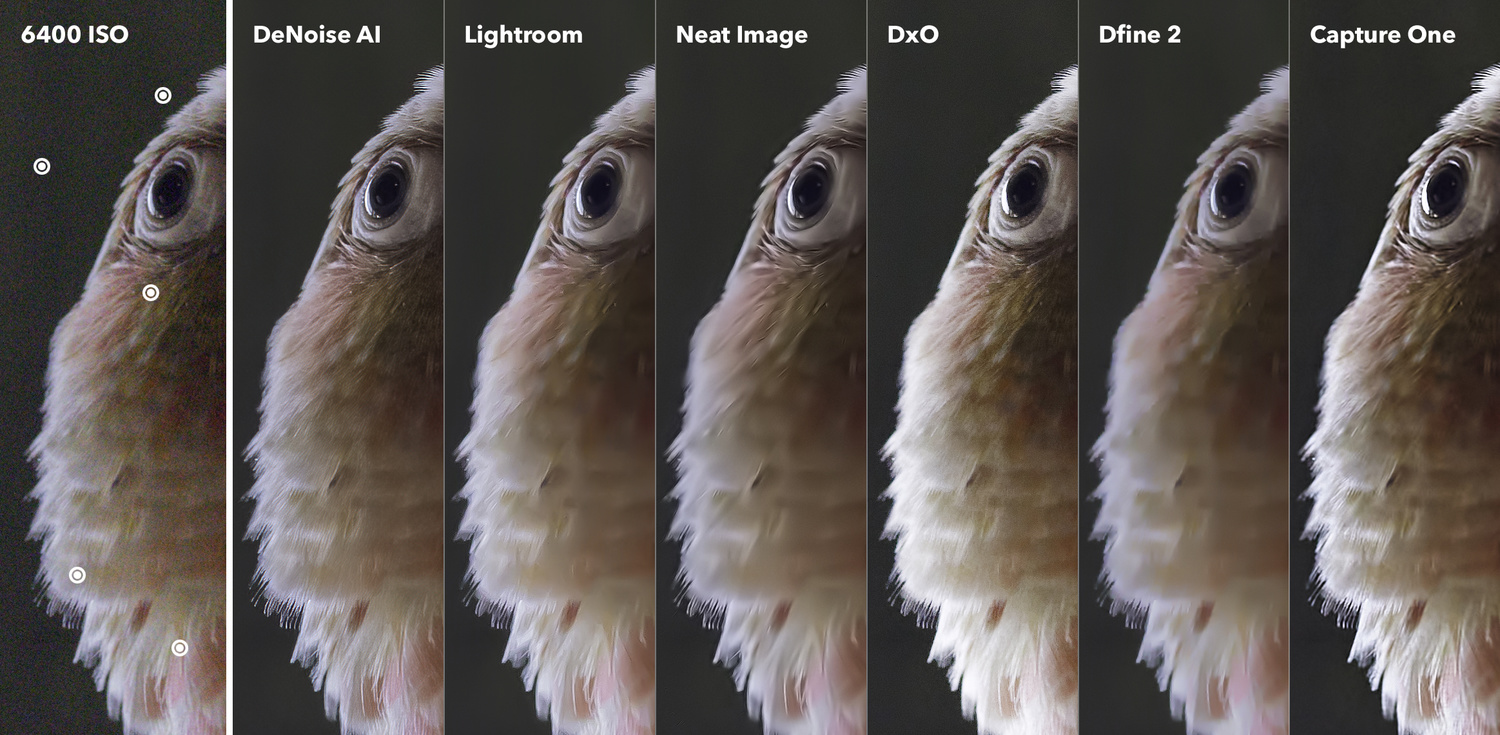
Final Image Noise Reduction Software Comparison
What do you think? Do you have a preferred noise reduction application? Do you use a different noise reduction technique we should explore? Let us know in the comments.
If you're passionate about taking your photography to the next level but aren't sure where to dive in, check out the Well-Rounded Photographer tutorial where you can learn eight different genres of photography in one place. If you purchase it now, or any of our other tutorials, you can save a 15% by using "ARTICLE" at checkout.


In most digital cameras, you get less DR, more chroma and more luma noise and less pixeldetail, the higher you bump the ISO value. This is either in low light or in good light. The overall result is lower quality of the photo - which is in reality invisible in print or normal viewing sizes on a screen, except in extreme cases.
Denying all this and throwing away the common knowledge that has been lifted out of the film area and applied on digital cameras for mere practicality and crying out it's all about the Lack of Light, makes you not a really fun guy to talk to, I'm guessing.
Bumping up the ISO doesn't have anything to do with low light or "good" (what?) light. You (or the camera) bump(s) up the ISO because you make the sensor "starve". You've chosen an exposure setting (have you listened, it depends solely on shutter speed and aperture), that the camera's lightmeter thinks is not enough to have the desired output lightness (raw image files are not part of the ISO 12232:2019 standard).
I'm wondering why one is offended when the proper physics are menitoned? Since when is it irritating to use the correct nomenclature in a (professional?) photography article, site, comment section, forum, etc.? Analog and digital are different. This pill is not that hard to swallow... :D
No need for expressing your butthurtness and is never too late to educate yourself: https://www.dpreview.com/articles/9698391814/the-ins-and-outs-of-iso-wha... :)
Offended? Me? You're the one cursing and crying out.
It's very obvious that you enjoy telling people that they know nothing. But nothing that I stated is incorrect or showed that I do not understand the concept of changing ISO on digital sensors. My point is that if you think your explanation has any real practical use or everyone else is ignorant, you're just being a smartass.
It's like replying to someone who says they like that beautiful red color on a car: "No you are wrong, the proper physics are saying that the photo-receptors in the retina of your eye are sending color info to your lateral occipital complex and activate parts of your reward and pleasure centers."
It's also funny you point to a source, a website that talks about the image quality of high & low ISO's in each and every camera review. Like any review of any digital camera ever. To answer any questions anybody has, about how camera X performs at high ISO vs camera Y. If every other photographer and gear website uses the same concept to describe ISO and how it effects image quality, you might start to think you should hold back a bit and reconsider the value of your "proper" explanation. Or at least the time and place to bring it up.
Box film ISO is of course also just an interpretation based on commercial or creative motives of a native intended ISO of a certain light sensitive film. But just as with film, millions of people lower and higher the ISO of their camera and see the effect on their images all the time, everyday.
1. What the author said: "Simply stated, higher ISOs dial up the sensitivity of your image sensor."
What I said: It is simply not true, it is bs.
2. What the author said: "Higher ISOs degrade the quality of your photo."
What I said: It is not the primary cause.
That is it. I like to tell self stated pros if they are wrong, because a lot of people listen to them. Why spread the same wrong information (based on film era...), when they could spread the accurate one? And it is not even "complex", as your example.
The article I linked uses proper nomenclature and tells you a lot about causality. Who cares if in other articles other people don't? Richard Butler is always precise. The article I linked is precise. DPreview forum is one of the best if you need proper technical answers.
Comparing camera bodies at different ISOs has rationale. It may show a lot about the efficiency of the analogue gain. Nobody said it is nonsense.
"If every other photographer and gear website uses the same concept to describe ISO" - if a lot of flies tell you faeces is tasty, will you consider to eat faeces? Does it matter how many people interpret ISO wrong? No, ISO will not change the sensitivity of the sensor, this is incorrect, period.
If you are a pro, you don't change the ISO, you change the exposure as needed (or as possible).
Having used Topaz Denoise AI quite a lot, I was truly annoyed by the CPU usage and long processing. But that was the minor issue. The major issue with the AI component of Topaz is the fact that it adds elements to the picture that were not in the original RAW file. It somehow is interpreting what should have been there and adds for example hairs etc. Topaz is good if you want something to look good, but not necessarily representing the object or scene you shot. And that's my main problem: I've shot so many pictures and compared DXO with LR with Topaz and Neat, in the end I choose the more-to-reality product, which happens to be LR. Neat Image is a strong 2nd one.
I did find that using Topaz DeNoise AI can sometimes produce some vertical lines, especially at the edges, but these didn't seem present using the 'Low Light' option.
Lightroom does indeed seem have the edge when compared to Capture One (my preferred RAW editor) and if you are a Lightroom user then you may not need another plugin, however I found the combination of Topaz DeNoise AI (latest releases) to be superior in particular when used in a combination with Capture One to further fine tune targeted noise reduction using advanced masking / layers.
Topaz is definitely the plugin of choice and unlike DxO doesn't have file type limitations, nor does it struggle as much with exporting, and its noise preview is also superior. If Capture One's noise reduction was just a tad better and matched that of Lightroom I too probably would have just stuck to noise reduction in my RAW editor, but as it happens I am kinda glad it wasn't as it made me realised the ultimate noise reduction is obtained when using Topaz in combination with Capture One (possibly with Lightroom as well). It is the winning combo by far IMO.
I am in total agreement. In most situations topaz denoise AI is head and shoulder above the pack. I have seen some strange artifacts where the subject is against a complex background ( i shoot birds and long lenses and low light and high iso can make for less then ideal backdrops) where there is a lot of contrast. But by and large I would use nothing else
I used DxO Photolab 3 and Nik Sharpener Pro 3 for the following resuts; then I used Nik Color Efex for further creative processing. I am satisfied with the results.
There's really only two true competitors; DxO PhotoLab and DeNoise AI. I have both and can say for certain DxO is better. DeNoise messes with the colors where there are gradients. PRIME engine FTW!
I was actually trying out both programs recently, but couldn't understand why DxO just did't make their product available as a separate plugin outside DxO PhotoLab as well, nor why Topaz didn't offer their products individually during the Black Friday sales like they usually do (I believe) as I probably would have opted one of them.
However perhaps this was a blessing as I didn't rush to buy neither and after playing around with both these products some more I came to the conclusion that the overall workflow was convoluted at best and flawed in that Noise Reduction should be applied as the first step, followed by all the post processing in *app of choice* ... and this just didn't seem to play too well with my Capture One workflow. I suspect the same probably goes for Lightroom.
As such I am curious, what's your photo editing workflow?
.
.
UPDATE (27 Dec 2020): After further testing of Topaz DeNoise AI and DxO PhotoLab 4 I have come to the conclusion that there is a huge time saving benefit in particular with Topaz which is far more flexible as a plugin to an existing RAW editor like Capture One. I dropped DxO as it simply doesn't agree with my workflow and now I use Topaz DeNoise AI (mainly the 'Low Light' option) as my main noise reduction app/plugin and further fine tune targeted noise reduction in Capture One using masks/layers to provide additional targeted noise reduction where/if needed.
from my experience Denoise AI creates artefacts, I prefere DxO Photolab and rate it 1.place
I would suggest to verify also Denoise Projects with the listet denois programs
https://www.projects-software.com/denoise
I shoot concerts and my go-to has been Topaz De-Noise AI for some time now. It took over from Imagenomic's 'Noiseware' which I think deserved a place on your comparison list as it is still good (but the Topaz is a tick better).
I'm a bit worried though that Topaz is starting to get a bit bloated with extra features like automatic suggestion of which mode to use and 'Low light mode' (all my concert shots are in low light - I mean, that's why I had to bump up the iso and got the noise!). More buttons and sliders = confusion in my book.
Would also like to hear your thoughts on AI Clear as opposed to AI De-Noise. I find AI Clear is great for both de-noise and sharpen in one go.
I found the 'Low Light' option does a great job even on the 'Auto' setting and it is my personal favourite compared to 'DeNoise AI', although they are similar. Low Light edges it for me and I have noticed some odd vertical lines at the edges using DeNoise AI on high ISO low light images.
For some reason I am still to discover a photo where 'AI Clear' does a better job than either of the other two options so not sure why your experience differs.
FYI I have used these recent versions v2.3.4 and v2.3.6 of Topaz DeNoise AI
I like golden hour/blue hour/ night Milky Way and have been fighting noise for at least 5 years, and have used every post processing program (to many to list). All have gotten better, thanks to our budding programers, even the early Topaz suite. Denoise AI/AI Clear (try both on an image) is by far THE BEST! Pluses you can edit from Lr/PS and return, now has Auto on/off, masking (yea), low light mode (for colors) (cleaner output), recover original detail, color noise reduction and Plus AI Clear auto on/off, Remove Noise, Enhance Sharpness, recover original detail, color noise reduction. One will do better than the other so a little play is needed and slower if not at 100%. The BIGGEST PLUS is when apply and back in Lr/PS you have a whole new image, YES and all sliders at zero and noise in the raw file is now controlled, like was noted at first "noise is controlled in a raw file best"! But now you can make an image brighter, add texture/clarity/dehaze and even a little Lr denoise/sharpness. I say this for if you have really dark place image It can be made to look like daylight but night with stars, like baking an images over and over a tiff everytime! This was done with a A7s and a Voigtlander 10mm f/5.6, yes dark but a clear Milky Way above a bight clear cloud no star trailing @ 25s, my test of noise control after many tries for many years. But the third captured in 2017 ISO 6400 with A7Rii but PP with new Denoise AI/Clear AI got clear rock walls and clear stars with no softening. But you want clear sharp natural rock surface and sand with footprints without noise at 6400 even with lighting! Before using always open to get latest update before working with a image in Lr , I have seen two within hours and if not working on first try just exit no save delete latest Lr image and start again it will work then.
I don't know what the LR defenders are seeing that I'm not. Order goes FS Topaz, My Topaz, User LR. First, LR = way more fiddle. Second, the LR user example show didn't reduce the noise as much as the Fstoppers Topaz example. I tried in the latest version with a noise reduction amount closer to the one show in the LR user example using the same jpeg. LR produces more typical splotchy denoising, doesn't preserve most details as well, and has more halo artifacting. I hardly messed with the settings in Topaz, other than taking down most of the settings to their lowest in the low light setting. If LR works for you, that's great, but the time saved with Topaz is a huge value.
For grins I went ahead and ran the denoise result in Topaz Sharpen AI. Normally I'd never torture a jpeg like this. Topaz Sharpen is more hit or miss, but it does show the machine learning mode more in stabilize mode like Gigapixel does where it's actually creepy and adding in details, and using previous solves to try and figure out what areas are what. I feel like they kind of screwed something up a few updates ago as I'm getting a lot more artifacts than I use to. Still it's interesting.
Originally I though Capture One like Lightroom did a pretty great job, but in the end I concede it's far more time consuming. Lightroom has the edge on Capture One in terms of noise reduction, but there's pros & cons between these two.
However on reviewing Topaz DeNoise AI and DxO PhotoLab 4 I came to the conclusion that Topaz DeNoise AI is far more flexible and does a fab job, especially when used in combination with Capture One to further tweak (targeted) noise reduction using masks/layers. This IMO is the winning combo.
.
PS This review is about noise reduction apps / plugins, so not sure where Topaz Sharpen AI comes in.
Just wanted to make a post showing something I noticed and people should be aware of while using Topaz - If someone else could confirm the findings.
The first image is the original and the other images is with options for GPU acceleration and Intel OpenVINO turned off/on.
In this case, activating GPU introduces artifacts (vertical lines); note artifacts are introduced regardless but this is above and beyond...
I noticed some vertical lines towards the edges in some high ISO test images when using the DeNoise AI option but they were not present if using the 'Low Light' option.
The author is definitely not very familiar with DxO. If you want it to look flat & dull like Lightroom's default output, change the color rendering setting to either 'neutral color, neutral tonality' or 'neutral color, realistic tonality' (both under the generic renderings category). Also try the microcontrast setting (even on auto) to bring out a little more detail.
Monkeying with the curves and stuff and adding unsharp mask definitely held DxO back in that comparison.
Hi
Why have you only tested DxO PRIME? DeepPRIME in Photolab 4 is in a different league. I say this as I've done some comparisons on a 4k monitor with photos taken at ISO 5000 with EOS R5 and RF100-500. At first I was a bit miffed at paying about £50 for the DxO upgrade to get the R5 recognised, but DeepPRIME is worth it.
Thanks
Ron
Unfortunately after reading all the comments and conducting my own tests in my personal program of choice (Capture One) I have come to the conclusion that this review article is somewhat flawed.
IMO you really should have another go at this whole challenge to produce an unbiased review of noise reduction abilities in all of the most common used programs, including the main photo editing programs Lightroom and Capture One for comparison.
Even better would be to invite experienced users / members or even invite the developers of these NR and photo editing programs to participate in a proper "Noise Reduction Challenge" and to have them submit their final noise reduced files for this challenge which is likely to yield a far more accurate and interesting comparison.
,
.
UPDATE (27 Dec 2020): After having another go at this I must confess that some of the de-noise programs / plugins can save time and effort tweaking sliders in RAW editors and generally tend to do a slightly better job.
I tried both the latest version of DxO PhotoLab 4 and Topaz DeNoise AI and my conclusion is that DxO is not quite as flexible as Topaz DeNoise, which can be used as a plugin from Capture One (and probably Lightroom etc) unlike DxO which is a RAW editor and req RAW files to allow its main PRIME / DeepPRIME noise options. Topaz DeNoise AI does not have this limitation and this alone (never mind the higher cost) was reason enough for me to drop DxO as it simply doesn't agree with my workflow.
.
In my opinion Topaz DeNoise AI does a better job in Low Light conditions which generally tends to generate more noise and as such it's my pick out of the bunch. Topaz can also be used as a standalone or plugin option to your preferred RAW edition. On top of everything it can often be picked up at a substantial reduced discount price which makes it even more of a no brainer, especially if like me you prefer Capture One as you main editor instead of Lightroom. For me the ultimate option and a way to add even further noise reduction is to use Topaz DeNoise AI first and to apply further noise reduction (if needed) using layers & targeted masking in Capture One. This combination is super powerful and probably does a far better job than Lightroom or any other tool which is why I have now converted to using Topaz DeNoise AI together with Capture One for the ultimate noise removal.
I would say the general 'Auto' setting using the 'Low Light' noise option does a really great job with low light photos and I really had my work cut out to match it using Capture One alone which was far more time consuming and not as sharp.
.
.
Summary:
As far as noise reduction in other programs goes it all depends what level of noise you find acceptable. Most programs do a fairly good job and besides this noise is unlikely to show up on prints. If you are a Lightroom user you probably find the inbuilt noise reduction adequate. Capture One noise removal on its own doesn't seem quite as good as Lightroom, but this is where plugins like Topaz DeNoise AI really add an advantage. For the ultimate noise reduction functionality the combo of Topaz DeNoise with Capture One is hard to beat.
.
Here is a screen shot at 400% comparing Capture One vs Topaz DeNoise AI along with the original. Topaz with Auto Low Light settings out of the box is far sharper than my edited image ...
First of all, thanks a lot for this very interesting tests and related comparisons.
As I was testing and comparing Neat image v8.6.0 Demo in parallel of Topaz denoise AI when I read your article.
So I decided to use your image with the two tools.
I confirm I got the same result as you when using Topaz but I got a better result when using Nest Image. Here is my result using the default setting called "Less noise, more details" using advance mode. The details are really present and when I compare the two results I do prefer the Neat Image one.
interesting comparisons here. But I feel the test should also be on a not so well lit environment where you have to bring up the exposure then you get colour noise as well. I tried Topaz Studio 2 (AI Clear) and works well on some subjects (particulary those taken in daylight), but I found this clearly visible mosaic pattern on other photos. LR did not have this mosaic pattern. I also tried C1 Pro and didn't feel it actually did much. In the end I prefer LR CC.
It would be interesting to redo all this testing; it's been well over a year and all the software companies have updated their algorithms several times over, and even introduced new algorithms. (just an example, how Topaz Denoise introduced RAW and also Severe algorithms).
I see you haven't tried ON1 denoise, which has got also the sharpening. This IMHO is better then anything you have shown yet.