
In this article, I'm going to break down this dramatic lighting setup and explain why light placement and angle are important.
I knew before starting this shoot that I wanted dramatic, almost mysterious light with lots of shadows, but that would still be flattering for my model. My plan was for her face and the movement of her hair to be the focus, with enough light fall-off that her body would be hinted at without becoming the center of attention. The dark, crushed velvet dress certainly helps in the way it both eats and reflects light, but I had to get the lighting right to make it work.
Both of these shots were taken with a medium octabox as the key light and a bare bulb with a reflector as rim.
Here is shot number one:

Model: Madison Flowers


If you look at the light, you'll see that the brightest point is the model's face and that the light falloff is relatively fast, leaving her lower body fairly shadowed. This happens because of the inverse square law: most power loss will come in the first few feet and gradually level off over a greater distance. The result is that the closer the light is to the subject, the stronger the light will be, but it will fall off faster. Since there is less space for the light to spread, you get denser shadows.
Because the light is angled slightly down and the model bent her head just a bit, you see a strongly directional light that carves out the model's bone structure yet still leaves soft-edged shadows, because the light source is larger relative to the subject. The rim light separates the model from the background. Like the key light, it's angled slightly down at the model to take advantage of falloff and keep the focus on her face and the movement in her hair. The result is a moody, contrasty image.
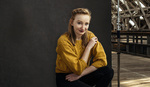
For the second shot, I wanted to keep the drama, but make the key light a bit less dramatic.

Model: Madison Flowers


To accomplish this, the light was turned very slightly toward the camera so that the model would be lit more with the edge of the light where it was a bit more diffuse. I also moved just a few feet farther away from the model and raised the octabox so that it wasn't angled as far down.
The light will spread the farther it gets from its source. The result for this portrait is that the shadows are slightly more open with softer edges and the falloff is more gradual, giving more light to her lower body. Just a small adjustment gave me a portrait that was still fairly dramatic, thanks in part to the black backdrop, but a bit softer than the first.
One last thing to notice in comparing these two shots is how the angle of the light affects the model's hair. In the first shot, the light was angled slightly down, meaning that the top of the octabox was effectively pushing light down toward the top of the model's hair. In the second shot, the top of the octa was pointed directly forward and accompanied by the model's more upright position, the result is very little light reaching the top of her head.
I'm not going to include my settings because they're basically worthless for recreating images like these. Remember that settings will always vary depending on the power of the strobe, the size of the room, the color of the walls, amount of ambient light, which aperture you choose, and so on. What are important when using an article like this to practice new or different light setups are the principles.
The Principles
- Close light: stronger source, denser shadows, faster falloff.
- Distant light: more open shadows, softer edges, slower falloff.
- The angle of the light determines where the hottest part of the light will strike the subject. The center of the light is the hottest point, and the edges will be more diffuse.
Caveat: get too far from the subject, and the light source becomes smaller and harder. You'll also require more power for a good exposure and lose some of the contrast and possibly introduce reflection of light depending on the space you're using.
Give this simple setup a try and let me know how it works for you. Don't be afraid to experiment and see where it takes you!


Great article, Nicole! Thank you!
I'm glad you enjoyed it, Richard!
It's difficult for me to separate the parts of a whole so, while both of these lighting setups may be really good, the model's expressions make them unattractive to me. The only subjective comments I can make are, I think a dark background with elements you can't really see is far more dramatic than a solid background and I did appreciate the information if not the results. :-)
That's totally fair, Sam. Not every look is going to appeal to every person, that's what taste is all about, right?
I love Madison! She's all over my Instagram :)
She's incredible, and a completely sweet human being, as well :)