
Lightroom is sometimes underutilized during post-production and IPS (in-person sales) during a boudoir reveal. Here are some tricks to increase the speed of your IPS sessions in order to move fluidly through the sales process and increase the number of clients who upgrade to your next collection.
Everything Is Better in Black and White
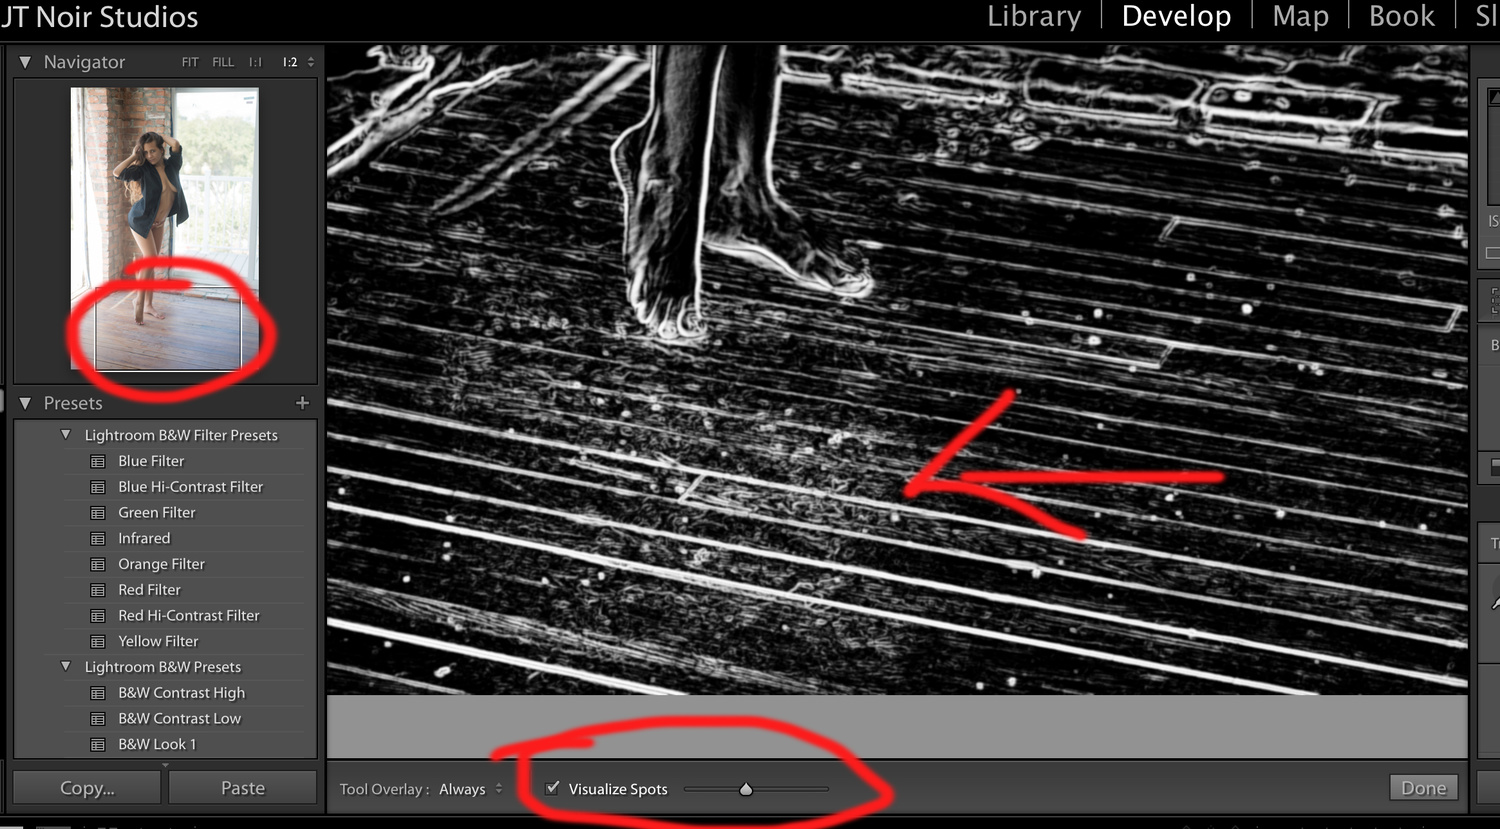
I know many boudoir photographers who do little or zero editing (as that is their brand); however, there is always some cleanup needed in the environmental aspect, such as this latest shoot where I had my client, Danielle, shooting upstairs in an unfinished apartment building. There was some construction dust, and although we managed to clear the area, once in Lightroom, I realized her foot-marks from the debris had been left on the floor. So, even if you are a non-retouching photographer, little issues such as this could be cleaned up quickly in order to have more focus on the subject.
Using Lightroom's Spot tool is a quick way to clean up any issues without having to bring it into PS and back for cataloging. In Lightroom, there is a nifty spot removal section at the bottom called "Visualize Spots." It converts the preview into black and white to allow for scanning the image to see where there may be distractions that you may not even have noticed until it was in your hands from the printer. It keeps the preview in black and white mode so you can easily clean up the image and then reverts back to color.
Keystrokes to Save Time
Using the before and after keystroke "Y," you can easily work an image without wondering if you have gone too far from the original. This is also great during the IPS if the client has asked for quick changes such as a conversion to black and white. This preview allows for her to see without toggling back and forth. Here, I used Split toning to bring down the yellows but wanted to still keep the original in plain view to make sure it was not too harsh of an edit.

After the ohhs and ahhs of the reveal from your client gushing over her images, the real work begins on choosing which images she just cannot live without. Using programs such as Animoto to show a video of her images prior to the selection process cannot only pull away all distractions, it will also add the auditory senses to allow her to become immersed (since the start of using video to present, image sales doubled that year). This video is also a great way to upgrade them or use as an add on to their images. Not every boudoir client wants to click through a flash drive of images so allowing them to chose the video package will increase sales.
Lessen the Distractions
Once the selections begin in Lightroom, the last thing you want at this point is to be fumbling around awkwardly in-between images in the user interface. You know your program, but your client may not. She could be overwhelmed with the sidebars, the presets, the histogram tool, brushes, or even the thumbnails below that keep her from focusing on the larger image on the screen.

Keeping the image in full-screen mode while adding ratings will not only speed up the process but also allow your client full visibility of the selection itself. Using the "F" key will allow you to quickly toggle back and forth between the full screen and normal layout.

If you still want the client to see all the images below, but not neccassarily the side toolbars, use the "Tab" key to remove them. 
Another way to help move things along is the Candidate selection using the "C" key. It allows the client to visualize the images side by side in order to select one. It also allows the photographer to show her how these images could work well next to one another in an album.

Survey Mode
Once my client has selected the images she would like in her album, we confirm them all in a screenshot of her survey mode. This will allow the studio to have a printout of her selections with her initials confirming her choices. I am a visual person, so when creating an album, I would rather pull from images than a set of file numbers. This area is also where you can rearrange the order of images for the client to see how they will flow in the album. While I still always send a proof of the album layout prior to ordering, this helps lessen the confusion if they thought there was a different image they chose. I am all about working smarter not harder, and this method will guarantee there is no going back to the design table.

Keystrokes
These are just a few of my favorites to help speed up workflow when toggling back and forth between views. While there are many more as well as combinations, these in particular can help speed up the workflow. While working on selections during the client reveal, having these keystrokes can aid in flagging or viewing without having to go back to seeing the entire program. Your client does not want nor does she need to see these. She needs to be fully engaged in seeing the art you are presenting her with.

Next week, I will be writing about how to present the images on their walls without ever stepping foot in their homes. This method will increase wall art sales instantly. If you have any quick tips that you have found over the years that you cannot live without, please leave them in the comments!


Never knew about the visualize spots tools, great tip!
Unfortunately, I don't see that Visualize Spots option anywhere. I'm running Lightroom 6.4.
In CC you hit "Q" and then the soft proofing and compare options are swapped with Visualize Spots and the checkbox for that at the bottom left of the main window. Don't have 6.4 to confirm it's there, unfortunately.
I have Lightroom 6 (v6.7) and am confirming that Visualize Spots is there when you access the Spot tool (Q shortcut)
Hey Alex, Thanks for responding! ..When I hit "Q" it just accesses the actual Spot Tool, nothing appears or are swapped...I don't even see "soft proofing and compare options" anywhere in the Develop screen.
Press "T" to to bring up the tool bar, then res "Q" and it will appear.
Thanks Jason, that worked! .. guess I just had my toolbar turned off.