
Enter the world of high magnification bug photography without breaking the bank. Learn how to turn kit you probably already have into a close-up winner and take macro masterpieces at home in no time.
If you've wanted to explore macro photography but could never justify the high price tag that comes with a specialized macro lens, then you've come to the right place. You don't need expensive kit to dabble in macro or close-up work. In fact, you probably have almost everything you need at home already.
In this tutorial I'll show you how combining a reversed wide-angle lens and some off-camera flash can give you decent-looking macro shots that can rival anything you could take with a macro lens. I'll be walking you through the steps to assemble your own macro photography rig that you can take anywhere, and I'll be throwing in a couple of tips to make things much easier for you when photographing your bug subjects. But this technique works for any tiny subject, so if bugs aren't your thing then take aim at some flowers or other intricately small subject. But for now, let's take a look at how I put my camera into macro mode and captured this gorgeous female zebra jumping spider from the comfort of my own home.
Reverse the Lens

Using a reversing ring you can turn your existing lenses around and mount them straight onto the camera body for close-focusing capabilities. Wide-angle lenses give higher magnification macros and the ring helps block out extraneous light
The first step is to take a wide-angle lens and reverse-mount it on your camera body. You can do this by simply holding the lens back-to-front onto your camera, but it's better to buy a reversing ring. Reversing rings are only a few dollars and screw into the filter thread on the front of your lens and then affix to the camera body, thereby keeping the lens on the camera body without you needing to hold it there. I use step-up and step-down rings so I can use one reversing ring with many different lenses. I chose to use my Nikon 24mm f/2.8D reverse mounted on my Nikon D750.
Wire in the Flash

A flash hot shoe connector wire is a low-cost, reliable way to trigger your flash off-camera. It doesn't require batteries and isn't as glitchy as wireless triggers that often have problems synchronizing with devices
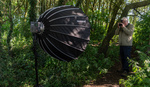
Next, dust off that old flashgun and let's get using it. When using a reversed lens for macro photography the scene will be much darker than normal so it's important to add some light in order for us to maintain the correct camera settings for a sharp, well-balanced exposure. I used my Yongnuo YN685 flashgun and hooked it up to the Yongnuo SC-28A hot shoe connector which attached to the hot shoe of my Nikon D750. I prefer using a wired connection to trigger off-camera flash for macro because it's a more reliable connection that triggers every time and doesn't require batteries. Plus, I rarely reposition the flash once it's set up so I don't need the flexibility of a wireless trigger.
Use a Flash Bracket

A flash bracket is useful to hold the off-camera flash steady during the photo-taking process. It frees up your other hand to steady and control the camera and holds the flash in the exact position you need it throughout
You can use this rig without a flash bracket, but when your arms get tired and sore you're going to come back to this step and realize how essential it is. A flash bracket holds the flashgun in place so you can use your hands to change settings on the camera and hold everything still. I prefer this flash bracket that has a flexible gooseneck which gives me much more flexibility with positioning the flashgun. Don't let the end of the flashgun sit in front of the lens or you'll risk getting flare in your shots. Instead, sit it just behind the lens to maximize power output without flaring your photos.
Diffuse the Light

A bare flash outputs harsh light, making subjects look unflattering. Use a homemade or inflatable diffuser to act as a soft box that helps spread the light, giving a softer look to your bug subject
Bare flash produces quite harsh light with sharp shadows and bright specular highlights. This isn't particularly flattering for any subject (think of the harsh shadows in midday, overhead sun) so you may want to consider diffusing the light. You can either make your own softbox out of some paper and an old cereal box, or for just a few bucks you can pick up an inflatable softbox that packs away small in your camera bag. I prefer this option because it's robust and lightweight.
Light With a Lamp

A continuous lamp like this can help brighten the area in front of the lens and make it easier to spot the bugs while you compose your shot. This is incredibly helpful for fine-tuning composition and ensuring the bug is in focus
One thing you'll find when shooting on a reversed lens rig like this is that although your flashgun has enough power to light the subject beautifully, it'll be when you're composing the shot that you might struggle to see. To get around that I recommend using a small, portable continuous light, such as this Manfrotto Lumimuse 8, to light the subject while you're still composing.
Set It up Right

The aperture read-out will be inaccurate because the lens is reversed, but you should use the sync speed of your flash to set the shutter speed and then increase or decrease ISO as required
The camera settings you choose will depend on the available light and how powerful you have the flashgun set. The shutter speed should be set to the sync speed of the flashgun, which is usually 1/200 or 1/250 sec. The aperture value won't display properly on your camera because the electrical pins on the lens won't be making a connection with the camera body, so ignore that for now. If you need to brighten your exposure but don't want to up the flash power (because of the added recycle times) then increase the ISO sensitivity.
Capture Shots Continuously

Set up continuous drive on your camera so that it continunes to take photos for as long as the shutter release button is depressed, this ensures maximum chances of nailing one bug shot that's completely in focus
Taking photos at such high magnifications means a drastically reduced depth of field. Without a tripod or macro rail, it's hard to nail the focus perfectly every time, so it's a good idea to turn on continuous drive when shooting. As long as the shutter release button is depressed the camera will take photos continuously until either the card or the camera's buffer fills up and slows things down. Aim to shoot bursts of 4-5 images at a time combined with the next step to get at least one shot that's in focus.
Rock to Focus

A reversed lens doesn't autofocus anymore so it's a good idea to use a rocking motion, forward and back, to nail the focus on your bug subject
With the lens reversed on the camera, there will be no option for autofocus. The focus ring does still work for manual focusing while the lens is reversed but there's little difference between the closest and furthest focusing limits. So the best technique to use for focus is to physically rock back-and-forth with the camera. Use continuous drive to take multiple images in quick succession and press the shutter button as you move towards the subject, then some while moving away. In the middle of the burst, there should be one or two images that nail focus spot-on. Aim to capture the bug's eyes (or nearest eye) in focus for a perfect portrait.
The Final Result

Lit with off-camera flash this zebra jumping spider photo is nice and bright, sharp on the front legs and eyes, and has a soft, out of focus fall off for a plain backdrop which complements the spider
Using this rig, the settings and techniques discussed above you'll be able to capture some good macro results at home on a minimal budget. It takes a little patience and consistency to get it right, but once everything marries up taking macro photos in this way can be extremely rewarding. Try finding spiders around the house, or venture out into the garden and even the local park to spot bugs for photos. This macro rig also works well for any tiny subject such as flowers, just in case bugs aren't your favorite thing.


Jason, could you please provide a more fine-grained link for the flash bracket? I don't see one on the B&H page that looks like the one shown in the article.
ooor... just use daylight and a telephoto lens... Canon 300mm f/4
I've always loved using mega zooms for "macro" work, especially with bees and snakes.
I got into it when bored waiting on birds. saw an orange bug, shot it, and blew it up to see what it was, The clarity was awesome and I've done it ever since. Also helps to make sure my focus is properly calibrated. If the bug isn't in focus you'll know right away... )
I got into it for the same reasons. Always had a long lens on in macro moments. I liked the compression effect and long lens bokeh they brought to the table. Some people will complain that you're not doing it correctly. Screw them. Use the lens you want to get the picture you want.
I built a similar setup, and you can adjust the brightness/aperture by putting the lens on the right way around, select the aperture, and remove the lens while holding down the DOF preview button. That will keep the aperture closed to your setting until you attach it the right way around again.
Much better to get an extension ring for your telephoto zoom or prime. Preferably a prime, but even your telephoto will do better than you think. With an extension ring you can also still have autofocus if you're working with an autofocus lens. The longer focal length negates the external flash as an absolute necessity, and camera pop-up flashes can effectively be used as well. It also creates a greater distance between you and your subject, diminishing the possibility of startling them. This makes macro life much easier, simpler, and more productive.
Panasonic GM5, 12-32 kit lens, 10mm extension ring.