Editing your images can be a love/hate relationship depending on how you feel about post production. Getting tied down in your workflow can be a result of not having the right displays and shortcuts for better visualization of the final result. A few key tricks will lay out your most used tools and displays to get you in and out of Photoshop.
Display
Just like your workspace in your office, your workspace in Photoshop should fit your style. Some artists work better in clean and tidy areas, while others find their workflow to thrive on a messier area. Whichever you prefer, in the digital world it can be more helpful keep the workspace consistent so you can push through your editing without being tied down with searching for tools.
My favorite display trick is to enlarge your thumbnails in your layers section. If you have eyesight issues like myself, or just prefer to change the display this is a big help to quickly refer back and forth through your layers. Naming your layers will help significantly as well, but having those larger thumbnails will be a quick reference check to see where you are. If you click on the background thumbnail you will see a pop up with the options for small, medium, large, or even no thumbnail if that is your preference.

View
Sometimes after long periods of up close editing on a composite or skin retouching, it is easy to lose touch with how the big picture looks. It may be working for you while you are close and tight into the image, but when you zoom out it is a mess leading to either hoping you saved on a separate layer or starting over. In bird's eye view mode you can simple scale out quickly and snap back to the original magnification you were working on. This allows you to periodically check your work and save you the frustration of working an edit too far. For this command press H on your keyboard and your mouse/tablet to get a bird's eye view of your image.
Tools and Layers
A handy trick is to keep your layers and tools available. These tend to be the most used so why not keep them visible at all times. I prefer them to be on my right side of the screen due to being right handed. Editing on a Wacom tablet, it allows me to keep my right arm on one side while the left is free to access the shortcut key commands.

Close Up
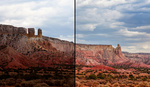
If you prefer to look in real time what is happening to your image while you are close up, using split screen will maximize your editing. Open your image and go to Window > Arrange > New Window(for the name of that file). Photoshop will create a new window of that exact file. From there go back to >window>arrange> 2-up Vertical (or whichever orientation you prefer). 

Scrolling Through Tabs
If you are working through many images during the same editing session, most likely you are tired of searching throughout the list especially if you have not named them all at this point. Scrolling through will be more efficient than clicking on each on hoping it is the image you are searching for. To scroll through the tabs of opened images go to Command/Control + ~ and if you need to scroll back hit Command/Control + Shift + ~ .

The ~ sign can be found top section second row on the left above the tab key
This list is by far not the only ways to keep your digital workspace flowing but it can be helpful to cut out the tasks that may be small but can add up in time. If you have any favorite Photoshop display features you love leave a comment to help another artist save some time!