
Lightroom received a group of new features as part of Adobe’s latest Creative Cloud batch of updates, but one in particular stands out as a huge shift to how you work with the software. Want to know how to make it work for you?
Lightroom applies a default preset of adjustments to every photo you shoot. Over the last couple of months, they’ve made a few adjustments to how this works, including changing the default profiles (the color and contrast “look” given to each photo).
This latest update adds the ability to create an ISO adaptive preset. What this does is give you the ability to generate a range of presets, from even just two separate values, which can then apply a shifting adjustment to the photo depending on ISO.
To better understand what this means, consider a photo at ISO 64, a photo at ISO 800, and a photo at ISO 6,400. Previously, you had to create a single sharpening and noise reduction adjustment that would be applied to all of those photos as the default. Now, you can set a value for those three shots, perhaps with increasing levels of noise reduction and decreasing levels of detail sharpening, then use those three examples to create an ISO adaptive preset. Lightroom will then create a “curve” along with those points and set a corresponding intermediate value for an intermediate ISO.
What makes this powerful is now you can have heavy sharpening and no unnecessary NR at ISO 64, which then tapers off into the midrange ISOs, followed by a jump up in noise reduction at higher ISOs, with this all being done automatically.
In that shot, you can see the examples of ISO 64, ISO 800, and ISO 3,200, but again, remember that this will work especially well because it also covers ISO in between those values too. I’m a big fan of Auto ISO, and so I have a number of shots at just about every individual ISO setting, making the creation of a matching preset by hand impractical.
Picking Your Shots
Now, getting this setup isn’t the most convenient thing, and there are a few tricks I figured out after prepping presets for a number of different bodies. Firstly, make sure you’re running the latest update of Lightroom Classic. Next, you’ll want to have one catalog with a good range of shots, including different ISO values and different subjects. If you don’t have a single catalog like this, it’s easy to create one temporarily, as both the presets and raw default preference panel changes cross between catalogs.
Once you’ve got these pieces in place, it’s time to pick out the sample shots you want to work with. I’d suggest setting 3 points as you get diminishing returns with more granularity since there isn’t a significant difference between how you’ll treat ISO 3,200 and ISO 4,000. You’ll want to work with one camera at a time, and I’d suggest gathering the shots in your quick collection, which you can easily add shots to via the B key.
For the shots, make sure they’re typical of what you shoot. If you cover a wide range of subjects, grab a few examples for at least the base ISO and highest ISO in your range, so you can check your preset against them while you’re working on it. The shots should be of good technical quality, as unintentional motion blur or significant under/overexposure will throw off your adjustments. Also, I’d suggest using shots that are under natural, neutral lighting conditions. Dealing with a significant white balance shift may lead you to overcompensate with color or noise reduction adjustments. Ideally, you’ll end up with about six shots, two at low, medium, and high ISOs, all well exposed, with neutral lighting conditions.
To help with finding these shots, make use of Lightroom’s metadata filtering tools. In the above screenshot, you can see how you can easily filter down your shots via camera and ISO value. From here, double-check the shot via the loupe view, then add it to whatever temporary collection you’re using. If you’re working with a preexisting catalog, you might want to consider creating virtual copies of your picks, then dialing in the preset on them to avoid messing with your existing adjustments.
Making the Adjustments
Once you’ve got the shots picked out, jump into the develop panel. Reset the photo, then work through the panel. The only changes I’d suggest making are to the profile, detail panel, and lens corrections panel. Other changes to things like tone and color are too difficult to generalize. Remember, ideally, this preset will work well for every photo you apply it to; these aren’t adjustments you’ll want to have to tweak on most photos.
For profile, this can be a bit of personal preference. Adobe Color and Adobe Standard have been the default, but I actually prefer the reduced contrast of Neutral as a better starting point. This can vary significantly depending on the work you do, so take a few seconds to go through the options and see what works well for your shots. Again, remember that this preset is just going to be a starting point for further edits, not a finished look in itself.
Once you’ve got a profile picked, decide on whether you want to have lens corrections on. I prefer the chromatic aberration correction to always be on, but I’ll leave profile corrections off by default when applicable, as I find I only need it for architecture shots.
Last, but certainly not least, is the detail panel. This is where the ISO adaptive nature of the new feature really matters. Start with your lowest ISO shot, and set the desired sharpening and NR values. For most modern cameras, you can drop the color NR quite a bit lower at base ISOs. Adjust your other settings to taste, and remember holding the ALT key while moving a slider can help you better visualize the impact.
Once you’ve got that initial set of values prepared, go back to the grid view. With your base, ISO photo selected, hold control/CMD and select your middle ISO value photo. Sync the settings with control/CMD+shift+S, and make sure all those boxes are checked. Once you’ve synced those settings across, you can go into Develop for that middle photo and refine the detail panel settings (you’ll probably want to bump NR up a bit over the low ISO shot). Follow those same steps, syncing the settings from the mid-ISO shot to the high ISO shot, then refine them.
Wrapping Up
By the end, you should have 3 example shots at low, medium, and high ISOs, with different values for the detail panel across them. With those three selected, go back into the Develop panel, and click the plus sign next to Presets on the panel. Then, select Create Preset. In this interface, name the preset by the model of camera it corresponds to, and make sure to check to Create ISO adaptive preset at the bottom. If this is grayed out, make sure you’ve selected multiple photos from the same model of camera. Create the preset and open the preferences menu, then select the presets tab. 
In the presets panel, click the checkbox to override the master setting for specific cameras. Then, choose the camera you prepared a preset for, and select that preset via the default menu. Lastly, hit "create a default," and you should see it pop up on the list to the right.
Once you’ve got all that set up, any new photos you import for that camera will be developed using your new preset! In practice, you should have a much better match for NR and sharpening values for each ISO, as well as the benefit of any other adjustments you made to the profile or lens corrections. If you want, you can reset old photos to use this new default, but remember, it will wipe out all your other adjustments.


First, this is not a new feature. It was there and missed out in the earlier updates.
Second, I fail to see any real utility of this for any genre...Would love to see some real use cases...
It is a new feature. ISO Adaptive presets were added as part of this update. You may be thinking of the ability to change the default presets, which is a different thing.
As for the use case, it makes a difference every time you shoot a photo at a different ISO than the one your default single-ISO preset was prepared for. It lets you get more sharpness and less unnecessary NR at low ISOs, as well as keeping effective NR at high ISOs.
This doesn't seem to be a new feature to me. I set up default ISO-dependent presets for the Feb 2020 release after reading about them somewhere. But it required editing sample preset .xmp files provided by Adobe. Does the June release just add a UI to simplify the process, or is this something completely new and different?
Here's a thread about the Feb feature: https://www.dpreview.com/forums/thread/4472073
This was probably the engineering groundwork that was laid back then, with the feature being rolled into the June update with a supporting UI. It's unclear - did setting it up that way allow the default processing to change, or was it just a "smart" preset that you still had to apply? That would be the only distinction other than UI I can come up with.
Yes, I set the ISO-dependent preset I made as a master setting for my camera.
I created an ISO-dependent preset using the new UI in the June release, exported it, and compared it to the preset I manually edited for the February release. It's equivalent, but the new UI is much easier to use and less error-prone.
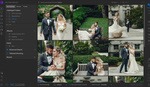
This has a lot of practical utility in the wedding business for one. Constantly switching between inside and outside of various houses and venues has the ISO all over the place throughout the day. This will create a faster workflow.
Ah ok! Thanks for the input. I could not quite figure out where a linear progression would be useful.
Yeah, essentially this better tailors the sharpening and NR to the different ISOs you may be shooting at, automatically. I think the naming might be messing some people up, as they associate presets with heavy color or contrast adjustments, where this is more like "smart" defaults for essential raw processing steps.
I have something similar w/o the adaptive ISO which I had shared a while back for wildlife...
https://youtu.be/CiifurKiCGE
For the most part Jeffrey’s “Bulk Develop Settings” Lightroom Plugin has done the same for years with ISO and sharpening.
Interesting, haven't heard of that before. I think having this built in will make it usable to a far greater number of photographers.
His plugins have been doing things LR should have been doing for years. They should just pay him a ton of money and implement them.
My favorite is bulk batch export. You can highlight multiple folders at once and batch export all the images. LR will just batch them to one folder. But Jeff's plug in batches them to the original folder in which they reside. This makes event work a breeze to deliver a massive folder structure with a click of the button.
Welcome to the Kingdom of Bloatware: Bridge, Lightroom, Photoshop. Yawn.
Nik Dfine had this many years ago. Now, though, I use DxO PhotoLab, which has amazing adaptive noise reduction.
P.S.: Well, Dfine wasn't exactly adaptive: I custom-generated NR profiles for my cameras with an X-rite ColorChecker Passport for each full-stop ISO setting (100, 200, 400...), and Dfine would automatically apply the appropriate one based on the image's ISO value. I even made those profiles available to the public via my website. It was cutting-edge at the time. But, for years DxO has been WAY better.
What the hell is up with all the negative comments? Looks like this article took a lot of time to put together, and it's available for free (with the cost of scrolling past ads). Photographers are becoming the sourest group of entitled a-holes in the world.
The article is excellent. It's about the software.
Thanks! I get that feeling. Lightroom can definitely have its moments, but if you're as "invested" in the ecosystem as I am, it's still nice to see these feature improvements come along.
If you love or even just tolerate Adobe that's all to the good. It's your preference - stick with it. Like many however, I've had it with Adobe. I switched to other programs and have found them to be better and more in line with what I need. I took a good long look at what Adobe installs on my computer and wasn't impressed by the invasive nature of the software. To uninstall it, you need to START with the Adobe uninstall program and then begin a systematic purging of the leftover files that the uninstall program deliberately misses. If none of that matters to you, then again - stay with Adobe. It works for the majority of photographers - just not me.
While I appreciate the sentiment, your post seems a bit off-topic.
The article is about the "new features" included in an update to Lightroom. It's hard to be enthusiastic about an update to Lightroom in the face of its other issues. Again, if you love the new features and the program, more power to ya.
If wanting a software that I have to use every day work fast, without lags and constant crashes is being an entitled a-hole, then we have a different definition of being an entitled a-hole.
Yes, this article is comprehensive and well written (a rare feat on this site), but this feature does not make LR any easier to use for me. It still takes sometimes up to 1 minute to export a 5D Mark IV raw file into a 1200px JPEG, which is never going to be offset by spending less time on presets (which I don't use anyway, each shot being unique and treated independently).
I'm surprised by that delay - for Z7 files, I just tested and am seeing 5 Z7 files exported with adjustments, converted to JPEG, resized to 1200px in less then 10 seconds. Have you checked some troubleshooting steps like drivers, preferences, and updates? That certainly doesn't seem like normal behavior.
Not saying Lightroom is flawless, but I'm sure you could be having a better experience.
LR is not flawless, no, nothing is. However, there is nothing on the market which even comes close to LR's overall usefulness. As a working photographer's tool it's superb. If people want to mess around with other software and fine tune their workflow that's totally fine - it's your time - knock yourself out. Capture One is a better raw processor but it's not a time saver, LR is.
Good article Alex, well explained.
I wasn't being negative. You're posting to the wrong person.
I believe when Capture One initially processes your photo, the noise reduction they apply is based on ISO. So, with Capture One, I've never had to worry about this, it is automatic. The folks at Capture One puts a lot of work into testing a new camera when it comes out.
Alex, thanks for the article. I wasn't previously aware of this. I won't be taking advantage of this feature, as I prefer DxO PhotoLab, but I'm glad to know about it, and it seems a valuable feature for those who rely on LR for noise reduction.