
My most used Photoshop action is actually pretty simple and by following along, you can record it yourself in just about 30 seconds. If you’re new to Photoshop’s actions, it serves as a great introduction to their functionality, and I think it has a place in every photographer’s set of tools. Want to know what it is?
The Story Behind the Action
So many Photoshop tutorials and intros cover the variety of selection tools, touching on things like the magic wand, quick selection, pen tool, or lasso, but in my experience, most miss an important aspect of selections: selecting an empty area.
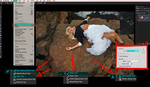
I first ran into this issue when I was working with panoramas put together by an external program. If you go through Photoshop’s built in Photomerge options, you can have the program automatically fill the empty areas between frames with Content Aware Fill. If you’ve put the images together yourself, or in another program, there’s not an easy way to trigger this behavior though. Instead, you might think you have to go through and manually select each little sliver and gap from an imperfect panorama stitch.
Your next reasonable thought might be to go to the select menu, but even here, there’s not an easy way to select the empty parts of your canvas. Instead, the quickest way to select the empty areas is actually to select all the pixels where there is info, then invert it. With this approach, you’ll automatically have a selection of every empty pixel in your image, without needing to manually select any of them. For panoramas, this is a huge time savings, as the edges can be very irregular, encompassing the entire image, or even in random spots in the middle of your frame where there wasn’t perfect overlap.
This technique isn’t just limited to panoramas, however, as knowing how to select the empty areas of a frame can be used in a number of different ways. Whether you’re working with composites, blending in a sky or alternate focal length, or working on something like a focus stack, there’s plenty of instances where you can end up needing to fill in information in an easy way.
Recording the Action
With the background out of the way, let’s talk about how to actually record your own action. To get started, make sure your Actions panel is actually showing, by going to Window>Actions and making sure it’s checked. By default, Photoshop shows a number of actions, but I don’t find many of these useful. I’d suggest starting a folder of your own actions, by clicking the folder button at the bottom of the panel, then giving it a name. 
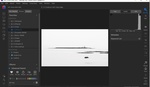
From here, it’s helpful to open an image with an empty space, or open a regular image, then just use the eraser to remove a small portion (just make sure that the background layer is unlocked so that the eraser doesn’t just replace it with white). Make sure all your photo’s layers (if applicable) are flattened to a single layer, and that the empty areas are actually empty (represented by gray and white squares by default).
Once you’ve got your photo setup, you’re ready to record. When you click record on the Actions panel, Photoshop starts recording the edits you make, letting you “play them back” on another photo. When the record button is active, all your Photoshop activity can end up in the action, so you’ll want to avoid switching between photos or trying to combine other steps. The most useful beginner actions are those that are clearly defined by one activity, as trying to make too complex of an action will result in bugs, or just a not-useful, hyper-specific action.
Once you’ve clicked the new action (plus sign), just hold control on Windows or command on Mac, and click on the thumbnail of that layer. You’ll see the marching ants that indicate a selection pop up around the boundaries of your photo. Now you need to invert that selection by going to Select>Inverse. It won’t look like much has changed, but the selection is now enclosing all the empty spaces. If you just want a quick way to select the empty areas, you can stop here by pressing the Stop button at the bottom of the actions panel. I take mine one step further, however. Typically, if I make this selection of empty areas, I want to fill it.
Content aware fill works best with a bit of context, and in this case, that means expanding our selection to include a bit of the photo’s information. So, with that empty area selection still active, go to Select>Modify>Expand and set it to about 3 pixels, then press OK. 
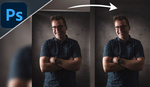
All that’s left is to have Photoshop fill in the blanks. For this action, I prefer just using content aware fill via the Fill menu option over the dedicated Content Aware Fill option, as the extra dialog just gets in the way and doesn’t make a significant difference in the quality of the filled area. To open the dialog, go to Edit>Fill, select Content-Aware in the Contents dropdown, check the box for Color Adaptation, and that the blend mode is set to Normal with 100% opacity. Click OK. Don’t worry if this step takes a few seconds, as the Action doesn’t record delays, and when played back, will work as fast as your computer can process the steps themselves.
Once the areas have been filled, you can click the Stop button at the bottom of the Actions panel. You’ve now created your first action! You can test it out by opening another image with a blank area, clicking the Action to highlight it, then clicking the Play button. It’ll run through the steps and you should end up with a filled in image.
If something’s gone wrong, you can click the > symbol next to the action to expand it to a step by step view. If you see a step that shouldn’t be there, you can try deleting it by highlighting it, then dragging it to the trashcan at the bottom of the panel. Sometimes, though, something’s just gone wrong with the process and you can’t troubleshoot it - at that point, just delete the entire action and try again, making sure to not include unnecessary steps.
Actions are an incredibly powerful set of tools to optimize your workflow in Photoshop. While it’s great to purchase actions or panels from other photographers, nobody knows your workflow better than you, and it’s surprisingly easy to get started creating your own actions. Give it a try and you might just create a favorite action of your own!


Thanks! I've been there and like you solution
Hope it helps! Thanks for commenting.
There's actually a very easy way to select empty parts of this image. Simply click the lasso tool and make a loose (but not too loose) loop around the empty space. Then hit Shift-Delete (on a Mac) - I'm sure there's an equivalent for the PC). This brings up Content Aware. Hit OK and you're done. I think you'll find quick and easy..
The distinction there is you're just selecting the area within the bounds of the lasso and filling it, where as this technique will automatically select any empty areas in the image - no need to manually make a selection, worry about overselecting or underselecting, etc. Both are useful, just for different tasks.
Great tip!
Thanks!
Thanks so much for this action. It works great for me and really saves time.
Good to hear!
Did the content-aware fill not do a good job? It looks like you've cropped the image to remove the areas that needed filling.