
The Retouching Toolkit is, without a doubt, the best Photoshop extension I have tried yet. It helps streamline one's editing workflow, improves Photoshop's interface, and with the latest update, it's getting one step closer to becoming the only Photoshop plugin you could ever need.
If you are a long-time Fstoppers reader, you may have read my previous review of the Retouching Toolkit 2.0 and then, the updated review I did when 3.0 was released. A little while ago, 3.1 was introduced, and while not revolutionary, it still manages to improve on the previous qualities of the extension.
In essence, the Retouching Toolkit is what Adobe Configurator should have become if Adobe had kept it alive and decided to make it better. The Retouching Toolkit is composed of an app that integrates with Photoshop to design your own custom panels and of add-ons to simplify and improve your workflow.
What's New With 3.1?
Speaking of add-ons, they are probably the most noticeable change found in the Retouching Toolkit 3.1. In the previous version, the Toolkit was delivered with a similar panel to what RTK (Retouching Toolkit) 2.0 offered. The scripts available were the same as well, and the significant improvement was the possibility to create custom panels. With 3.1, add-ons have become available, and scripts have been redesigned for a better experience and improved performances.

Wallstrom's Workflow Addon
The first add-on you'll notice when installing RTK 3.1 is the Conny Wallstrom Workflow add-on. Wallstrom is the brain behind the app, and he designed this add-on to help streamline any retoucher's workflow. You'll find all the necessary scripts, arranged in a well thought-out layout, ranging from dodging and burning to creating the folder structure to keep layers organized. The scripts rely on non-destructive and industry-standard techniques so that you can edit as any high-end retoucher would.

Among the improved features, you'll find in the Wallstrom's workflow panel dedicated dodging and burning scripts. They create your typical dodging and burning curves but with two points to keep the color shift to a minimum. I've been working with the panel for over a week now, and I must admit that while the difference is subtle, it's visible and could potentially save time on your color correction process. If you want to learn all about the difference this dodging and burning method makes, be sure to watch the video below.
Another exciting feature found in Wallstrom's panel is the selective saturation method. It's a technique I had never used or heard of, as I tended to correct saturation issues in other ways, but this one proved to be better than most methods I knew of. It creates a visual help layer along with two adjustment folders, one adding saturation, the other one removing saturation. Once the folders have been set up, it's as easy as dodging and burning! Color correction, in my opinion, is the most important part of retouching, and proper color correction is the sign of a great retoucher. Having tools such as the selective saturation available makes this process a whole lot easier and more accessible! Just like for dodging and burning, Wallstrom recorded a video explaining in details how this works.
And one last script I have to mention is the one that removes identical pixels! While healing on a blank layer is best practice to keep the workflow as non-destructive as possible, it limits the use of the spot healing brush tool and also the tools' blending modes, which is why working on a merged layer often makes it much easier and faster. However, a merged layer breaks the non-destructive workflow. Wallstrom designed a script to solve this very issue. With his script, you can work on a merged layer and then simply click on a button to delete the pixels that haven't been changed compared to the layers below! This way you get the best of both worlds: a non-destructive workflow and the speed of use of the spot healing brush tool.
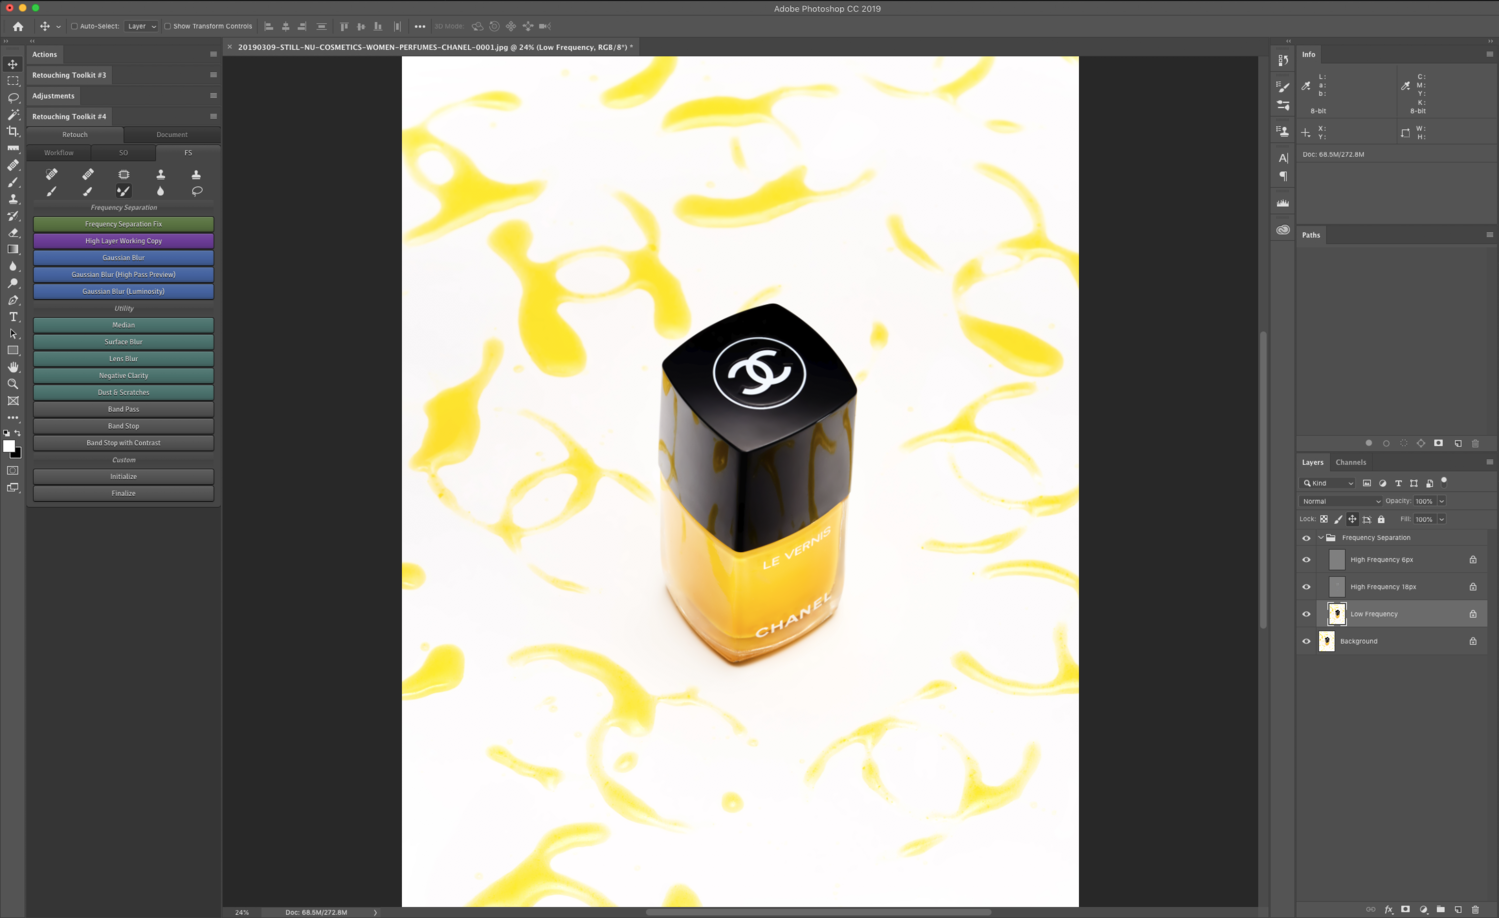
Frequency Separation Fans Aren't Overlooked
Although frequency separation has been used and overused over the past few years and often been called a poor technique by many, it's still a relevant method and a very potent one. It shouldn't be the go-to tool for skin retouching, but in some instances, it makes the editing process much easier and faster. With the dedicated add-on, you can create frequency separations based on most blur techniques available in Photoshop depending on the problems you need to edit. From the traditional gaussian blur to dust and scratches or surface blur, you'll have more choices than you can dream of and probably actually will ever use.
The scripts for Frequency Separation have been improved, and it's now effortless to create multiple separations. So you can, for example, easily separate very fine texture from the larger details and the overall tones of the image. When editing still life, this makes it such a powerful technique to remove dust without touching any detail of the product.
The Power of Smart Objects
At least, if not more interesting than frequency separation, is the smart objects add-on. There is a tab and a couple of scripts dedicated to techniques based on smart objects. For those who aren't familiar with smart objects, they let you apply filters such a liquify in a way that you can come back at any time and modify the filter, even after closing the file. Techniques that are by default destructive – liquify, blur, etc. – can be used in a non-destructive way, thanks to this neat Photoshop feature.

The RTK 3.1 smart object add-on takes advantage of it and offers a bunch of scripts to make your retouching faster and better. You can add grain, accentuate sharpening, use liquify or camera raw, and also use techniques to add contrast or emphasize texture in ways otherwise time-consuming. The smart object add-on may not be the one you would try first after installing the RTK 3.1 default panel, but trust me, it has some exciting and powerful techniques! Once you try them, it's challenging to go back.
Pricing
The Retouching Toolkit 3.1 is available in different flavors. It starts at $129 and includes all the tools mentioned above as well as the 2.0 panel layout if you still want to use it.
For $199, you'll get access to the upcoming color wheels add-on (to be released in May), bringing the ease of use of the color balance tool found in Capture One into Photoshop. Included in this price is also the color mapping add-on (to be released in June).
For $239, you'll obtain everything previously stated as well as the luminosity add-on (to be released in June), so you don't need a luminosity masking and selection panel anymore.
Finally, for $299, you'll also get the launcher (similar to a Spotlight search, but in Photoshop, to be released in May) and the export add-on (to be released in July).
Add-ons will also be available on their own, so you can buy the panel at $129 and then buy any future released add-on separately according to your needs.
Unfortunately, further details regarding the listed upcoming add-ons aren't available on the official website. However, you can join the official Facebook group to access teasers and videos created by both Conny Wallstrom and Stefan Kohler. The content they offer in the group is not limited to the panel, but covers a wide variety of retouching topics.
What I Liked
- The extension is turning into a very comprehensive supplement to Photoshop.
- The upcoming add-ons seem very promising.
- The current add-ons make retouching much more accessible and straightforward.
- Easy to customize and add personal scripts and actions.
- Facebook group is very active and contains a lot of educational content available for free.
What Could Be Improved
- Pricing is well established but can be daunting for beginners or for those who don't understand what future panels may offer.
- No trial version.
All in all, my opinion about the Retouching Toolkit hasn't changed since version 2.0. I still believe it's one of the best, if not the best Photoshop extension currently available. It's extremely good with the default layout, scripts, and add-ons, but it can become even better once you get into customization. If you are looking for a way to streamline your workflow and have more efficient retouching methods at the tips of your fingers, then the Retouching Toolkit 3.1 is definitely worth looking into!


It doesn't offer the split screen preview, but you get more blur methods to chose from and Wallstrom worked on the technique to minimize any image quality degradation due to frequency separation. So I'd say it's different, but I'm sure we may see add-ons that look like the NBP Freqsep for the Toolkit in the future – but that's just my opinion :)
Yes, my FS Addon uses the built in Apply Image instead of an external plugin. You have the live preview though, either what you want on the Low or on the High, depending on what you prefer. (But not in split mode.)
The new Fix layer will take care of any artifacts, and most of the artifacts in a FS aren't actually from Apply Image.
I haven't tried the NBP Freqsep, but I agree that a plugin is capable of better calculations then Apply Image. However, the high layer will still have the limits of your current bit depth. More specifically the Linear Light blend mode on the High layer is what causes most of the artifacts, and a plugin will not solve this. I explain this in depth in one of my videos.
Edit: The Linear Light limitation is why I created the new "FS Fix" feature that will take care of any artifacts.
Nino and the guys does a great job though, and they provide high quality Addons. So compare it yourself and use the one you prefer :) I explain how to check for artifacts in the same video mentioned above.