
One of the best things about window light is that you can find it almost anywhere. As winter approaches and chilly weather threatens to keep photo sessions indoors, photographers will face the choice of how to light their portraits. Strobes and flashes are a great option, but not all photographers own them. Almost everyone has access to a window though, and a window has plenty to offer any photographer who knows how to use it.
Window light has the great advantage of being a very frank light source; what you see is what you get, and different light patterns are only a few steps away. Since the light source is immobile, the trick to shooting window light and getting several different looks during a session is twofold: move your body and your subject to create the light pattern you want, and then manage the resulting light ratio.
I photographed these three images with natural light from a single window in my studio. In each case, light pattern was my first consideration. Then, when needed, I used flags and reflectors to control contrast and add fill, or give me a quick no-fuss background.
Loop Lighting
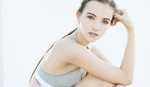
The first pattern I used is a classic loop. Loop lighting is popular for being almost universally flattering, which makes it a nice tool to keep in a photographers bag of lighting tricks. Creating loop light with a window is shockingly simple. In this diagram, you can see the placement of the subject and camera in relation to the fixed light source. In my studio, the walls are white, which naturally cuts down the contrast. I put a black v-flat between the model and the wall to stop too much light from bouncing back to fill in the shadow. The flag was far enough away from the model to allow some ambient light to keep the shadows open. If you want to adjust the light transition for a faster fall off, move your model a few steps closer to the window. If you want the fall off to be more gradual, take a few steps away from the window. The trick is to keep the window in front of the model at all times. If the model stands in the center, you’ll have a split light pattern rather than a loop.

Model: Madison Flowers

Flat Lighting
The second light pattern is flat light. This is one of my favorites for beauty because the light is coming from directly in front of the model so it fills in shadows and mitigates skin texture. Getting this light shape with a window is easy as pie. Simply put your back to the window and place your model in front of it! What I really like about this set up is that I have the option to add more contrast to the edges, increasing the depth of the light, by either keeping the room I’m shooting in fairly dark, or bringing in flags to the sides of the model. In this case, the room was dark enough that the light had nice dimension.

Model: Madison Flowers MUAH: Kimberly Clay

Dramatic Lighting
For the last example, I’m using a pattern that’s a bit more muddled because of the model’s pose, but this is short lighting that’s about a hair’s breadth away from becoming Rembrandt light, as evidenced by that small, soft triangular highlight on the camera side of the model’s face. For this shot, I placed the model a bit closer to the window, and I walked around to the opposite side facing her so that I could see the light just kissing the model's skin as it streamed toward me. I wanted drastic fall off, so the model was much closer to the window than in the previous two photos. I exposed for the dramatic highlights and brought in a white reflector to keep the shadow side of the face from going too dark. This set up is a fantastic way to light moody or dramatic portraits.

Model: Madison Flowers MUAH: Kimberly Clay

Window light can be used almost anywhere, from wedding venues to living rooms, which makes life easy for a photographer who is stuck indoors. It’s also great for learning and practicing light management, which is a great skill to have no matter what light you’re working with.


That was a very interesting article, thank you very much for writing it. I seldom shoot people, but I'd really like to try those techniques at some point. Please post more stuff about lighting!
Your photos were excellent, by the way.
Absolutely, I'm glad it was helpful!
Also, thank you very much :)
Lovely light and great looking model. Not taking anything away from the shooter, but that woman took over the camera. Of course, when the shooter saw it, she pushed the trigger. Good article and good teamwork. Thanks.
That's absolutely the point of working with a fantastic model like Madison, so no offense taken over here!
Appreciate it, Lorin.
Nicely done!
It's difficult to read an article on photography when you don't care much for the accompanying photos which, presumably, are a result of the techniques discussed. Horses for courses. :-|
That's understandable. The setups are still worth a try, though, if you like the light quality.
Actually, that's the part I didn't like. I can't even say why.
Last setup is pretty neat.
Very helpful article.... I wish I had a window in my studio! Love this type of lighting.
I've used a sliding glass door at home for the same effect. That's the nice thing about windows, you can find them almost anywhere ;)
Very informative article. Thanks for the write up! Really appreciate it.
Absolutely, I'm glad it was helpful!
Great article and great shots. Nice little reminder that all that work manhandling my strobes is an effort at recreating natural light patterns anyway, so you if you're lucky enough to have a studio with a big window, use it!