
Imagine yourself under a starry night sky. Wouldn’t it be great to capture the Milky Way to show it at home or on the web? Unfortunately, you are left with a black frame after you’ve pointed the camera upwards at settings you are used to. It's time to open up the aperture, lengthen the exposure, and bump up the ISO. You will introduce noise, but do you really care? Aren’t there tools out there to reduce noise but still keep the detail?

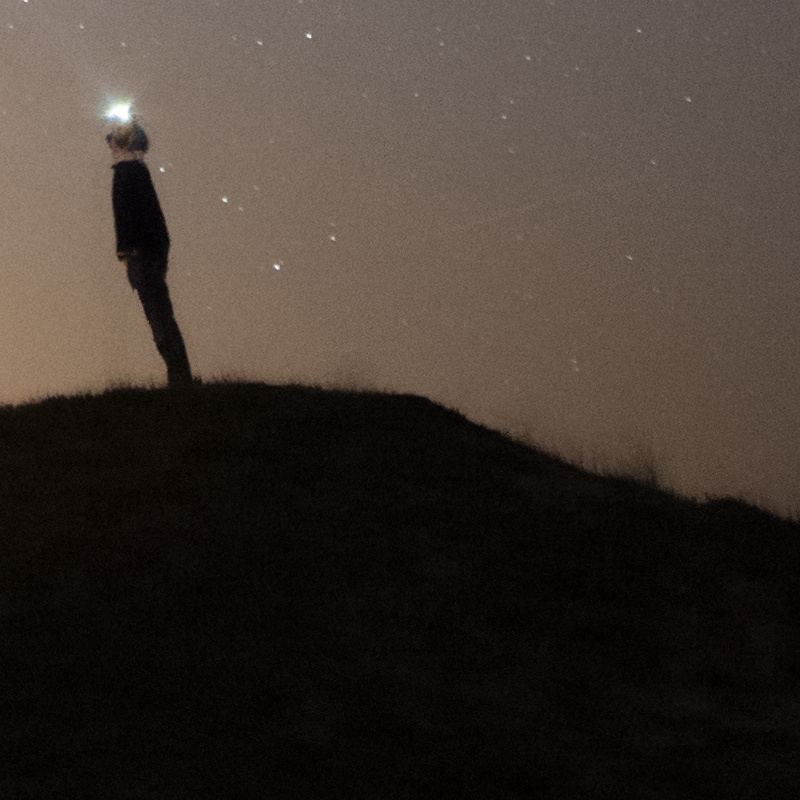
“Expanse of the Night.” Shot with a Nikon D750 with a Samyang 14mm f/2.8 IF ED UMC Aspherical Nikon AE (Rokinon, Bower, Walimex: they’re all the same, just rebranded). 15 s at f/2.8 and ISO 6400.
Method
Full disclosure: I’m not affiliated with any brand or software developer. I’m just a regular landscape photographer who happens to shoot Nikon. In fact, I would love to learn which current software reduces noise the best myself.
There are many tricks and tools available to enhance the quality of our images, about as many as there are genres in photography. I'm choosing to compare those tools on a nightscape image, because its typical usage scenario is almost always the same. In which other genre do you max out the ISO as well as the shutter speed for almost every shot? Anyway, raw converters and Photoshop plugins will help to reduce noise, but what we really want is to increase the exposure of the stars in these nightscapes without increasing the noise. We want to increase the signal-to-noise ratio. I’ll touch on that in another article. But we can’t expose for the stars any longer, since the rotation of the Earth will stretch them from pinpricks to streaks across the sky. To avoid star trails, there’s a rule of thumb going around the internet, but I’ll warn in advance that there’s more to it.
Shutter Speed
To make a long and complicated story short: An increased exposure doesn’t necessarily mean more and brighter stars. If you can follow along, this next part may appeal to you. Don’t worry if it’s too complicated. Just skip to ISO and we’ll catch up there.
The rule of thumb is the 600-rule, which states that if you divide 600 by your focal length on a full-frame camera, the maximum shutter speed in seconds pops out at the other end of the equation. So, if I shoot at 14mm, this “rule” will tell me that I can expose for up to 43 seconds until the stars appear to trail. While this may be the case when your composition includes either celestial pole, it is definitely not the case when you capture the galactic core of the Milky Way. Even a shutter speed of 20 seconds with a 14mm lens on a full-frame body is really pushing it in terms of preventing star trails. The 500-rule is a better rule of thumb, but for the sake of the argument, think more along the lines of a 300-rule if the Milky Way is the subject for your full-frame.
Think of a star that at the beginning of the exposure is in one place. As it progresses along the night sky, its image is projected upon the camera sensor. A photodiode, a piece of a pixel on a camera sensor, translates the brightness of that star into an electric charge. The electric charge recorded over the exposure time multiplied by the ISO-setting is a measure for how bright that star actually is.
Let’s say a pixel recorded about 30% of its capacity. Now, consider that at the end of the exposure, our planet has rotated and the sky seemingly shifted one pixel. And it too records a value of 30%. While both record a value of 30%, neither of those will ever reach 100%, because of Earth’s day and night cycle.
ISO
The camera used to capture an image to test the capabilities of noise reduction software was the Nikon D750, with a native ISO range of 100-12,800. Above that range, the signal will be amplified once it's been recorded by the sensor. At any lower setting than 100, that signal is attenuated. The maximum setting on the D750 will overexpose the city lights on the horizon (light pollution), so we avoided maxing out the camera.
Let’s say we don’t bump the ISO all the way to 12,800, but settle for a stop less at 6,400. That keeps the light-polluted horizon well within the histogram and certainly works wonders for noise reduction purposes.

We'll eventually compare stars in a dark area, a nebula-rich area in the Milky Way, and in the foreground with high contrast to the light polluted sky.
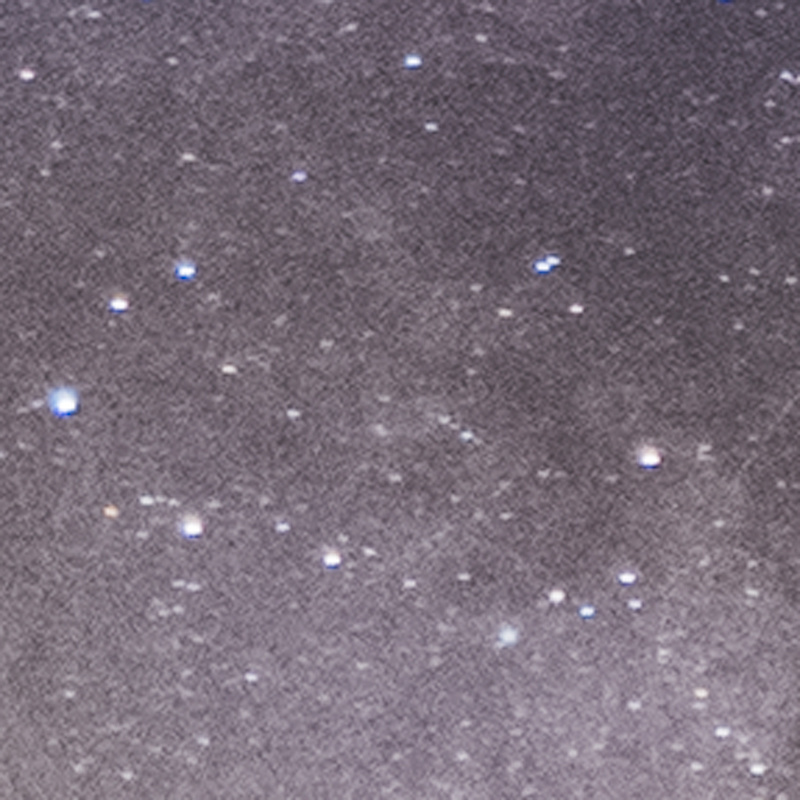
We will work with Adobe Lightroom as a hub to find, compare, and eventually process the image. What we are doing in this step, is called pre-processing: creating a single file which you can work with in your favorite image editor. This comparison is intended for reducing noise before you do anything else to it in order to retain faint stars and nebulae. Let’s work on the above raw photo, zooming in on the red marked area of the image and applying an "s"-shaped contrast curve to better see what would happen if we processed the image after noise reduction. We’ll compare the seven applications listed here:
Raw Converters:
Plugins and Filters
- Topaz DeNoise 6
- Noise Ninja 1.2.6
- Nik Dfine 2
- Photoshop CC 2014 (Reduce Noise filter)
And we’ll compare each of those with whichever comes out best of:
- The average of a stack of three images
- The median of a stack of three images
For the tested plugins, I have exported 16-bit TIFF files using Adobe Lightroom, leaving every develop setting turned off. As for the tested raw converters, I have only turned on the noise and sharpening modules in those, effectively exporting the same result as Lightroom should.
Registering and Stacking

What can we do with three images, shot in quick succession at exactly the same camera settings? Of course we can try to auto-align them in Photoshop, but that will not get us very far. The sky shifts with each exposure, while the foreground is static. A dedicated free program will aid us in the alignment. We will register the initial three exposures (untouched TIFF files from Lightroom) in DeepSkyStacker, a program dedicated to astrophotography. It both registers (detects stars in exposures and aligns them to compensate for the rotation of the Earth) and stacks the images you’ve shot. The are many more applications that will do the same, like PixInsight, Starry Landscape Stacker for Mac, and Registar for Windows, but DSS is completely free. I ask that you trust me when I say that using multiple exposures that are offset slightly from each other result in the best possible noise reduction method without sacrificing small details. And the more images you have, the better your result will be. The true workings of stacking software are very complicated and are not within the scope of this comparison. However, I have only used DeepSkyStacker to align 3 images, which I’ve stacked in Adobe Photoshop CC. It’s really important that you align every star perfectly before you do, whether you do this automatically in DeepSkyStacker or manually in Photoshop with layer masks.
Average Versus Median
Stacking the exposures in Photoshop through a median mode is achieved by importing each registered exposure into a separate layer, then selecting all three layers and going to to Layer, Smart Objects, Convert to Smart Object. Now, go to Layer, Smart Objects, Stack Mode, Median.
The median method above works pretty well when you have a large number of exposures. Another method to stack your images in Photoshop is by averaging them. Averaging the three exposures works by putting each registered one in a separate layer as well. Set the bottom layer to 100% opacity, and each subsequent layer to an opacity value that is 100% divided by its exposure number. So, the second exposure you add will be set to an opacity of 50%, as 50 equals 100 divided by 2. A third exposure will be set to 33%, because 100 divided by 3 equals a rounded 33%. A fourth should be set to 25% opacity and so on.
Eventually you end up with something like this:

Average vs. Median.
While the stars are perfectly aligned with the help of DeepSkyStacker before, the foreground is all jumbled up. It’s easy to explain, but harder to correct. First, I can hardly sit still for a couple of seconds (and yes, this is a glorified selfie). Second, DeepSkyStacker detects stars and aligns the images based on their position. The foreground then gets distorted due to the rotation of the Earth. To compensate, I typically shoot one extra exposure just for the foreground at a lower ISO setting and longer exposure length. The foreground isn’t affected by the rotation of the Earth, so you can easily expose for a couple of minutes in low winds. Do be aware that increasing the shutter speed will also increase the temperature of the sensor, and that will introduce thermal noise in your foreground.
As you can see, producing a clean, noiseless nightscape involves advanced planning, shooting, and processing, but that's not why you're here. Let’s get to the actual noise comparison. Averaging the three images does produce a marginally smoother image, as seen above. Here is stacking versus raw with added contrast:

Stacking vs. raw with added contrast.
So, the above comparison shows our best stacking method with three images. Mind you, three images is not a very good stack, but it sure does help with suppressing noise. We will move on to comparing each application with that average stack, so we can see how well they reduce noise without sacrificing detail.
Raw Converters
These suites perform a host of features. Noise reduction is one of them. The idea is that raw files contain more data, and when you get rid of noise during this step, it is more accurate. Let's see if there's any truth to that.
DxO Optics Pro 10 Elite
The "Elite" version of Optics Pro comes at a cost of $70 more than the essential edition, but also comes with some great perks. PRIME noise reduction is one of them, and it is supposed to yield amazing results. I've used these settings, which gave me the best results for this image:
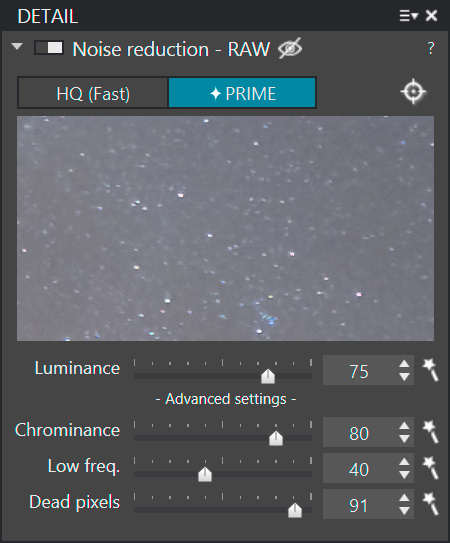

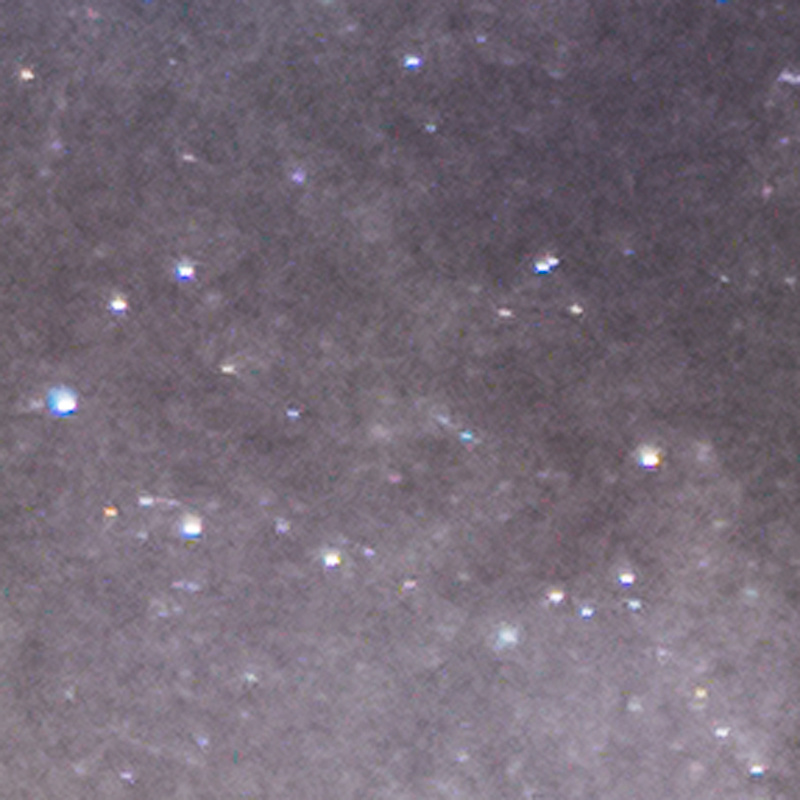
Average stack vs. PRIME noise reduction on raw.
It's nice and smooth, but optical aberrations at the edges of bright stars become more apparent, which is easy to correct with the built-in lens correction feature at the press of a button. However, faint stars are getting drowned out by the higher contrast that its raw conversion algorithm produces. Optics Pro also leaves some color to be desired in the stars, but the structure in the Milky Way nebulae is very pleasing to the eye, especially when we're not zoomed in 300%.
Adobe Lightroom
Lightroom 6 comes in at $149, or $9.99 a month for its CC counterpart as well as Photoshop, but does so much more than noise reduction. In Lightroom, I've applied these settings, which yielded the best results for this image:

Average stack vs. Lightroom noise reduction.
The careful color noise reduction comes at a cost, but the Masking setting is great. The latter works by not applying any sharpening on smooth areas, thus only sharpening fine detail. There's a lot of color noise going on, but the preservation of colour in the stars is quite good, just like the contrast in the nebulae.
PhaseOne Capture One
A raw conversion suite as well as a library for all your work it's a true contender against Adobe Lightroom, but at a whopping $299.


Average stack vs. Capture One noise reduction.
Capture One's sharpening is quite similar to Lightroom's, with the Threshold slider preventing smooth areas from becoming overly sharpened. The amount of noise reduced is very similar to the average stack, but there's much more random color in large swaths, while there's almost no color at all in the stars. I personally do like the pattern of this noise, since it resembles film grain and doesn't look quite as digital, but that's a matter of taste.
Plugins and Filters
A plugin is something that works in or around your image editing workflow. You can apply a specific filter in a standalone program and come back to the image editor with your photo hopefully looking better than before. I've racked up the most popular noise reducers that work together with Photoshop.
Photoshop CC 2014: Reduce Noise Filter
Photoshop has its own noise reduction filter. So, why go through the trouble and price of a dedicated noise reduction program? I've found that these settings with this filter give the best results for this image:


Average stack vs. Photoshop's Reduce Noise Filter.
The amount of noise reduction and color almost look identical to the stack, but that's where the similarities end. Some of the larger, faint stars are pulled from the sky. Large stars are reduced in size and the structure of the nebulae becomes much harder to see, and there's a distinct swirly thing going on with a good amount of introduced local contrast.
Nik Dfine 2
Recently, Google announced that the Nik Collection is now free to download. There's absolutely no reason not to use and discover the power of both Color Efex Pro and Silver Efex Pro, but what about the collection's noise reduction plugin? I've left the measurement on auto and increased the reduction of Contrast Noise, while I toned down Color Noise for best results.


Average stack vs.Nik Dfine.
That's interesting. Faint stars in the darker areas are erased, while stars in the brighter nebula are mostly left alone. The pattern looks slightly swirly, but more natural than Photoshop's attempt. There's also a slight increase in saturation on some of the stars, while others have been desaturated. Finally, we see less structure in the nebulae, and medium brightness stars are reduced in size. But not bad for a free plugin!
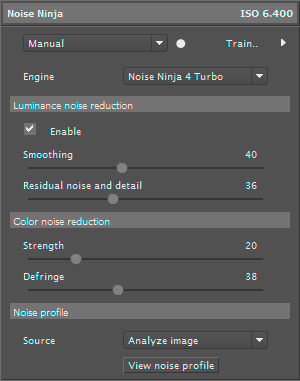
Noise Ninja 1.2
Noise Ninja is yours as a part of PictureCode's Photo Ninja Suite for $129. As with most of these suites, you'll get a host of applications along with Noise Ninja, one of the most talked about noise reduction algorithms in recent times. Does the Noise Ninja 4 Turbo engine live up to the hype as we apply these settings to our night sky?

Average stack vs. Noise Ninja.
The noise pattern looks identical to me. That's a good thing. And the reduction does a good job at smoothing out the background. However, the stars in that background are smoothed until there are none left, while the overall image looks to me like it's pockmarked rather than star-speckled. The nebulae do look more cloudy and contrasty than some of the contenders, but not by much.
Topaz DeNoise 6
The latest upgrade to DeNoise is yours for $79.99, while the whole suite of Topaz software, which includes 16 more plugins, sells for $499. But just look at the amount of settings. I tweaked these for the better part of two hours to get the best result I could squeeze out from DeNoise.


Average stack vs. DeNoise.
It's buttery smooth, but with a lot of digital-looking artifacts. I like the fact that this algorithm works by analyzing things locally. Not every part of the image is the same, and some parts benefit from more reduction than others. With that being said, the result isn't natural-looking anymore. The nebulosity is more foggy than cloudy, and stars that are close together clump together with lots of noise in between them. There are obvious squares in the pattern as well, and faint stars are erased here too.
Put Them Together
So, what's the verdict here? Let's compare all of them in one composite to reach a conclusion.
 The big surprise is that Photoshop's built-in filter retains the most stars after the median stacking method and the average stacking method. The background produced by Lightroom is rather grey and cold, while Capture One's background is the most colorful of the bunch. Lightroom and Noise Ninja provide the highest contrast between the nebulae and background in this area.
 Stacking the foreground doesn't work with the methods used in this comparison, so we'll leave them here. Topaz DeNoize produces a foreground that looks out of focus, but there's no noise left. Adobe's Lightroom and Photoshop both produce the most detail, especially in the shadows. Capture One and Optics Pro add in more contrast than the other methods, but that can easily be balanced by lowering the contrast since they are raw converters. Noise Ninja and Dfine are the balanced winners in this case, with Dfine showing more detail and Noise Ninja more noise reduction.
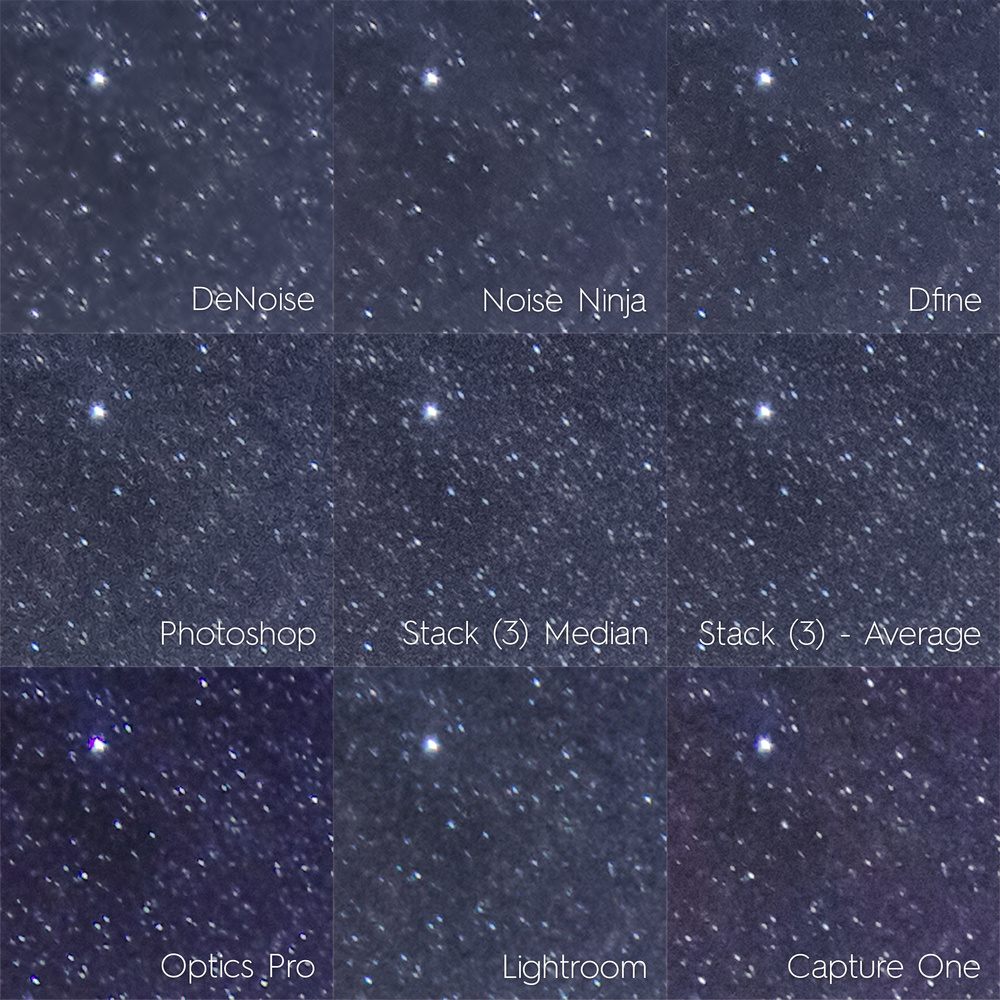 This is where it gets hard to count the stars. So, let's look at the obvious differences first. Both Capture One and Optics Pro are the higher contrast images. That may be to your liking, but again, it can be dialed down easily if it's not. The first three images, the plugins, sure have the least amount of stars. And of those, Dfine is more grainy, and DeNoise is more blurry. The raw converters do better, but Photoshop's filter leaves the most stars intact when compared to the stacks. Noise Ninja and Lightroom come really close here, so let's compare those two in detail, without the added contrast.

Lightroom vs. Noise Ninja.
With Lightroom showing more color detail and Noise Ninja showing more reduction, I'd say this is matter of taste. The blue shift in the stars is also due to the fact that this comparison is a crop of an area close to the edge of the frame. Aberrations in the lens (coma and chromatic aberration), as well as an aperture setting that shows the most of those aberrations are the reasons for that. Noise Ninja handles those aberrations quite well without any other correction at all. Lightroom, however, respects those color shifts in order for you to work on them separately.
Conclusion
So, which will you choose? My recommendation is that you at least do some amount of noise reduction with a program you currently have. And by all means, give Nik Dfine a shot. It's free, remember? The prize for most aggressive noise reduction method goes to Topaz Denoise, and the prize for most conservative to Photoshop's Reduce Noise filter.
The very best results, however, are achieved by shooting many more images, editing those frames simultaneously in a raw converter of your choice without applying noise reduction, and stacking them, perfectly aligned. Any residual noise you can then reduce with the aid of whatever plugin or filter you already use, but with restraint. It's a lot of work, but it produces the highest quality image, one that's representative of that great night sky.
My opinion? Stacking only two images increases the signal-to-noise ratio about 1.4 times, but it also increases the dynamic range, so you'll have more leeway in post-processing. I'm sure eager to try Noise Ninja after I have stacked at least two images or if I haven't had the time to shoot multiple images in the field. I've previously always used PRIME noise reduction in DxO Optics Pro on my single-shot nightscapes, but that's about to change due to the results I've seen here. Thank you for your time. I know it has been a long read!
 You can find more of my nighttime work here.


Very interesting and helpful article! I am a huge fan of wide field astrophotography so this is certainly right up my alley . I currently use a star tracker which routinely allows me to keep ISO in the 800 to 1600 range. After a several minute exposure there is still plenty of noise, however, so this will certainly come in handy!
Thank you, Taylor. I'm eager to learn which tracker you use. You have the most powerful combination here: Tracking and stacking. There's a little more to it than just imaging the night sky. When you do not use a raw converter with a noise profile for your camera built in, then you'll also do good by taking some dark frames, bias frames and flat fields.
Let me just point you here, instead of me writing another article in a single reply. :D http://deepskystacker.free.fr/english/faq.htm#lightdarkflatoffset
I current use a Sky Watcher Star Adventurer. It's a low end tracker but I've had excellent success.
Thanks. A mate of mine is currently looking into getting that one, so thanks for the +1 on the Star Adventurer.
Excellent writeup. I love the idea of doing this sort of photography in my free time. Will definitely save this for later.
Stacking 2 images reduces noise only by 30% not by one half (noise is added by mean squares).
And more, I do not like any of the NR examples and prefer the result of stacking alone. All the processed images look plasticky while the shot-noise pattern is not too bad for my eyes
Thanks for the input and the addition, Martin. Will correct.
This is an excellent article detailing the challenge that is noise reduction. However, I think your settings on all the types of NR have been a bit heavy handed.
I have tried so many kinds of software and techniques trying to reduce noise, but after a while of seeing washed out images, you learn that a lot of NR software actually ruins your images. You don't want plastic looking Milky Ways, you want detailed Milky Ways. And in most cases, the noise itself holds the details. So I've learned to 'embrace the grain' and never looked back. A light touch in NR can do wonders for your Astrophotography.
But, it also depends on your cameras sensor, I use a 6D and the grain is so good, it doesn't require much editing. But when I edit a file from my 600D it requires so much editing. Such a tough subject to crack :(
Great article, really. Thanks a lot for doing this.
One more for you to consider.... Perfectly Clear has a very awesome noise engine. I actually find it better than the others you've listed here. You can get it here to test and let me know if you need a copy for your review.
http://www.athentech.com/products/plugins
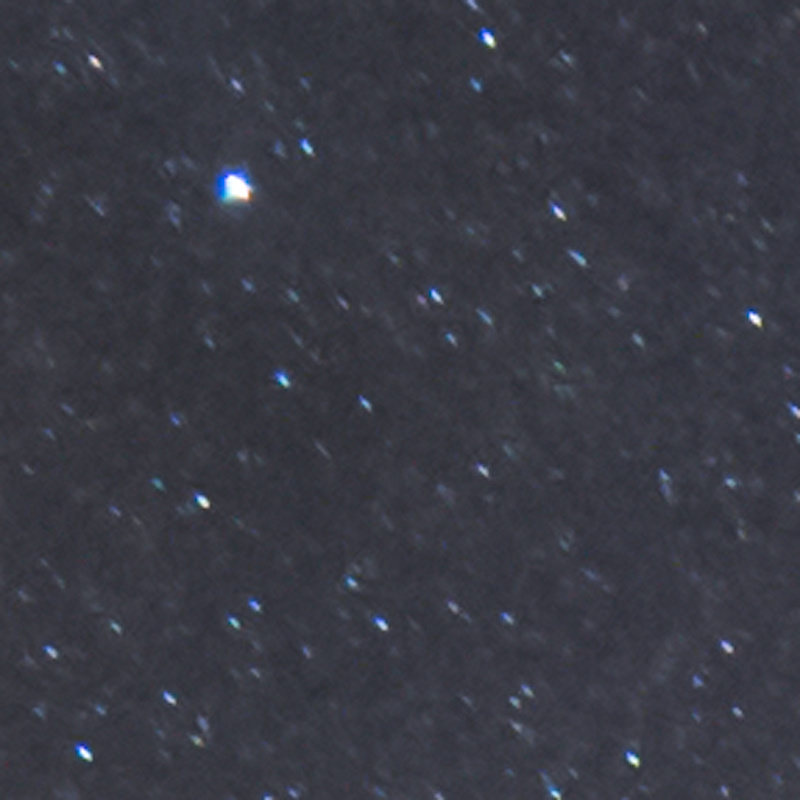
Very interesting article, the noise is a real pain in astrophotography. Stacking is a good way to reduce it but there are some limitations for night landscape photography: as Martin mentioned, the noise decreases with the square root of the number of frames, so there's no real advantage in taking more than 7/8 shots. On top of that, since the stars are moving, stacking is less effective where new stars enter the frame (usually two of the edges and around the horizon) and you might end up with a non homogenous noise reduction.
In my opinion if you're serious about astrophotography a star tracker is a really good investment. I bought a vixen polarie last year and I couldn't be happier.
Here's an example (100% crop) of a 4 minutes exposure at ISO 800 @15mm with my Nikon D750. At the bottom of this crop the nebula around Antares (the yellowish star) is very faint but still visible.
Isn't there another method people use where they take a frame with the lens cap on, then they take a High ISO frame with a short shutter, and a few other "control" frames and use those to help reduce noise? I don't shoot a lot of astrophotography so I'm not familiar with most of these methods but I think that method has actually crossed my reading more than these median and averaging methods. Has anyone compared the two methods side by side?
The dark frame has a different purpose than the median/averaging methods.
When shooting a dark frame you're recording the thermal noise (hot pixels) that depends on the physical conditions of the sensor at that moment.
The noise that you get when you increase the ISO is white noise, which follows a gaussian distribution so, mathematically speaking, given enough frames it averages to zero. That's the reason why the averaging/median method increases the signal to noise ratio.
Nikon cameras (I don't know other brands) have an option that takes the dark frames automatically for you. I think it's called "long exposure noise reduction" or something along those lines.
In astronomy it's common practice to also shoot a flat field frame, that is a picture of a white flat surface. This allows the stacking software to correct for vignetting.
Google Chrome: Settings -> More tools -> Add to desktop!
I have to also mention, My experience with Noise Ninja on the customer service side wasn't good. Took them forever to make a 64 bit compatible version for mac. And the plugin wasn't that old at the time. I actually gave up on it, cos 2 or 3 years later, no joy.
wow did I miss one? I have been using NOISEWARE for a few years and have been very happy with it. Has anyone else tried this?
http://www.imagenomic.com/nw.aspx
Sheesh this is one hell of a comparison. Well done man.
Great article - thanks for doing the legwork on this so we can all see the comparisons. :)
Frankly, I think that median is the only real method to reduce noise in your pics like this. Noise reduction tools are useful in general photography, but not in astro work. As Paolo pointed out elsewhere, a tracker is great if you want to get a bit more serious about astro work with your camera.
Although not relative to astro work, there's a good article over at Photography Life on minimizing noise in your shots, you may find it interesting:
https://photographylife.com/how-to-avoid-and-reduce-noise
Agreed, I made a video tutorial on this last week, you can see it here: https://www.youtube.com/watch?v=BOAnEU2iD2s
Thanks for the good work! :)
These pictures are incredible! I've only recently discovered stacking and I'm a big fan.
A couple of things jumped out at me though:
1. The D750 starts amplifying the signal from around ISO 800, and not 6400 as mentioned above. In fact, this was one of the main reasons I bought one to start with - you can shoot to preserve highlights, and recovers shadows later.
2. You say that the stacking methods used aren't appropriate for reducing noise on the stationary foreground. I might be missing something, but if you're not using a tracker and have your camera stationary on a tripod, is that not the perfect situation for reducing noise on something that isn't moving?
This is one of the most comprehensive reviews of a whole set of software and it seems to have been done with care and precision - I'm definitely bookmarking this for future reference!
Hi Charlie. Thanks for your input and kind words. If you're willing to quote a source for statement 1, I'd be happy to change that in the article. But I actually said: "...with a native ISO range of 100-12,800. Above that range, the signal will be amplified once it's been recorded by the sensor."
It's important to note that I've learned that the signal is amplified after it has been recorded by the sensor, not during when shooting above native ISO's.
And concerning 2: You certainly can use the foreground for a separate stack. Although the slight variations in the sky as a result of Earth's rotation help to increase the signal-to-noise ratio. With each layer, you correct for our rotation, thus re-aligning the sensor slightly with a next image. Any pixels that would otherwise be on top of each other, are now offset. Should a pixel be defective, malfunctioning or registering a false-positive signal as a result of noise, stacking will take care of that pixel.
Thanks again!
Great article, thanks for sharing!
How did you use DSS to align the images and then output them so you could do the median stacking in Photoshop? I've been digging around in there for a couple hours and cannot figure that out.
Hope to be of some help here: Check out Forrest Tanaka's video on stacking in DSS:
https://www.youtube.com/watch?v=e0JSTF8SGi4
You register the images and output them directly. So "Save picture to file" instead of going through with stacking them in DSS.
Did you ever try Noiseless? Curious on how it worked...
For other subjects, NR can be very useful, but stacking is not an option. For birds and wildlife, I often find myself shooting at high ISO, in low light, to get the shutter speed up. This will result in noise, which I handle with DxO's Optics Pro 11.3.1 PRIME noise reduction. I find that raising the Luminance correction too high, such as +75, as in this article, will crush details. Instead, I use a setting at like +32 and raise Micro Contrast to around +40. This preserves fur and feather detail, while reduce the noise to a level that looks like mild film grain. For Chromanince, I set the slider at 100%, since it has little or no impact of details.
Thanks for the suggestion, David! Appreciate it. Crushing the details is starry landscapes is a shortcut to lessen the amount of stars to create a more impactful image. But I agree: Sliding that one all the way up will result in detail clipping too much. Especially for the foreground.