
Automotive reflections can be a pain, especially if you are restricted to where you can shoot the vehicle. Reflections of the surrounding environment can really ruin your image.
In this tutorial, I'm going to show you one way you can really reduce these reflections, in this case, the trees, and perhaps also introduce a new Photoshop tool that you may not use too often, the Mixer Brush. This is a very versatile tool, especially when it comes to reflections, and can be used in so many ways throughout your editing. For now, though, I'll just deal with basic usage and how that played a major role in editing this image.
The image was shot in the last stages of the golden hour and the beginning of the blue hour, simply to diffuse the highlights and provide a more graduated feel and tone to the shadows. As it was shot in a parking lot surrounded by trees, the easiest thing to do was to remove them from the scene and replace them with a dramatic sky and some mist. I kept the pavement under the motor but added a new shadow to help ground the image.


The Process of Editing
The first stage of the edit was to work out the contours of the auto and how the light and shadows played with these. For the entire edit, I mainly worked panel by panel except for the doors, where it made sense to work over the two as it was a continuous edit. Not knowing much about this model of the vehicle didn't help, but the way the reflections and light worked made the job a lot more manageable.
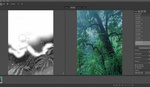
I first mapped out in my head roughly where the edits were going to be taking place and how the contours would work. This was mainly based on the visual information I had and what I wanted to remove or clean up, in this case, the trees. The red arrows in the image below indicate the flow I was imagining the contours would make when corrected.

The Pen Tool
Working panel by panel, I used the Pen tool to carve out the flow that I was seeking for the new reflection, and once I was happy with this, I chose Selection from the Options tab. In the window that appeared, I chose a feather of 0.5, which would allow for any discrepancies and also aid in another edit along the way.

Once the selection was made, I created a new blank layer on which to work on. This again is required for the rest of the editing process. So, if you follow this tutorial, remember to create a new blank layer after each selection is made, or some of the future steps will be applied at an extra intensity and perhaps won't work as well, namely Noise and Gaussian Blur.
The Mixer Brush
This is where the fun begins. Now, I won't go into the depths of the Mixer Brush in this tutorial, but needless to say, it has quite a few options that will work wonders with reflective surfaces. It can also be used to paint with. So, if you are an artist of digital paintings, you will have a lot of fun with what this tool can do. For now, think of the Mixer Brush as a type of Liquify effect. In layman's terms, the Mixer brush will mix the colors that are below the brush.
For this technique, I've stuck to the main brush, the first brush in the General Brushes option, as this will work best with the type of surface I have for the automobile. My settings for the brush are also indicated below:
1. Load Solid Colors Only: This will pick up the underlying color from the image and blend them.
2. Clean Brush: selected. Cleans the brush each time after the mouse or pen is released from editing.
What's not selected is Load Brush, as this will load any color that is set in the foreground/background color option.
3. Wet, Load, Mix, and Flow control the intensity of the brush and will vary from image to image based on the effect you desire. I would definitely play around with these until you get the hang of them, although it won't take much to become accustomed to.

Knowing that for this panel edit, I wanted to increase the darker tones and take them to the inside line of my selection, I worked from the center out towards the marching ants boundary with quite a large brush size. With this selection being on its own new blank layer, the smearing effect will be recorded there. If you make a mistake or don't like the end result, simply either step backwards, CTRL+Z (pc) CMD+Z (Mac), or delete the layer and start again.
The Mixer brush will pick up and mix any of the colors below it, so to speak, so if you grab a color, even from outside your selection, it will blend it. If you try it, you will see what I mean. This can be very useful when blending, however, and you will quickly get the hang of it. Brush size is also important when blending, and choosing different sizes of brushes depending on the type of blend you are after will yield different results. I've found that a large brush for the larger areas creates a more pleasing blend overall.
Invert Selection
Once happy with the results, I checked the perimeter of the selection to see if any areas outside of this had been missed. A few had, so I inverted the selection and with a smaller brush, gently brushed them back towards the marching ants.

Noise and Gaussian Blur
Now that the mixing was complete, I had to blend my new layer into the image. I did this by adding Noise to the layer, in this case, set to 1.53 and Uniform, as this suited the entire image more. Then, adding a Gaussian Blur of 0.5 to the layer and pulling back the opacity to between 78 and 92 helped the blend it even further. The pullback of the opacity is very useful in any editing scenario, as the colors of the underlying layer help to show through and match up your new layer overall.
In some of the other panels, I doubled up the noise adjustment and then added the Gaussian Blur, as each one worked differently depending on the location within the image.

Repeat the Process
The remainder of the panels were completed in the same way. First the Pen Tool, then Selection, then Mixer Brush, then Noise, then Gaussian Blur, and then a slight opacity blend. For some of the layers, I did have to adjust the Levels of that layer to allow for the blend to match in better, but that was not necessary for a majority of them.
Finally the Clean Up
Once the entire vehicle had been retouched and the reflections adjusted using this method, it was time to go around and clean up any other areas using, in this case, the Patch tool. When using the Patch tool, I have a tendency to throw the selection to a nearby area of the same tonality so that I am not picking a spot where I think it will work best. Photoshop does a great job of this without my intervention. The only time I tend to place my selection is where there is a gradual tonal shift, as again Photoshop does a great job of blending this in.

Conclusion
It wasn't really a time-consuming process, and although photographing the vehicle in a more spacious location would have been my first option, editing this way for me was a cathartic experience and allowed me to experiment more with the mixer brush, which in turn allowed me to see what I could do with it and then store this method in my memory for any future edits with similar issues.
Automobiles can be edited in so many ways: Gradients, Clone Stamp, Content-Aware Move, the list could go on, but nothing beats getting it right in camera, so I'd aim for that first. For myself, with this image, I was limited with the parking lot and surrounding trees, so I had to come up with something to repair the reflections.
Hopefully, you've taken away something from this tutorial, especially if it's intrigued you enough to try out the Mixer Brush on some of your own images. Either way, it's a positive.


Nice work. Great results.
Many thanks Andy, really appreciated.
Love! I use the mixer brush on all my bottles (I work in beauty) I don't know why it took me so long to figure that out!
It's a great tool to use, perhaps under used. At a very low flow it can produce great results with skin as well.
Really good stuff. I use something similar in jewellery, but it looks great on cars!
Many thanks Robert. The mixer brush is such a versatile tool isn't it.
Informative! Thank you.
Glad you enjoyed it, thanks for reading.
I can already see how the mixer brush is going to be my new best friend. Thanks for this...it's appreciated.
Thanks for reading Rick, glad you found it helpful.
Great work! Thanks for sharing.
great tutorial
Many thanks Lee, really appreciated.