
Frequency separation and dodge and burn are powerful techniques for retouching photographs. But which one is better?
Well, imagine you have a fork and a spoon. Which of those is better? Just like asking which utensil is better is an inane question, so too is asking which retouching technique to use. They’re both powerful tools that should fit into your retouching repertoire!
In this article, I will briefly explain what each technique is and the philosophy of where to use each one in the context of portrait retouching. There are already heaps of guides on how to do this on YouTube, but if you’re like me and are always tabbing back and forth and pausing those, this might be a nice reprieve with something that’s written so you can go at your own pace. With that said, in no particular order, let’s begin!
A Non-Destructive Workflow
Working non-destructively is super important, but what is a non-destructive workflow? Imagine you have been working on a single image for a good hour or more; that’s not out of the norm when you are still learning the ropes. Heck, it’s still not out of the norm for me if an image is super complicated or needs special attention, but I digress. If you have set up the file to be non-destructive, you have approached it in a way that you can go back and undo any of your changes at any point in the workflow. This is often achieved via the use of layers.
In the context of the techniques covered in this article, when I work non-destructively, I use various blend modes and layers so that if I’m quite far in the process, I can just delete a layer entirely if it’s not working or mask out parts of it using layer masks. I never work on the "base" image.

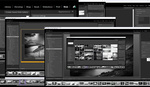
The above image is a typical starting point of an image file for me. It might seem like a lot, but it’s pretty simple to understand. Reading this from the bottom working up, I keep a copy of the base file in case I need to go back to this at any point, I can cut parts of it and paste that on top or mask out a higher layer. Above that is a low frequency layer in the low frequency folder; these don’t usually get touched. The high frequency layers in the high frequency folder are identical copies of each other; but to have a non-destructive setup, the higher layer clipped onto the one below it is the one I work on and manipulate. If I need to ever undo a part of something, I can always mask out parts of the working layer. Above this are the dodge and burn folder. Some photographers usually have a single dodge and burn layer but I prefer to work on them separately so that I can manipulate their opacity settings independent of each other. Usually, things get “dodged” a lot more than things get “burned.”
As a bonus tip, back up your files. This can’t be stressed enough. With that in mind, at minimum, I usually keep a copy of the raw file, and then multiple copies of TIFs which are exported through CaptureOne. The TIFs, which are retouched in Photoshop, are then exported as JPEGs and I’ll usually have at least a copy, if not multiple copies, of the TIF and the JPEG. The absolute worst thing you can say to a client is that you’ve lost a file. Back that file up! And then again!
Frequency Separation
Images exist in a high frequency and a low frequency. This is easier to visualize if you imagine a children's coloring book. In a coloring book, you have the lines and inside the lines, you have the parts that would get colored in. The lines are the details of what a thing is, and the color fills in those details with additional information.
To contextualize this in terms of frequency separation, the high frequency is the details or lines in an image, and the low frequency is the "colored in" parts. To reiterate, this technique quite literally allows you to separate high and low frequencies of an image so that you can work on each one independent of the other.


I tend to use frequency separation "fixing" things up. If you use the slider in the above image, you'll notice some of the "dead skin" has been removed. By working with frequency separation, I was able to remove the details of the anomaly without affecting the color or shading of the skin. With the previous "coloring book" analogy in mind, I worked in the "line" parts of the coloring book without touching the "colored in parts".
This technique is great for getting rid of blemishes or pimples or fixing up specs of dust or lint on clothing. Essentially, it’s more maintenance, within the realm of what a good skincare regiment or lint roller might provide.
Dodge and Burn
In ye olden days of film (before my time!), a positive image was developed using a negative. Parts of the negative would be exposed onto the positive image for longer, burning it in, to yield areas that were darker than what was captures. Conversely, parts of the negative would be exposed for shorter periods of time onto the positive image, dodging (the light/exposure), so that they were lighter than what was originally captured. I’ll confess I’ve never done this in a darkroom, but the concept when working digitally is the same. You selectively make specific parts of the image lighter or darker.


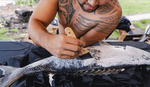
This sitter had a great bone structure. He is a professional model after all! However, without a makeup artist on hand, we had some splotches on the skin. I was able to remove these using dodge and burn so that much of the skin texture was preserved; additionally, I brought out some of his musculature and facial features in the process as well.
Dodge and burn are great, in tandem, for enhancing features of a subject. This is more of the smoke and mirrors side of retouching. You’re essentially hiding and enhancing what is already there.
Conclusion
This has been a fairly brief introduction. The main reason for that is because skin retouching can get quite intense. There are so many more tricks. But these two techniques, used in tandem, are a great starting point. To summarize though, frequency separation is great for cleaning up and managing imperfections. Dodge and burn work best to enhance the sitter’s features and shape and sculpt what is there, along with using light and makeup, to achieve the desired outcome.
In the comments, I’d be keen to hear what your thoughts are on post-production? Do you utilize these or any other techniques? Would you be interested in perhaps a more in-depth tutorial on how to set up your files to achieve these effects? Let me know!


I use dodge/burn for the majority of my skin work. Though, back in the day, I'd never imagine you can make skin appear smooth just by brightening and darkening. I did the cheesy methods of using negative clarity + adding structure; or, frequency separation and selecting parts of the skin and applying Gaussian blur.
I use frequency separation minimally. Usually for some color correcting; and muting totally blown highlights on the skin.
Absolutely! That's all you really need.
And I use the opposite approach, generally starting with FS then moving to D&B. However, instead of blur I use the Mixer Brush to blend values and tones. One of the secrets is to work with in a specific range of feature sizes and stick only to that. So many people try to do everything in one pass, and FS is really more suited to deal with specific ranges. For example, one FS group for major blemishes, another for skin texture, and one for hair.
The same can be said for D&B of course - one set for detail corrections, another for sculpting, a third for vignettes or background.
I have yet to use frequency separation at all, many because I have been mostly unaware of it. I have an image that may benefit from it that I'll try soon, so thank you for this excellent article.
Also, is it frequency separation (Used to an extreme) that allows some people to give their models the skin texture of a mannequin?
I'm glad you found this useful. Please keep me update on how you go with it!
And yes and no. It's one of those things that it can be, but anything done incorrectly can do that.
As a philosophy, I tend to go by the 2 week rule when retouching. If what you are retouching can be removed in two weeks (for example, a spec of dust, a stray hair, or even a pimple, then get rid of it, etc). If something is a more permanent feature and is a defining characteristic of the model, then leave it in (such as a mole, a scar, or freckles, etc).
Though the vast majority of my skin work is done with DB, FS certainly has a place IF done correctly. Properly done FS retains texture.
Absolutely agreed. :)
Which one do you believe is better?
Honestly, the method you're most comfortable with at the moment. As you learn both techniques, you'll probably find yourself moving back and forth until you get your "feel" for each one. Take some time to learn both approaches, try each out on the same problems and see what works best for you and your style. That's the best way to tell.
There is just something about frequency seperation that i think takes edits too far. Some shots become unattractive because so much of the human eliminates are removed and they come off like a mannequin. I like fine lines and moles.
Frequency separation is a tool. Like any tool, it's upto the user on how they use it and to what extent.
As a philosophy, I tend to go by the 2 week rule when retouching. If what you are retouching can be removed in two weeks (for example, a spec of dust, a stray hair, or even a pimple, then get rid of it, etc). If something is a more permanent feature and is a defining characteristic of the model, then leave it in (such as a mole, a scar, or freckles, etc).
Both are useful and both can be overdone. I am currently in a place where I am trying to stop using either unless I NEED it. But, sometimes you gotta.
That's a great summary of the article actually. Thank you! :)