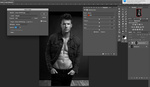
Last year, Unmesh Dinda of PiXimperfect produced an excellent tutorial on how to remove harsh shadows from an image using Photoshop. In this new video, he reveals a much faster way to achieve equally good results.
Dinda’s original technique was certainly effective, but it was definitely time-consuming, with a lot of work required to brush in the mask to remove the shadowed area. Dinda’s new tutorial offers a means of massively speeding up the workflow, using a selection and some intelligent methods for dealing with the areas of transition, which can be difficult to hide.
For those more accustomed to dealing with dodging and burning, it might be worth noting that lifting shadows in this manner can result in a loss of saturation, leaving the skin looking slightly gray where it has been dodged. If you decide that you need to create a new layer to bring back the saturation, remember that if you hold Alt (P.C.) or Option (Mac), you can drag the mask from your curves layer and copy it to the mask for your color adjustment layer. This is a quick way of making changes while having them target a part of the image that you have already isolated.
Let us know how you get on with Dinda’s new technique in the comments below.


.
Fstoppers more and more degenerate to reposting YouTube vids.
I am curious as to how you did this, was it automatically by Facebook, or manually in your posting somehow?