
Whether you’re shooting macro subjects like jewelry and flowers or landscapes on the latest high-resolution bodies, controlling depth of field can be essential. Focus stacking, where you combine multiple exposures at different focus points, can completely change the game when it comes to tricky depth of field situations. When you don’t have to worry about stopping down or picking what’s in focus, you can be even more creative. Fortunately, it’s easier than ever to properly focus stack. Check out this guide to the best field and post-production practices.
As mentioned, focus stacking involves shooting a series of exposures, moving the focus point a small amount between each shot. This set of exposures then contains a wider cumulative area of focus compared to even a significantly stopped down single photo, and these shots can then be combined in software to produce a final image.
Technique
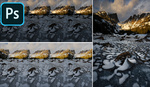
The basic setup goes: choose an exposure and set it manually, disable adjustments like auto ISO, and move focus to the nearest point in your image that you want to be in focus. From here, trigger the shutter, then move the focus point back ever so slightly. Ideally, you’ll just be shifting the in-focus area back, not changing it entirely. Continue to move the focus point back and take photos at each point, until you’ve reached the farthest back point you want in focus. If you’re going to try again or shoot a similar composition, I like to take a random picture of the ground just to separate the different stacks in Lightroom.

Here's an example of a single frame that would go into a stack. Note that depth of field doesn't extend across the whole flower, even stopped down to f/8.
There are a few things to keep in mind when shooting, regardless of which method you choose to capture the frames. The first is that you can’t take too big of a step between each frame. If you move the focus beyond the point where the two frames have the in-focus areas overlapping, you’ll end up with a subject that has alternating bands of focus and blurred areas. That stack is ruined, and you might not know until you get back to the computer, so err on the side of too small a movement, compared to too large.
The next is that if you’re shooting the stack by hand (not advised), make sure to lock in your exposure on the first frame. Each frame needs to be as consistent as possible, other than the focus point, and exposure changes can cause issues. Also, while you could shoot very small stacks handheld, it’s going to be much more difficult. When getting started, make sure you’re on a sturdy tripod, locked down.
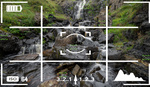
Finally, consider the impact that focuses breathing will have on your composition. Focus breathing is the effect where changing focus will subtly change the focal length of the lens. A shot with focus as close as possible could show or conceal things at the edge of the frame compared to a shot with a focus set back. When setting up a composition, consider moving focus through the range while looking through the viewfinder to make sure that everything you want in the frame will still be there throughout the stack. Stacking is one instance where a little preparation goes a long way; with 20 shots in a stack, a settings mistake can mean a bunch of extra work.
To create this set of exposures, you’ve got a couple of options depending on your subject and gear. The easiest solution is to just manually move the focus ring a small amount between each exposure. For macro subjects, this might require a tiny adjustment between each shot, which is where a dedicated macro lens’s big, finely geared focus ring comes in handy. When photographing and stacking larger subjects, where you have more margin for error thanks to the greater depth of field, you can use any lens’s manual focus ring, or even just use autofocus to focus at a few different points throughout the frame. Professionals often use a sliding focusing rail.

If you have a newer camera, you may have a great option built right into your camera. Some newer bodies support focus stacking right in camera, with the camera’s focus motor performing the same steps that you would manually: capturing frames, adjusting focus, and repeating until finished. For example, my Nikon Z 7 supports focus stacking. Check your camera’s manual or Google for more information. Typically, the implementation will let you select the size of the focus steps, the number of frames, and additional perks like automatically locking the exposure on the first frame.
Processing
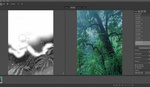
If you’re just getting started with focus stacking, Photoshop makes things easy. Photoshop supports blending a stack of images and does a pretty good job. As the stack gets more complex, larger, or you become more demanding in your workflow, there are some dedicated stacking tools, but first, we’ll just look at the Photoshop workflow.
In my workflow, I import and edit the images in Lightroom, performing the basic color and contrast adjustments. Lightroom makes it quick and easy to sync these changes across the images in the stack. Also, if you didn’t set a manual white balance in the camera, make sure you’re setting one now for your raw files. Remember that we’re trying to keep these files looking as similar as possible.

With the adjustments made, select all the files in the stack, right-click the selection, and choose Edit In, Open as Layers in Photoshop. Depending on the size of the stack, this might take a few seconds. Once it’s done, you’ll have a single file in PS with all the individual shots in layers. Shift-click the bottom layer to select all the layers, then Edit, Auto-Blend Layers. Select "stack images" if it isn’t already active, then click OK. From here, if the images are shot properly, Photoshop will go to work blending them.

The final result will be a set of layers, with each frame having a mask to reveal only the in-focus areas. While you can manually adjust these masks if necessary, I’ve found that the final result is usually good enough. To save time when making adjustments to the stacked image, I’d recommend you flatten the image. Flattening will collapse all the individual layers into a single one, drastically cutting memory usage.
Conclusion
Focus stacking doesn’t have to be complex. Cameras have made it very easy to shoot a clean, usable stack, sometimes with just a few clicks. At the same time, higher-resolution bodies have lowered the diffraction limit, making an alternative to stopping down to f/16 all the more useful. Lastly, faster computers and better software support have made stacks quick to process. When you’re photographing landscapes or 1:1 macros, consider shooting a stack next time! The result can be visually impressive, and it’s a great technique to have.


Thanks, Alex. Very useful little primer. I use focus stacking constantly, even for images that would work just fine without it - if only to increase the presence and resolution by sticking with the lens's optimal f-stop. But I'm writing to add four things to your list of considerations.
1. For much easier very small focus adjustments, I use the device linked below. It is easy to mount and unmount from the lens. Their image shows two attached; one for the zoom ring as well for the focus, but for stacking, one suffices. https://www.focusshifter.com/lensshifter-pro-follow-focus-dslr
2. For macro work, I'm often on the forest floor. Forest floors, being very compressible, can be responsible for moving the tripod system ever so slightly - enough to destroy a stack. One should find a comfortable position (standing, sitting, kneeling or bellyflopping) and STAY PUT for the duration of the stacking, reaching without shifting one's position to focus.
3. My tripod has a reversible center post. When the scene is very close to the ground, I often take advantage of that and mount the camera UNDER the tripod. Normally, this would reverse all the controls and settings, but I also have a multi-row panoramic gimbal system that allows me to put the camera back right for a much easier session. Because that gimbal system is a bit bulky (compared to a simple ball head) I end up extending and spreading the tripod legs to give me the necessary room while still getting the camera as close to the ground as I wish. If I didn't already have those expensive pieces of gear for landscape work, I doubt I'd have made the investment just for macro, but I did have them and life is good.
4. I have learned, relearned and re-relearned this lesson. When I think I'm done with the stack, I go back and use the fine focus adjustment that the camera allows to ensure that I caught any essential elements of the scene. You can have everything in good focus, but if you miss a critical plane being in tack-sharp focus, you could be unhappy with the results.
Photoshop works fine much of the time but when it doesn't it's a lot of work to fix. If stacking is your thing then consider Helicon Focus. Specialist software is almost always better than generalist software, if a little less convenient.
Yeah, good point. I ran out of space in this piece to cover Helicon Focus, but I'll be writing a follow up comparing it to Photoshop.
Focus stacking is fairly old technology in the Olympus micro four thirds system, so alternatively you could just buy a cheap second hand olympus em10 mk2 (their entry level model, they're now at mk4) and set it to focus stack for you. When combined with their 60mm macro lens (another bargain secondhand) some of their bodies even focus stack within camera.
There is also the benefit of the greater depth of field that the micro four thirds sensor gives you in the first place.
For landscape and macro photography m4/3 cameras have some advantages. One disadvantage for macro though is with true macro being 1 to 1, you are restricted to subjects that are smaller than the sensor size.
You win some, you lose some, there isn't a perfect camera.
With the in body image stabilisation you can even focus stack handheld. Check out Geraint Radford on youtube, not a tripod in sight.
It was my cheap way into macro and cost less than some photographers tripod set ups, not to forget the greater ease of movement from having less kit to carry gives.
As always if you do consider getting into another camera system, check out all the specs and see if you can actually hold one. A camera that fits you and your needs gets used, if it's you trying to fit around a camera it doesn't.
Malcom, I have a G9 and 5 different lenses, the G9 does have focus bracketing, but NOT the feature of a set time in between shots. Do any of the Oly cameras have this? I love my MFT System.
I'm not sure about your definition of a set time between shots..
Once you press the shutter button it just does it's thing. If that misses the shot you just go again.
Like I put in the OP watch Geraint Radford if his first focus stack didn't take he can take it again.
All courtesy of the in camera photo stacking.
Leon might be referring to a feature that's on my Z's implementation of focus stacking, where you can set a delay between shots to reduce shake in your setup caused by the shutter.
I always dislike the advice to buy a new camera. Especially when in this case you're suggesting one with substantially lower resolution than what the author was using (47mpix).
In my opinion, buying new gear is seldom a better answer than learning how to get around the limitations of your existing gear.
When I still had a G9, I never even bothered with the inbuilt focus stacking capability - Manual stacking is hardly slow and you're the one in control and are the only one to blame if it doesn't work. This in itself is a strong incentive to get it right.
To be fair though, seldom do I wish for a greater depth of field and the cases that I do are usually the cases when I don't have a tripod with me and there's too much wind anyway.
I agree and share your dislike of the advice to buy new gear, not just a new camera.
Sometimes the cost of working around the limitations of a given camera system outweighs the cost of buying into a different system which is better suited for the purpose.
For example if I want shallow depth of field, then it's a cheap secondhand DSLR full frame, with one of their cheap sometimes sub $120 brand new nifty fifty lenses, the equivalent work around on micro four thirds would be 3 to 4 times the cost for a secondhand lens. New retail the cost for the lens alone would be closer to 10x (25mm f1.2). True I could stand well back and try (usually unsuccesfully) to use a longer lens, but then I'd have a more restricted field of view..
Having watched a photo club trying to replicate a Gavin Hoey lighting youtube photo shoot, with their full frame cameras whilst he was using micro four thirds with a 45mm f1.8 (equiv 90mm f1.8) lens, really highlighted the point that workarounds are a pain and don't always achieve the same result. Sometimes there is no equivalent.
The reverse holds true, some people spend more on tripods and sliders than a secondhand lighter solution would cost them, for macro photography, in order to turn a shallow depth of field into a deeper one.
If you recognise that the choice of sensor size lends itself naturally to particular types of photography, you become system agnostic, and can actually save money, avoiding expensive and usually heavy weight work arounds.
An alternative would be everyone using 100mp medium format or larger sensor cameras with potentially completely impractical work arounds.
Contradicting my own comment, I eventually moved from using a Panasonic G9 to 2x Sony A7r III bodies, 1x 24-105 and 1x 200-600 lenses - All because the Panasonic had limitations around max focal length and low light performance.
That was just months before Covid-19 hit and I was still planning to do a nice little jungle walk in Malaysia. Working around the G9 and 400mm effective focal length wasn't going to be viable.
I'm surprised there's not more comments here about Helicon Focus
Helicon's up next - while PS's implementation of focus stacking isn't perfect, it's free if you already have PS and is good enough for basic stacks.
totally agree with this!
May be one day Adobe will pause their annual image selection new claim and start improving other tools.
I have used both PShop and Helicon, I seem to get fewer artifacts from Helicon, and it seems much faster than PShop. I have a little different approach to focus-stacking. I use focus stacking for in-studio still-life compositions, using strobes for different exposures. So to keep it organized, (I shoot with a Z7II, 105mmZlens), I use a small post-it note for each Exposure-Focus-Bracketed group. 98% of the time I usually shoot 5-6 images in a group, with 5-6 exposure groups, and that covers the focus from front to back. These marked exposure post-it notes help separate the exposure groups in LRoom.
I might add that if you are shooting anything that is alive, mostly plants, for me. That over a short period of time they can shift their position slightly, and ruin the complete stack. It can be tricky at times. I would also like to add, that using both my Z6 and Z7II's focus shift feature, is awesome, especially when shooting with strobes, and different exposure's. What's nice is The Z Cams allow you to set a time period between each shot, and this allows the strobes to recycle properly between shots. Works very well.
Beautiful stack, very painterly!
I might do one stack every two years and haven't used Helicon for many years. Good to hear that it's still bloody good!
So, if I understand this correctly, I have a few options shooting a stack:
1) In-camera focus-stacking (R5, Z7, Olympus, etc.)
2) A focus rail / slider
3) Helicon FB tube
4) Manually adjusting focus
I would expect the focus rail to create problems due to the changing distance between lens and object, but I'm not sure.
Rather than just looking at the options, I'd be curious as to which one will provide the best results. Any advice?
Yeah, that's a good survey of the options. In camera, at least with how the Z7 implements it, is just automatically moving the focus point - I believe the Helicon tube is the same way, but I've not used it. That's supposed to be the best way, as you're less likely to overshoot, like you could with manually moving it.
To recap, if you have a camera implementation, that's best. After that, just move manually and err on the side of smaller increments.
Thanks!
Let's update this, please, with special reference to canon r5/6.