
Some tools are just too powerful to not have in your tool bag as a photographer, and the plate composite technique is one such method.
Employed frequently in the entertainment and commercial photography industries, the modern plate composite technique is immensely flexible and shockingly simple. The results one can achieve using the technique produce an effect that seems a bit like cheating once you realize how easy it is to achieve using the power of modern editing software and their ability to use layer masks.
Often used in the entertainment industry to photograph group photos of performers who cannot always be in the same place at the same time due to their busy schedules, the core concept of the technique is to lock your camera down into one position, optimally a sturdy tripod, and take multiple photos, which are then merged using layer masks in software such as Photoshop. Photographers would take a clean photo of the background and use it as a clean slate to mask in photos of the subjects, which are taken in the same framed-up scene. Use of the tripod to do this technique optimally keeps each layer closely aligned, making the process of masking and merging them straightforward and resulting in a very polished final hybrid photo of your scene.
Picture this: you have four actors for a sitcom and the studio needs a group photo of them. Instead of playing hell to get their schedules to align and have them all together at the same time, a photographer would set up the scene and lock down the camera on the tripod, then bring in each actor as they are available. The photographer can then light each individual carefully, even leaving equipment in the subject frames as needed, such as light stands, because the original plate shot of the clean background gives you the ability to not only mask your subjects together, but to mask out anything extra in the subject frames. After all the actors have their shot taken, a simple session at the editing desk merges them into one photo by stacking the layers, applying layer masks, and carefully masking the actors together, as well as masking out any lighting equipment included in the frames.
This concept can be applied to many other forms of photography for creative and practical purposes. Highly polished large family photos can be made following the aforementioned workflow, but thinking outside the box to see how this can be a good tool in your photographer’s tool kit opens a lot of creative possibilities.
I first discovered the technique while teaching myself the use of off-camera flash. I had taken to using myself as the subject in my flash training by using a tripod and 10-second timer, moving in and out of the scene as I made adjustments to get the shot right. I read about the plate composite technique and realized I was already doing a big part of the workflow and it would be a relatively simple matter to practice my flash at the same time as creating some artistic self-portraits using myself as a subject not just once in a scene, but multiple times — effectively “cloning” myself in the shots. I ultimately created a small series of images where I was playing games against myself, and the deceptively simple process of doing so resulted in fairly polished and interesting work for my then inexperienced self that went on to get me quite a bit of attention from potential clients.
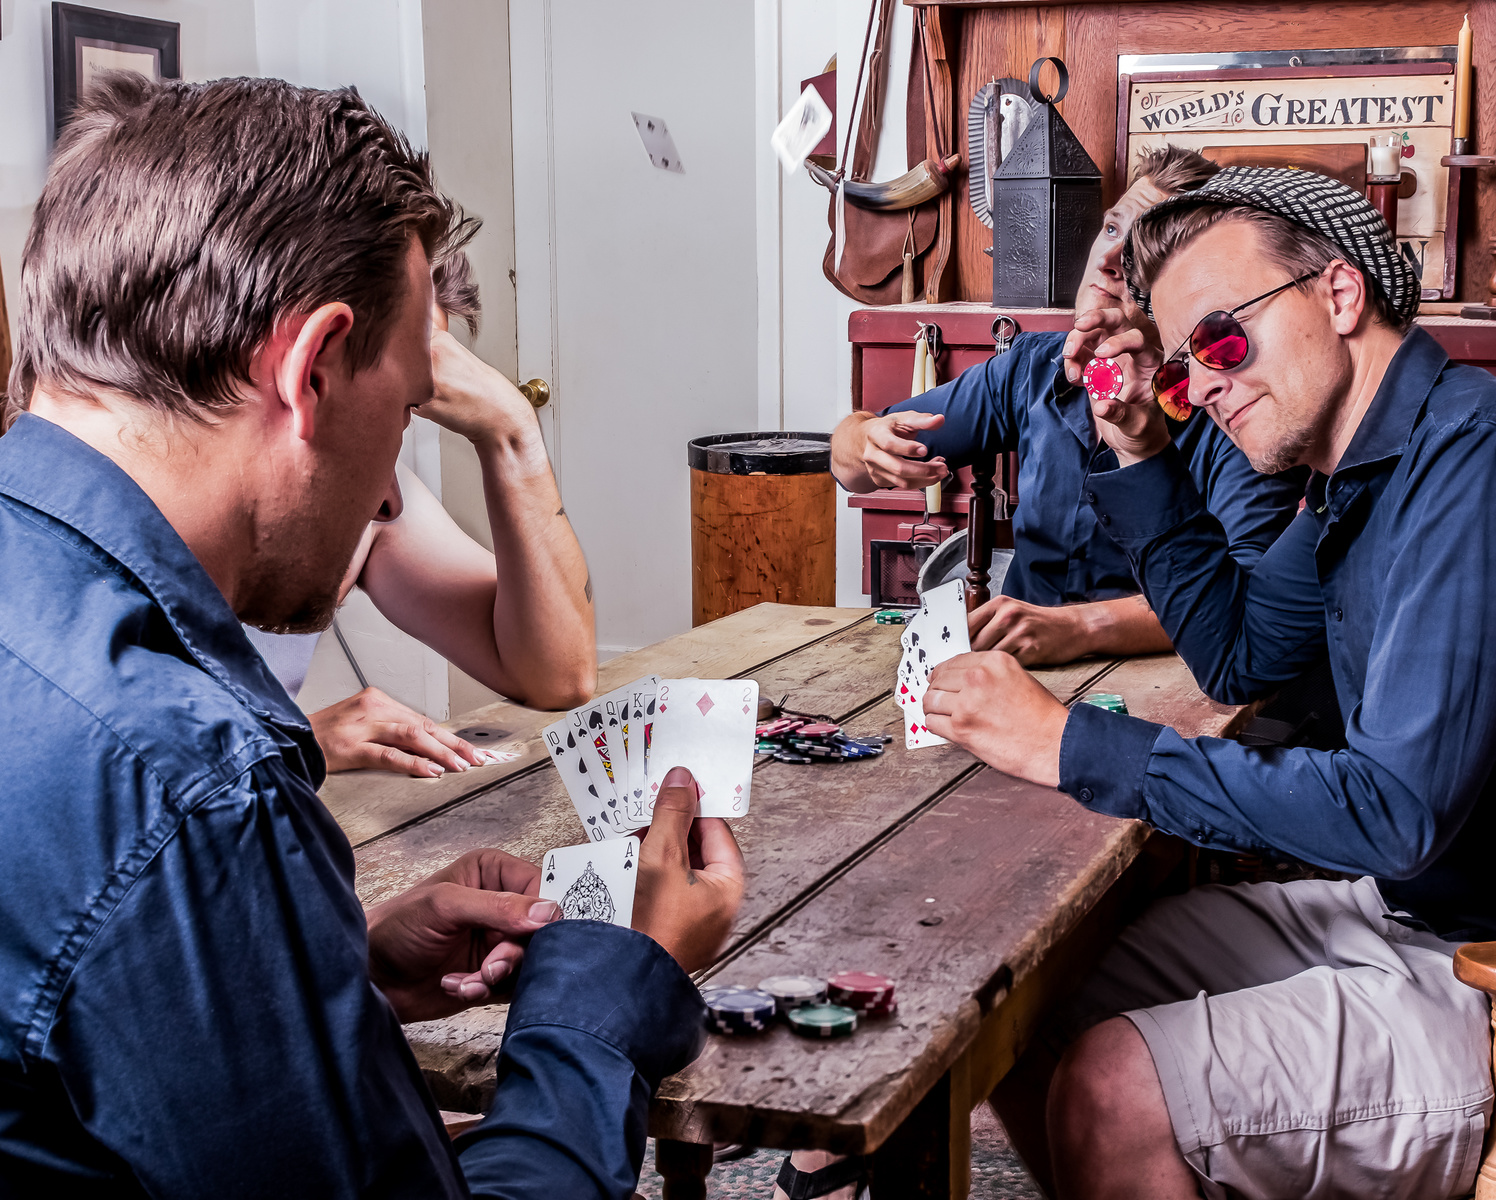
By using the plate composite technique, a method of shooting multiple shots while on a static tripod and using layer masks to merge together, I was able to create this image of myself playing poker against my other personalities.
But there is so much more potential to this technique than self-portraiture and group shots. By adding a few extra components to the workflow, I discovered I was able to use it to create something along the lines of a still time-lapse photo, showing motion in a scene with movement by masking in the subject in its range of motion to show them in multiple places along their movement path.
This use of the technique came in handy for a shot of professional freestyle motorcycle rider Sean Nielson doing a show for a local town 4th of July celebration. As Nielson was performing his signature motorcycle jumps, I placed myself in position for a scene that showed both takeoff and landing ramps, as well as the entire arc of his jump. I crouched, pre-focused, held as steady as I could, and used the camera’s continuous burst mode to fire off a string of shots as Nielson launched himself off the ramp and into a backflip, only to touch down on the other ramp successfully. I suspected that if I was careful, I could still pull off the technique without a tripod, thanks to the immensely handy Photoshop feature Auto-Align Layers. My theory was correct, and the auto-alignment went without a hitch, creating the same stack of aligned frames for the compositing process that a tripod would. I was able to select the best frames of Nielson mid-jump and mask each one into the scene as well as do cleanup and mask out some unsightly inclusions to the photo. When all was said and done, I had crafted a still time-lapse shot that perfectly showed the path of his backflip as spectators gathered round to watch. The image went on to win a first place in the Utah Press Association’s Better Newspaper Contest in the sports photo category, although it is important to note that the photo process should be explained in your caption if an image like this is used in a journalistic application to avoid misleading your viewer to believe it was captured in a single frame.

The plate composite technique is also useful to showing movement through a still timelapse-style photo, like this award-wining shot I captured during a freestyle motocross show.
The applications for this workflow are nearly endless. One must simply apply the concepts to use them correctly. Some photographers use this technique for ensuring a clean image by removing subjects or items only, as opposed to adding them. For example, some street and city photographers will use the technique to cleanly declutter or depopulate a scene of people and cars. The core power of this method is simply the access to easy, polished compositing, without all the mess of clipping out and pasting in subjects to a non-native scene. Through this method, you even get the benefit of flawless shadow directionality in your composite, because each frame existed in real and is merged with another, preserving the light and shadow quality, resulting is a perfectly realistic composite that doesn’t strike the human eye or subconscious brain as “uncanny,” a serious problem afflicting many manually composited images where the subjects were initially captured in a scene where the light direction and shadows were different than that of your setting.


Never done this! BUT JUST FOR INFO - the last image of the motorcross can be done in camera. On any Sony camera original to mark 2's there are on camera apps at Sony Playmemories camera apps
https://www.playmemoriescameraapps.com/portal/
There is a Motion Shot app
https://www.playmemoriescameraapps.com/portal/usbdetail.php?eid=IS9104-N...
It captures and process the images together in camera before sending to the cameras SD card, as it is said So Easy.
Also tired of carrying around a lot of filters well here is my favorite.
Digital Filter
https://www.playmemoriescameraapps.com/portal/usbdetail.php?eid=IS9104-N...
and
Digital Filter (upgrade)
https://www.playmemoriescameraapps.com/portal/usbdetail.php?eid=IS9104-N...
What it does is divides the screen into two parts (the first) or three parts (the second). Each section you select and use SS, F/#, ISO, WB, and EV settings. One for the sky and one for the foreground and one for a third area if you want.
The point if you want the sky and the ground and even the center section different this is great. I used on my A7s for Milky Ways over bright city lights and getting the darkened sky that brought out the MW. The kicker is it is all 2 or 3 captures processed in camera to one image and the beauty of it is you get to view and adjust the graduated sections before it gets sent to the SD card.
I suggest you pick the sky to capture first in the app.
Lastly having all the apps on your model camera A7/r/s or A7ii/rii/sii will make them more valuable to you and though older per say can do tricks the newer models can not. So Hold On to them or get an old one just to have.
I went to a Best Buy and was talking to a Sony Rep about the apps and he had no idea about but went over and bought himself a A7rii!!! True story.
To be honest it takes some time to learn how and many tries to get it the way you want the image to be, BUT you get a raw image you can further process in post. AND with the new Lr Masks you will get great images.
Both images took about an hour or two (can not remember) just to figure the settings and the processes outcomes, the runway shot lit up while out because there are three airports and just keying the mic turns them on and looking over my shoulder for a incoming plane to boot. Both also using the E 10-18mm f/4 OSS in FF mode at 12mm done a while back before the FE 12-24mm.
Thats pretty neat! I think I would still prefer the extra control of doing it manually with full raw control on every image and all aspects of it, but this is a very neat idea from Sony. I also just struggle with doing anything like this on the back of the screen, cuz I feel like I am missing some issues due to the tiny display, even if its not the case. Oh, that and I shoot Fuji lol. I really want to play with that app now though just to tinker with it. Sony is very innovative for their customer base.
Useful technique for some fun shots too'
The Mechanics
Dude this is SWEET!