Creating a time-lapse can be one of the most time-consuming practices in photography. Due to the nature of time-lapse, you spend a while finding a suitable composition, set up your camera and wait.
The waiting process could be a few hours or a day, depending on how long you want to make your time-lapse. Once you're done shooting, you head back to your office, copy your footage, and start editing the batch of images in Lightroom. From there, you can throw it into programs like After Effects or a Lightroom time-lapse plugin to export it as a movie, but what if you're in a rush and need to simplify the entire process by using only one program?
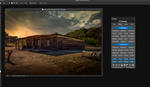
In this video, landscape photographer Michael Shainblum offers a simple solution to finalize your time-lapse edits and exports by using only Adobe Photoshop. By importing an image sequence, Photoshop automatically switches to the Motion workspace and creates a Smart Object layer with a timeline to scrub through the footage. From here, you can add an audio track, make adjustments to your image, and export it as an H.264 MP4 to upload to any social media platform.
Perhaps using Adobe Lightroom to grade all your images in bulk before heading to Photoshop would offer a versatile solution if you're looking at putting together a time-lapse quickly and efficiently.