
Here, I show you how to take the first steps with the free and open photo-editing software RawTherapee.
RawTherapee is just one of the free and open resources for editing photographs. If you want to know the pros and cons of this software, you might be interested in my review of RawTherapee, where I compared it with the popular but expensive Adobe Lightroom. After all, there are some downsides. Also keep in mind that this is only a guide to help you make the first steps with RawTherapee rather than a one-size-fits-all solution. Every photograph is different, and so is our taste.
Copy and Import
I don’t think I need to tell you how to find software online and install it on your device. So, let’s jump right into it: RawTherapee. Before you start your editing career with RawTherapee, you need to know where to find your photographs, though. RawTherapee doesn’t help you organize your pictures, it will only support you in the editing process. Make sure that you establish a clear structure on your drive.
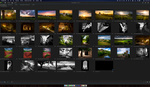
When you open RawTherapee, you will find three different panels on the very right of your window: “File Browser,” “Queue," and “Editor.” To find your photographs, you’ve got to switch to the File Browser and find your photographs in the “Folders” section on the left. Got them? Great! They should appear in the middle section of the program.

Select Images
In many photo sessions, you will have made a lot of pictures of the same subject. In RawTherapee, you can rank the images with stars. Because the program doesn’t offer you a fill screen review, you might want to unfold the magic of the “Inspect” panel on the right. Here, you can review your photograph in a 100-percent view. Collapse the left panel (shortcut “i”) to give it a little more space. Now, you can check all the details in the image and rate them one by one. To rate them, you can either click on the stars of the thumbnails or hit “Shift” plus your rating between “1” and “5” on the keyboard.

When you are done, you probably only want to give the best images a try. By hitting 1-5, you can make RawTherapee filter your folder for the rating. In my example, I want to edit the three-star images, and, so I hit 3.
Edit the Basics
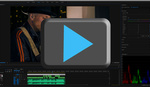
After selecting your photographs for the edit, you’ve got to open the editor either by clicking on it on the left side or by hitting “Ctrl” and “F4” at the same time. Don’t confuse “Ctrl” with “Alt” here; that combination will shut down your active window.
Crop
I personally like to crop my photos before I edit them. Either click on the crop tool or hit “C” to crop your image. The right frame of RawTherapee will switch to the “Transform” panel. You can choose your preferred overlay and also select a certain aspect ratio for your image. When you're cropping, you probably want the whole image to be visible. Select the “theme-base” preview by hitting “9” multiple times on your keyboard or clicking on the left square field in the bar above your image.

You can also straighten the horizon in the “Lens/Geometry” module below. Just click on “Select Straight Line” and draw a line over your horizon. The image will be straightened accordingly. Crop: Done!

Hint: RawTherapee won’t remove your Crop overlay, so you switch it back to “None.” It can also be annoying to see the area of the image, which you actually cropped out. Hit “9” on your keyboard to adjust the background color and make the cropped area disappear.
Set the Overall Exposure
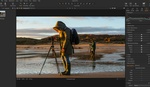
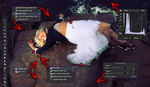
By pressing “Alt” and “E” on your keyboard, you will get to the Exposure panel quickly. RawTherapee applied some settings on the tone curve when I imported the photographs. It looks decent, but I want to start from scratch here, so I set the curve back to “linear.” You don’t need to do this if you are happy with the automatic development. After all, the uncooked photograph looks quite dull.

When adjusting the exposure via the exposure compensation slider, I take a careful look at the histogram. Sometimes it’s unavoidable, sometimes it’s on purpose, but usually, I don’t want to blow out any highlights. I keep the indicators for clipping highlights and shadows on by clicking on the small warning signs above the image. Then, I set the exposure. In some cases, I’m very careful with the highlights. Here, I will bring them back later. 
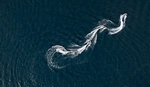
I generally find the image a little dark, so I push the exposure a little bit. The photograph doesn’t really look better yet, but that will be fixed soon.

Adding Contrast
This photograph lacks contrast because there are very few dark spots at the moment. With the help of the "Black” slider, you can give your photograph a lot of punch. Push the slider to the right, and it’ll make the dark parts darker. Now, we already have a good basis for our development.

You can also add contrast with help of the contrast slider. I tend to be rather careful with that one because it affects colors really heavily. Usually, I decrease the saturation whenever I add contrast to keep the colors more realistic, but that’s a personal decision.
Now, you probably have realized that I blew out quite a lot of highlights (marked black by RawTherapee) and clipped even some of the shadows (marked white). I can bring back detail in the highlights by using the “Highlight compression” and “Highlight compression threshold”. Using compression, you define how much you want to pull the brightest parts of the image down. By setting the threshold, you decide which areas will be affected. As I only want the brightest parts to become darker (meaning the bright blue spot in the sky), I set a high threshold and pulled it back quite a lot.

Now that all the blown-out parts are gone, I do exactly the opposite with the black parts by using the “Shadow compression” slider. I generally find it appealing to have some black spots in the photograph, but I can also remove them all depending on the situation. Here, I got the clipped areas back.

Hint: If the exposure of the sky is generally too bright, you can also add a Graduated filter instead of using the highlight compression. It’s easier and won’t affect other highlights in the image.
Export and Play
Exporting your developed photograph is quite easy. Just click on the little floppy disk in the left corner below your photograph.

I felt old, when I asked myself, if every ready still knows what a floppy disk is
RawTherapee will usually save your image in the original resolution. If you want to resize the image, unfortunately, you need to go back to the “Transform” panel.
You can export the photograph as a JPEG, TIFF, or PNG file. If the basics weren’t enough for you already, you can play around with other sliders. I’d recommend you the “Shadows/Highlights” module in the Exposure panel, as well as the Tone Curve in the Exposure module.


For my final image, I did the same and played a little with the colors as well to achieve a film-like/retro (and somehow Instagram-able) look. I hope you enjoyed your first edits. Feel free to ask questions if you have some!

Paid software is cheaper than the time I lose using unfriendly free software.
Have you actually given any free software a try before writing that down?
Give darktable a try. I've paid for software, yet I ended up preferring dt. I consistently get the results I want with very little effort, and it's more flexible than many of the sw you can pay for.
Actually I found Rawtherapee to be harder to use for my intended results than dt. But your mileage may vary.
Same here. I have used Capture One for years but wanted always to switch to Linux so I gave darktable a try.
The learning curve is pretty steep but now I am happier with it than with Capture One. Even the learning curve wasn’t that bad considering that I had years to learn Capture One’s quirks.
Digikam is also an excellent DAM tool. Way more capable than Capture One.
One thing I notice in open source software like darktable and Linux is that they don’t put in all the weird and arbitrary restrictions Capture One or MacOS are putting in. It’s much easier to export and interface with data. No vendor lock in.
Only Rawtherapee and I didn't like the interface and final quality.
Same as my experience. I came from Bibble 5 Pro (very user friendly and impressively fast back then) which was then acquired by Corel (Aftershot), and.... You know the result. They tried for a while, but it's now half-abandoned, other than new camera support.
Then I tried RT....but no way, too messed up and too much work to get any decent result for me.
I found then darktable, which even recently made huge changes. If they do that being free, I'd love to see the result if we all donated 5$ month to the project.
So let me get it straight. After spending thousands for photography hardware and countless hours taking pictures, saving $10/month on Adobe photography sub that includes Lightroom and Photoshop makes a big financial difference?
For some it's not only about money. I've recently paid around 250-300€ iirc for PTGui. It works as advertised, does what I need. I considered Hugin (free), but it was just too complex to obtain the desired results in a reasonable time.
Being free does not mean it's crippled. If you have a look at darktable's drawn and parametric masks you'll be amazed. The color adjustment tools are incredible. The only issue here is the user: humans are buggy, and only learn a single flow: windows/lightroom/photoshop. Once learned, they age ;-)
If you mention this software specifically (rawtherapee), I tried, but never got used to the interface and wasted much more time in comparison to any other software. With darktable, the experience was very friendly to me, and if you add the price to that "experience"...
Its about being a good tool, in a platform you like, and not being locked to do, store and organize with your files wherever you please.
If darktable charged an annual fee to support yearly development, I'd happily pay.
It might make big financial difference.
$10/month for being able to try and learn editing? Quite a lot if you have just paid $100 for your first dslr, also no one knows yet if you will stick to that hobby. $10/month ain't helping, I bet.
You know, not everybody makes photos as a profession. Still, it's no hobby if it doesn't take all of your money..
I like the idea of actually owning my software - as opposed to feeling like I'm renting it.
If your a beginning photographer, shoot with a 2nd hand DSLR, and you don't make money, because you're a student... Mhh. I guess the answer is "yes"!
I look at it in the context of F-Stoppers. Looking at the images posted by many of the members, these are good photographers that spend a lot of time photographing, most with nice hardware. In that context, $10 a month is pocket change.
Now, if you just don't like Adobe, that's another thread. The combination of LR and PS is tough to beat. I pay my subscription once a year and still haven't found any software that's better for what I do.
Well, if you pay $10/month on Adobe you lock yourself into using their products. You invest your time in learning this software and you build your library. This means one will probably stay with Adobe for decades.
If you say you use your DSLR for about 10 years, $10 per month times 12 times 10 is $1200 per decade. Which is pretty much equal to a new camera or a good lens.
The problem is not $10, the problem is locking yourself in for years. Of course the same effects happens with RT or Darktable, but then you can invest $1200 in another good lens.
For a beginner or somebody within their first few years of photography it doesn't really matter which software to learn. There is no reason at all (except the many tutorials) to use the expensive software. It is well known that Darktable even has more tools than Lightroom (Making it more complicated to switch, but doesn't affect new users that much, because you can always use/learn less modules)
I've used RT for about a year with some reasonable sucess. The problem for me is the limited articles, tutorials, and explanations why you use some setting. Local community college covers Lightroom. YouTube vids don't cover half the possible inputs abd settings.
This is why I tried to add a little bit. More to come...
Linux, Gimp, and Rawtherapee. I pay nothing for operating systems or software. A lot of money saved to buy cameras and lenses - smiles.
Thanks for this article!
I hope you do one soon for darktable as well!
And then, maybe some articles on the more "advanced" techniques (of both RT and darktable) for those of us who are new to post-processing?
yea, and do one on Gimp too!
I have GIMP as well. I'm hoping to get better at darktable first. I'm pretty new to the post-processing thing.
Actually, I started out with Gimp just recently ;)