Retouching photos is as much an art as a skill, and portrait photographers must understand the proper way to retouch images, even if they prefer to have a retoucher do this work for them. Although there are a variety of ways to retouch an image, using frequency separation is the most common method and is considered one of the best. In this article and the accompanying video, I detail the process I use to retouch my headshots and portrait work.
A Note on Affinity Photo and This Editing Method
I would be remiss if I didn’t give credit to London-based portrait photographer Ivan Weiss. Ivan taught me everything I know about retouching and introduced me to Affinity Photo, so my method is based largely on what I learned from him. You can see his amazing work here.
Affinity Photo is robust editing software with an interface that will instantly be familiar to anyone who has used Adobe Photoshop. I prefer Affinity for a variety of reasons, but the main advantages are its user-friendliness and price. Working with multiple layers is very easy, and the interface is laid out well. Best of all, it only costs $54.99 for the full application (as of the writing of this article). Keep in mind, though, that this entire editing process can be done using Photoshop if you do not have or wish to purchase Affinity.
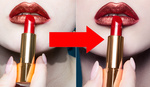
A retouched photo of Dana. When retouching, it's important to use a method like frequency separation since it preserves the texture of the skin.
What Is Frequency Separation?
Frequency separation takes the information in your image and divides it into a high- and low-frequency layer. The high-frequency layer keeps all the detail of your image, while the low-frequency layer is used to apply the bulk of the editing changes. By using this method, you can preserve the detail in the image while fixing skin blemishes and the like. Frequency separation avoids plastic-looking or overly smoothed-out skin, so the final result remains realistic looking and true to the original capture. It's also relatively easy to do, especially in Affinity Photo.
Step 1: Use the In-Painting Brush to Remove Stray Hairs
The In-Painting brush (content-aware fill) is my first step in the editing process, even before separating any layers. I use this brush to remove things like stray eyebrow hairs, nose hairs that may be peeking out, or stray hairs that don’t belong across the forehead. This first step in the process is to remove small items that do not cover a circular or large area, and therefore, do not affect the skin greatly. This is why I use it mainly for stray hairs.
Step 2: Apply the Frequency Separation Filter
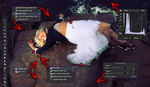
Generating a high and low-frequency layer is super easy in Affinity Photo. This can also be done in Photoshop, but it requires a lot more steps. Just go to the menu, select "Filters," and click on "Frequency Separation." A dialog box will pop up, as well as a side-by-side of the high- and low-frequency layers. All you need to do is set your radius, and as you move the slider, you will see the changes in real-time. For headshots, I generally set the radius between 4-7, but mostly, I want to eyeball it to get the high frequency looking crisp and the low frequency blurry enough that my edits will make a noticeable difference. Think “less is more” when applying the radius of the filter.
Once I have my high- and low-frequency layers, I will create a new layer (called a Pixel) and place it in between the high- and low-frequency layers. This is the layer where I will begin to apply my edits so that I can always change or undo what I’ve done without affecting the original image. First, I use the In-Painting brush (Content-Aware fill) to paint over skin spots, age spots, or any kind of discoloration in the skin tones. This will make spots and lines seem more subtle, although it doesn’t completely remove them, and it preserves all of the texture.
Step 3: The Healing Brush Does the Heavy Lifting
The bulk of the retouch work will be done on another layer (or two), where I use the Healing Brush. I set the flow to somewhere between 30-50% and use a small, soft brush to begin blending the skin texture. Instead of trying to remove things completely, I prefer to blend similar skin tones at a close zoom (small areas). I will go through the entire face and even out tones, as well as brush over fine lines by selecting a good part of the skin and painting over the problem areas. It’s very easy to overdo this, which is another reason why it’s so important to use a separate layer. This way, if you get done applying the Healing Brush and then zoom out and feel like it’s too much, you can just adjust the opacity of the layer to get it looking natural.
Step 4: Eye Relief
Often I will add another layer and use the History Brush again to go around the eyes. I do this especially when there are dark circles under the eyes. Selecting the better skin tones on the cheek, for instance, and painting over the dark spots, bags, and darkness can be dialed down quite a bit. As before, you can always lower the effect by adjusting the layer opacity if you feel like you went a bit too heavy-handed with the editing. It’s extremely important to be careful around the eyes because if you remove all of the lines completely, the eyes will look like they are floating in the middle of the head and not look natural at all. Always remember that less is more when retouching a corporate or actor headshot.
Step 5: Paint in the Drama With Curves Layers
Although the retouching is technically done at this point, I will often add another step to make the photo a bit more dramatic. Keep in mind that you can skip this step if you want. To do this, I create two new curves layers, one set to “Multiply” and one set to “Screen.” After inverting them, I paint in the darks and lights with a brush at about 40%, give or take, and then use a Gaussian Blur on the layers, setting their opacity to about 20%. This is much easier to understand in the video, but what it does is add a bit more drama to the photo. I also use this for things like filling in thin hair or eyebrows. Finally, I set the layers to around 20% opacity, because if you have it set too high, the photo will look fake.
A photo that is retouched well should look natural and not as though it has been retouched.
Step 6: Make It Pop With Levels
The final step is to create a “Levels” layer and pull in the white and black sliders until they are touching the edge of the histogram. This will keep you from unintentionally crushing the blacks or blowing out the highlights, although I do suggest using your eye as well as the histogram. In the image of myself used for this tutorial, for instance, the blacks were already up along the edge of the histogram, so I barely moved the slider, and the whites were quite a bit from the other edge, so I didn’t bring the slider to the beginning of the information on the chart. Once again, remember that less is more!
Some Final Thoughts
I realize that this can seem very complicated for someone new to retouching, but once you get the hang of it it, the entire process becomes quite simple. I recommend practicing on a few images and then looking at them after going away from your monitor for a few hours or a day. Chances are that you will tend to overdo it at first, and it takes time to get it to look subtle and natural. Even if you prefer to farm out your retouching work, it’s still so important to know how to do it yourself for many reasons. First, you will be much better at spotting good work from bad, second, if your retoucher does something you don’t like, you will be able to easily notice and advise them on how to correct the issue. Finally, you will be able to retouch photos in a pinch when needed, something that is fairly common for headshot and portrait photographers.
Pete Coco is a portrait photographer and musician based in New York. When not performing as a jazz bassist, Pete can be found in his studio working with a wide range of clients, although is passion is creating unique portraits of other musicians and artists.


Great article, Pete. Thanks for the shout out, but you've made the process your own.
Thanks Ivan. I appreciate all you have taught me!
This is laid out really well, Pete Coco . And I have so often been inspired by both you and Ivan Weiss ! Thank you 😃
Thanks so much Lynda!