Have you found yourself cranking up the contrast slider and running a sharpening filter just to end up with a shot that fell short of your initial vision? Here are two editing swaps that you can make that will help your post-production be more precise.
1. Swap the Contrast Slider for Editing Your Tones Individually
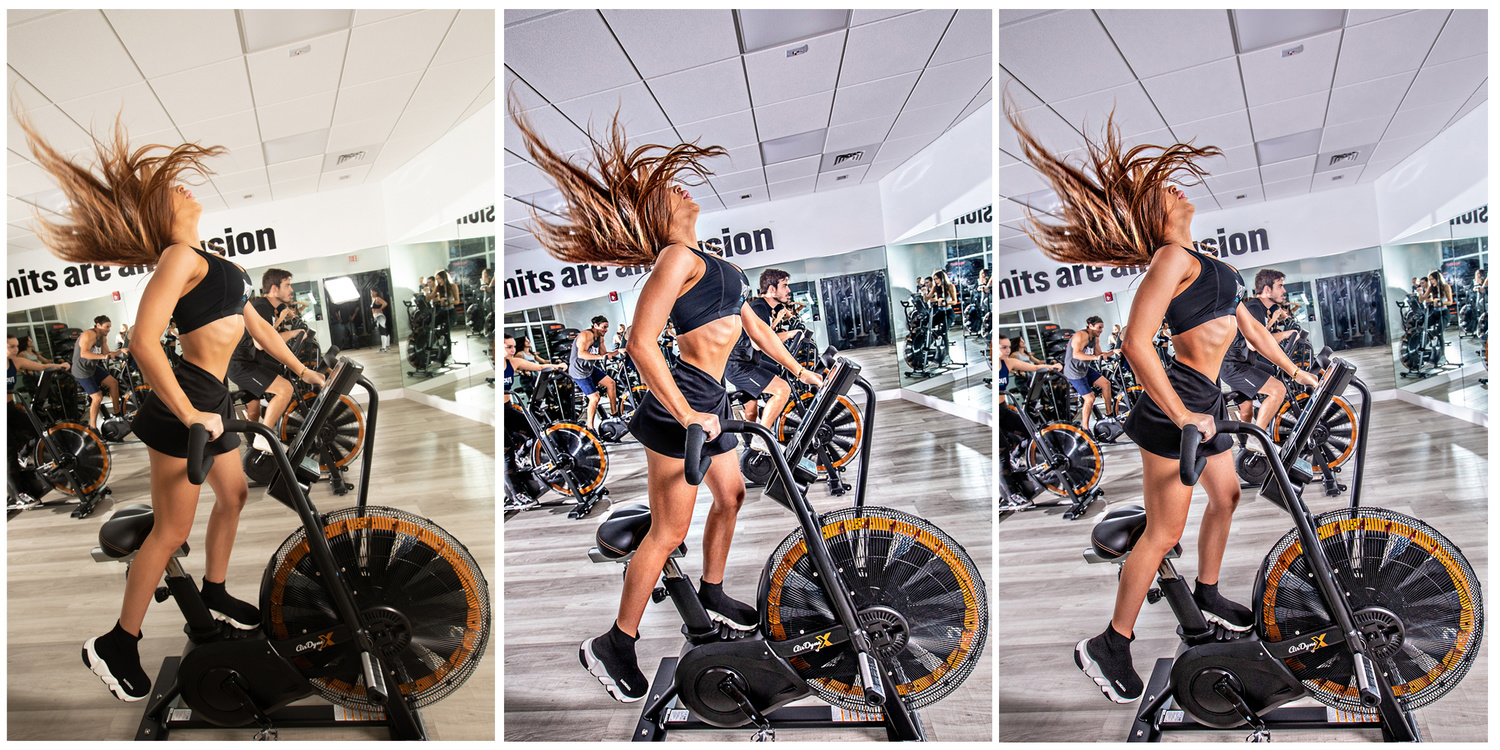
One adjustment I use very minimally in my editing is the contrast slider. The contrast slider adjusts the overall tonal range in your photo, making the lights brighter and the darks darker. The reason I don’t like the contrast slider is that you don’t have control over the proportions by which you want to brighten the highlights or darken the shadows individually. The contrast slider often affects the color also, as you can see in the comparison images below. The image on the left is with only the contrast slider used. The darks around the chin of the man got lost, and the image took a turn for the orange.

Left with contrast adjustment only. Middle with highlights, shadows, and blacks adjustment only. Right finished edit by Michelle VanTine Photography.
The middle picture only used the highlights, shadows, and blacks sliders. These give you much more control over your tonal range, setting it exactly as you want. The last image is the finished edit to which I added color correction, frequency separation, and selective sharpening.

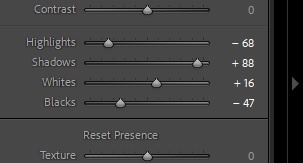
Play with these instead of cranking up the contrast slider.
These are the settings that I used in the middle picture above instead of using the contrast slider. My aesthetic is to pull up the shadows and pull down the highlights and the blacks, but you can find what look you like. Whatever look becomes your signature, this approach allows you more control than the contrast slider alone.
2. Swap Full Image Sharpening for Sharpening Selectively on Focal Points
Have you ever walked into a store like TJ Maxx to do some shopping, but there were so many clothes everywhere that you turned around and walked out because you were overwhelmed by it all? Images can quickly become like a TJ Maxx store on Black Friday if you don’t compose and edit them with focal points. Not everything in your images should be fighting for attention. Your eyes need places to rest. This is one of the main criticisms of HDR photography. It’s just too much visually. Choose a focal point and emphasize its crispness, sharpening, and texture rather than the entire image.
 Below is an example of each: the left is the straight-out-of-camera shot. In the middle image, everything is sharpened and defined equally from the foreground to the background. Finally, the right image is edited for sharpness and definition on the main subject, but not on the background.

Left: straight out of camera. Middle: Everything is equally sharpened and in focus. It's a lot for the eye to take in. Right: the foreground is defined and sharpened and the background is mostly just color corrected.
Editing is a very subjective art form, and there's no one way to do it. These are two tips that you can explore, however, to create your signature look with as much precision as you need.
What look is your favorite? Do you have your own "swap this for that" technique? Leave a comment below and share.


Michelle VanTine These are the kinds of articles that drew me to FStoppers years ago when I was first really trying to learn ways to use Photoshop and Lightroom. Great job.
I'm so happy this helps! As a new writer for Fstoppers I've been trying to think about what some of the initial struggles were when I was in my first 5 years out the gate. I still have SO MANY things that I'm working on (year 13 full time) and trying to figure out. I think all good photographers should be forever learning. But I'm glad that my tracing back in time hit home. Thank you for taking the time to comment
Sure thing - FStoppers is a great site and it's stuff like this that made it great. With politics and endless arguments occupying every other inch of space of our lives, it's like a breath of fresh air just reading something about photography and leaving the other stuff out. Thanks for that.
The order of your corrections is very important.
I set my camera to preserve the highlights, but when i edit i often first (well after rotation and white balance) set the exposure higher for the general feel, without looking too critical at detail surrounding the main subject.
Then i correct highlights (sometimes in a separate layer if parts turn too grey for my liking while other parts need the correction) and shadows (many times subtle or none).
Then (important to do this AFTER HDR settings) i set the points in levels.
I want to have some real black in the photo. Whitepoint is often not necessary anymore. And a gamma correction for the shifted black point.
After this i use favorites layers (Capture One)
-S curve: i use the opacity slider to bring the punch back that got lost through the HDR sliders. Levels did this for a part already so i often stop at 20%, sometimes 50%
-Clarity: i mask in selective only the parts i want to give some pop
-Structure: not very often, but sometimes selective in materials like stone, leather or clothes
Special photo's i open in Photoshop for some mild retouche and i often use Pro contrast (dynamic slider) in NIK filters.
This is excellent tips you're sharing. I like the technique you shared of using the S curve. You have a clear goal for your blacks, your highlights and you have your method to achieve it. That's the mark of a talented editor. You should post some of you images on your profile! Share all that skill. Thank you for commenting
In Capture One, I'll usually use the Luma Range instead of the Contrast slider.
1. Create a New Filled Adjustment layer.
2. Adjust the Range just so it covers the shadows on the face and/or body tones.
3. Adjust the Radius to feather the range. I find 100 to be pretty good at most scenarios.
4. Darken using RGB curves to taste.
I find a lot of times, the gradation feels little smoother than just using the Contrast slider.
That's a great tip! It makes so much more sense to have more control over the range. Thanks for sharing