
The Hero Shot
The Hero Shot is a 13 hour video tutorial on product photography taught by Commercial Photographer and Digital Artist Brian Rodgers Jr. This video is a digital download and can be watched immediately after purchasing. The video files in this tutorial are unlocked and can be watched on a computer, phone, tablet, or TV.
Who is Brian Rodgers Jr.

Brian Rodgers Jr. got into product photography shortly after leaving a corporate career working on a 3D team. In 2016 Brian became a part-time writer for Fstoppers.com and within just a few months became the highest rated product photographer on the Fstoppers Community. Brian has taught himself the skills needed to produce world-class product photography without the need for a studio or expensive gear.
Where The Tutorial Begins
Chances are, you don't have a big studio. Well, neither does Brian. He shoots products for companies all around the country out of his home studio. For the first lesson in this tutorial Brian wanted to prove that capturing an incredible shot doesn't have anything to do with your studio or your gear. Brian uses three inexpensive lights to create a product image of a cordless Drill.

By combining a few different exposures and adding a background in Photoshop, he was able to create this image.


For the next shot, Brian uses another cheap option for lighting; speedlights. By lighting a single perfume bottle and then duplicating it in Photoshop, Brian was once again able to come away with a simple, yet beautifully lit photograph without relying on expensive gear.


All Image Files Are Included
Whether you like it or not, Photoshop is an absolute necessity in the world of product photography. Almost every image of a product you have ever seen in an advertisement has been created with some sort of compositing techniques. For that reason, a large part of this tutorial takes place in Photoshop where Brian teaches the techniques he has mastered to produce professionally edited photos quickly and easily. All of the files that Brian uses to create his shots will also be available to you for following along in Photoshop.
What Gear Does Brian Use

Brian is adamant that the gear you use does not matter and that almost any camera, lens, and lighting system will work. So for the sake of this tutorial, Brian uses a range of different gear to help you master his techniques regardless of what equipment you own yourself.
Brian shoots with a Sony A7RII and a Canon 24-105mm lens but he always tethers his camera to a computer. This allows both Brian, and you the viewer, to view each shot directly through his camera. Every time Brian moves the product or a light, you'll be able to see and understand how the changes affect the overall product shot.
For the lighting in this tutorial, Brian uses a variety of light sources including hot lights, speedlights, and Profoto strobes. The light itself doesn't really matter, but the modifiers are important and throughout this tutorial Brian uses countless store-bought and DIY modifiers to sculpt the perfect light. After watching this tutorial, no matter what your budget is, you'll be able to use the tools you have to replicate Brian's style.
Shooting multiple products
You might think that shooting a pair of speakers would only require a single shot, but Brian shoots all of his products separately. This gives him total control in post-production to change the composition after the shoot is over. If the client ever wants to make a subtle or extreme change in the final product photo, Brian's method makes it extremely easy to give the client exactly what they want.


Making Products Levitate
We've all seen images of products levitating but how do they do it? Sure, you could cut it out in Photoshop, but if your product is laying on the ground, you won't be able to light it realistically. Brian uses a dowel rod attached to a video game controller to "float" it above his set. After adding a simple background in Photoshop, he was able to turn a well light image into another incredible advertising style photograph.


Focus Stacking
When shooting small products with a macro lens, depth of field may become an issue. For example, when shooting a watch, most brands want every aspect of the watch to be tack sharp. Brian teaches his favorite way to light a watch while also focus stacking the image to make sure the entire watch is as sharp as possible.


Managing reflections
Shooting reflective objects can be the most difficult part of product photography. Brian wanted to film an entire lesson on reflections and decided to shoot a set of cutlery, the most reflective, and oddly shaped products imaginable. Using a few techniques and DIY lighting modifiers, he was able to control the reflections and come away with a clean and elegant final shot. 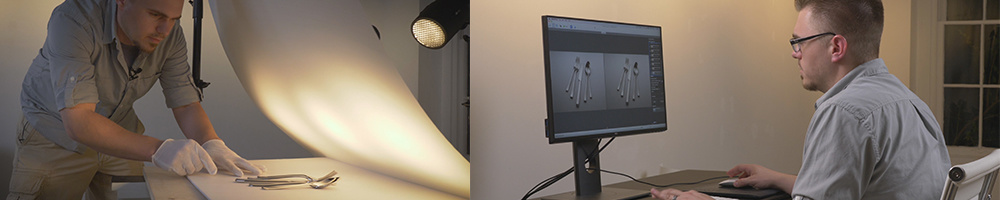


Creating A Small Set
For the final shot, Brian wanted to take all of the information taught in this tutorial and use it to stage and light a complex set. In the end, he was able to come away with a great looking image straight out of the camera but with a little bit of Photoshop, he was able to perfect it into something portfolio worthy.


This Download Includes:
- 9 Video Files (25 GB, 1080p 23.98fps h.264 mp4 files)
- Over 13 Hours of Content
- All High Res Images Included
- Brian's Full Story
- Intro to Post Production
- 7 Unique Final Photographs
- Brian's Entire Post Production Workflow
- Access to Brian's secret The Hero Shot Facebook Group
FREE LESSON
If you want to learn how Brian Rodgers Jr. works and his teaching style, we have uploaded a free stand alone lesson to Youtube. In the video below, Brian teaches you how you can light an entire liquor bottle with just one speedlight and some clever photoshop compositing. This video should give you an idea on how Brian approaches his photography and will give you a better idea of how this entire tutorial is laid out.


Hello that s insane and very professionnel but i am not understand why he is using jpeg in workflow not raw . can someone please explain for me and thx :)
david elyse That's a great question. I always shoot RAW, edit RAW and often use smart objects in my retouching workflow. I never shoot and edit off of JPEGS, ever. The reason I'm using JPEGs in this tutorial mainly for two reasons. First and foremost, the Fstoppers crew asked me to use the same exact files that would be provided to student who purchase the tutorial so they can more easily follow along. The second being that providing the actual RAW files would make the download way too large to distribute. I mention all of this in the tutorial, but yes as a professional photographer and digital artist, I always shoot and edit from RAW files with no exceptions. Hopefully this makes sense. Cheers 🍻
thanks so much for your explain and you helped me a lot Brian Good luck :)
Brian Please make for us another tutorial i like it so much for exmeple about your splash or aqueous photography i like it really . and Finally i have a question I read an article they said product photography gonna died in the future because of the new technologgy CGI i think it s not true just Exaggerated informations to give a look on CGI . Because the product photography it s a big industry and not every one can do it . he need a lot of informations with professionnel gears and skills . they said the Commercial product photography did not evolve with the advancement of brands and is expensive for big companies .i am not agree with them i think it s just a fake what you think about that and thanks
Hey david elyse, I actually did film an advanced lesson involving splash! The new advanced lesson is in a new tutorial called The Well Rounded Photographer here on the Fstoppers website.
If you decide to purchase Fstoppers The Well Rounded Photographer tutorial, please consider using my affiliate link: https://fstoppers.com/product/well-rounded-photographer-8-instructors-te... Purchasing this tutorial through my affiliate link will help me earn a small commission with no extra cost to you. This makes it possible for me to take on more educational projects like these while simultaneously supporting the future of Fstoppers.
In terms of CGI as it relates to product photography, I think CGI is an important skill to learn. Do I think that it will completely replace product photography? No, I don't. However, in commercial advertising product work, it is becoming more prominent creative asset. So it's not a bad idea to learn some CGI skills in addition to photography skills. Even with CGI becoming more prominent in the industry, The Hero Shot still holds a lot of merit because there are a lot of fundamentals that translate directly to 3D work and CGI. And even if you are using CGI to create 3D models, you'll still need post production skills and knowledge in Photoshop to complete an image. Not everything is done using 3D software, Photoshop is still a really important part of the process. And The Hero Shot covers that. Additionally, you can use a combination of actual photography mixed with CGI in order to create infinite creative possibilities.
Cheers 🍻
For anyone interested: I filmed an advanced lesson on product photography that involves splash photography, how to freeze motion and how to composite splash into your product photography! This advanced lesson is featured in the tutorial called The Well Rounded Photographer here on the Fstoppers website.
If you decide to purchase Fstoppers The Well Rounded Photographer tutorial, please consider using my affiliate link: https://fstoppers.com/product/well-rounded-photographer-8-instructors-te... Purchasing this tutorial through my affiliate link will help me earn a small commission with no extra cost to you. This makes it possible for me to take on more educational projects like these while simultaneously supporting the future of Fstoppers.
Hello please can someone help me i am really disappointed alot . i have Dell U3219Q and i am trying to calibrate my monitor with spyder x pro pro . i do every thing . but finally when i finish my calibrate i got colors close to yellowth color i dont knew why really . i cant edit my pictures now i cant do anything for real . the white color is really close to yellow color .
david elyse I would direct this question to Datacolor since they make the Spyder series of calibration devices. I don't use a Datacolor Spyder, I use the X-rite i1Display Pro series. But it sounds like your white point is off. The industry standard for most digital work is a white point of D65. I'd start there. If you have further questions regarding monitor calibration, I would reach out to Datacolor directly in order to get more information regarding your specific questions.