
Finding a good video editor can be difficult, especially when you're on a budget. Fortunately, the VSDC video editor could be a great place to start if you're looking to produce more video content.
One of the great things about VSDC is that they offer a completely free version without any strings. There are no sloppy watermarks embedded into the video or limitations on how you can export your videos either. The free version is actually quite a comprehensive editor in its own right and for many people, this may be enough. Of course, if you do decide to upgrade to the pro version, there are some notable benefits which I'll be covering in this article.
Video Stabilization Tool
Most cameras that are being released now have some form of sensor stabilization built into them. Cameras like the GoPro HERO8 for example, have incredible stabilization built into them, called Hypersmooth. This particular stabilization feature is so good that it's made gimbals for the camera, pretty much redundant.
Unfortunately, this isn't the case with every camera. The IBIS features in most other cameras are currently not quite as good as the GoPro. For this reason, it's important to have some ability to stabilize footage in post. Even if you're shooting with a smartphone, it's likely that the camera in your phone won't have the kind of stabilization available in a GoPro. The great thing is that VSDC offers a very simple and straight forward way to stabilize your footage.

In the top left hand corner of the software screen, one of the options is Tools; selecting this will reveal the video stabilization option. Once you click on this feature, a new window will pop up allowing you to import a clip and apply stabilization. Once you've applied the effect, you can export the clip in order to view the results.
Based on some of the clips I've tested it on, the stabilizing feature does seem to work pretty well. Like most post stabilizing features, it's not perfect but does smooth out many of the wobbles and shakes in the footage. The downside of this feature is that it's not really built into the main part of the software. Having to use the effect in a separate window and then to have to export the clips does negatively impact workflow. Despite this, it's great to see this feature being implemented into the Pro version of the software.
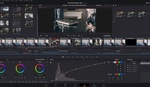
Audio Waveforms

This is probably one of the most useful features the Pro version has over the free version. Trying to edit video clips without being able to see the audio waves, feels like an extremely frustrating thing to do.
If the clips you have produced contain any talking bits for example, then being able to see the waveform is pretty much a requirement. Lining up clips on a timeline without being able to see a the audio waves, can be quite difficult. This is especially the case if you need to synchronize any audio clips together.
When you first import any clips into the software, the waveforms will not be visible in the Pro version. To the left of the timeline, there is a waveform symbol. Clicking on that reveals the options you can see in the image above. You can then select "Show Waveform" and the audio clips will become visible on the timeline. You can also select how large the audio waves appear on the timeline with the zoom options.
Hardware Acceleration
Another feature the Pro version has over the free one, is that the Pro software is able to make proper use of your hardware. If you're using a computer system that has dedicated graphics and a relatively capable processor, it's probably a good idea to upgrade from the free version. It's no good having the best graphics card if the software you're working in doesn't make use of it.
Generally speaking, video editing software requires a lot of graphics processing power. This is why having a capable graphics card can make a huge difference to both your workflow, and overall time it takes to complete the editing process. In my experience, I've seen huge improvements simply by upgrading my graphics card. Previously, my computer system would struggle on occasions when editing 1080p footage. Now with my current graphics card, I can comfortably edit 4k 60p footage, without having to use any proxies.
Similarly, upgrading form the free version opens up the software to make full use of your hardware. This dramatically improves software performance and allows you to edit clips faster.
Motion Tracking
This is probably one of the coolest features in this software. This is essentially, a "pro" level feature that's available in software that costs less than $20.00. The other brilliant thing about this feature is that it's super easy to use. There are a number of steps to complete, however the majority of it is done by the software itself. It's simply a matter of selecting what you'd like to be tracked, clicking on the analyze button and VSDC will save the motion. Once that's complete, you can add the object into the timeline, so it can follow the motion path you created.
I can see how just how useful this feature could be and it really does have a massive impact on the production value. Simply having some text follow a motion path can add a whole new dimension to the edit and that can sometimes make all of the difference. For a detailed tutorial on how to use this feature, check out the video linked above.
Video Masking
Along with the motion tracking features of this software, another tool that can be extremely helpful is the ability to create selection masks. For example, in the video linked above, the tutorial demonstrates how you can blur out someones face. Using the masking features and the motion tracking features you can ensure that the blurring effect sticks on the subject through all the frames.
This is a powerful tool because of the potential it has on what you can do with it. The mask selection feature is not just to blur out portions of a frame, but instead it can be used for creative reasons too. For example, some creatives have used this feature to clone themselves in a video by masking out certain sections of the frame.
Ultimate, this feature along with the motion tracking feature can lead to some interesting effects that you normally see in software that's far more expensive.
What I Liked
- Simplicity of the software is a huge benefit.
- Effective integration with social media platforms.
- A great stabilizing tool.
- Very noticeable speed and performance difference compared to the free version.
What Could Be Improved
- The stabilizing feature isn't built into the main section of the software.
- Waveforms don't appear automatically.
Final Thoughts
I can appreciate the fact that there are probably many people out there, for whom the free version will be sufficient. Personally, I don't think I could work using the free version of this software for a number of reasons. The lack of hardware acceleration and not being able to see the waveforms would be extremely frustrating to me. This is why I highly recommend upgrading if you are currently working with the free version. For less than $1.70 a month you have access to a more effective and well rounded piece of software. When it comes to value for money, it's pretty difficult to beat, and to make things even better, a 30% discount code has been linked below.
You can purchase the pro version using this link here. They are offering a limited time discount right now for 30% off when you use code VSDClovesFstoppers.


Is this software strictly for PC? No Mac version?
Yes I believe so.
How far down do you have to drill to find out what OS is supported?