![[BTS] The Anatomy of a Luxury Interior Shot](https://cdn.fstoppers.com/styles/large-16-9/s3/wp-content/uploads/2012/04/Featured-Image-Mike-Kelley-Anatomy_jpg.webp)
When it comes to interior and architectural photography, there is often much more involved than what meets the eye at first glance. In order to create a photograph that is realistic and enticing, careful planning, staging, lighting and a healthy dose of patience is imperative. In this Fstoppers Original, we dive into a luxury interior shot and see what it takes to construct a mouth-watering interior photo from the ground up.
When shooting an interior, there are many things to take into consideration before I can get close to a final product: interior light levels, exterior light levels, the amount of flash that we want to use, color temperature, composition, who our client is, etc. All of this comes together into two critical questions: "what do I need to show?" and "how am I going to show it?"
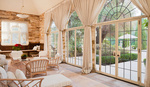
For this shot in particular, I was shooting for the homeowners who commissioned a shoot to document their dream house after it had finally been completed. This is important to keep in mind for a couple of reasons, which I will touch on over the course of the article. So without further adieu, let's begin, shall we?
Part 1: Prior to Shooting
The first thing I do when I begin shooting any architectural scene is to take a good walk around and get a feel for the space. Every single scene that I shoot, I want to know the different compositional options available, how the light will affect the scene, where I can place lights if necessary, what interesting architectural features must be shown, and how I should show them. When I first saw this scene, I knew immediately that my compositional options were somewhat limited for the following reasons:
a. I wanted to show the view
b. I didn't want to shoot into a mirror (nowhere to hide myself or the lights)
c. I wanted to show the details of the bar and countertop
Because of what I needed to show, my options were immediately limited. This limitation actually made composing the image a much simpler task. If there is only one option that can accomodate the right composition, I don't need to keep thinking about the perfect vantage point. So with my rough composition selected, I was able to start moving gear into the space and getting set up to create the image.
Part 2: Setup and Gear
When creating an interior image, I try to travel light, which translates to traveling effectively. I personally am always shooting on location, and moving gear around can become a huge hassle. To help myself out, I designed my kit to be quick and easy to both set up and tear down. Here's a quick snapshot of what I'm using. I've labeled it and explained my choices below.

2. 17" Macbook Pro, for shooting tethered. In situations like these, there is so much attention to detail involved that it would simply be impossible (well, much more difficult and frustrating, at the very least) to rely on the camera's LCD alone.
3. Paul C. Buff Einstein, with PocketWizard MC2. A great light at a great price. The MC2 allows me to remotely adjust the power, which is quite useful so I'm not running back and forth around the room adjusting light levels. The MC2 also integrates flawlessly with my Plus IIIs, Flex TT5s and Mini TT1s, for when I need an intricate light setup with speedlights and Einsteins.
4. I've taken a hacksaw to a rolling cart and set it up so that I can place a computer on it. I've also covered it with the fuzzy Velcro so that I can have easy access to my lighting modifiers, which for the most part, are all from David Honl's line of accessories. They're all velcro-based, which makes them easy to use and easy to keep on my "Macguyvered" cart.
5. More Honl modifiers. I use the grids, softboxes, gels, bounce cards, flags and snoots religiously on every shoot.
6, 7, 8. Another Einstein around the corner with a shoot-through umbrella mounted on it. More lights outside - in this case, Q-flash with a diffuser on the left, and a 430exII with a Honl Traveler 18" soft box on the right. Lastly, a 430exII with another Honl modifier on it between the counter and the bar to light up that area. All of my non-Einstein lights in this scene are triggered via PocketWizard Plus III triggers with a Mini TT1 on the camera.
Part 3: Composition, Staging, and Lighting
As I mentioned earlier, my composition had more or less been chosen for me, as the only composition that shows all the necessary elements would be quite near to the camera's position (which you can see in the set up image above). From here, it's a matter of fine tuning. I also took the liberty of staging the scene to make for a more pleasing photograph. I'll go through the lighting and staging process step by step so you can get a feel of how the scene evolved.
In terms of staging, I ran into a couple minor problems that were easily smoothed over for this scene. First was the fact that the chairs outside the door that were originally in the shot were very, very in the way of the exterior scene (see below).

- First, it is facing out of the frame and leads to nothing, which creates some serious tension when viewing.
- Secondly, it doesn't let your eye move naturally from the foreground to the background; its presence acts as a magnet, drawing your attention away from the flow of the space.
- The last reason for removing the chair was a practical one: I placed an Einstein with an umbrella directly to the left of the chair (Labeled '6' in the above setup shot) to illuminate the barstools and floor. Because of the chair's position relative to the umbrella, it cast a pretty ugly and unnatural shadow right into the middle of our scene. Out with you, chair!
After I had these main problems taken care of, I got to work on the details: repositioning items on the counter, adding some flowers for color and interest, repositioning the rug to just the perfect spot, and making sure everything was lined up for the final shot.

In order to light an interior scene that happens to contain windows or open doors, you will need to balance the interior light levels with those of the exterior. In this case, If I were to come in and try to shoot this without lights, I'd be in trouble. Exposing for the interior leaves the exterior looking like Gandalf The White just rolled into town, and if I expose for the exterior, it looks like I'm finally coming to the end of a journey through the Mines of Moria. I've labelled the meter readings for the interior and exterior below. I'm only slightly exaggerating, I swear.
 Good luck doing anything with this!
 "There is one dwarf yet in Moria who still draws breath!"
To light the exterior (labeled '8' in the setup photo above), I placed a Quantum Q-Flash on a stand high and to the left to play the part of sunlight streaming over the patio. By varying the light from soft to hard from the foreground to the background, I added another dimension and a certain amount of believability to the scene. For the finishing touches, we put a 430exII with a PocketWizard Plus III opposite the Q-Flash. The 430exII had a Honl Traveler 16" soft box attached to it, and filled in the exterior couches with an inviting light, somewhat of a foil to the hard light coming from the left.
Here's a shot with nearly all of the above mentioned lighting and staging in place:

Not bad, right? But there are still a few problem spots, which brings me to...
Part 4: Finishing Touches
The horizontal window above the door frame was showing a very underexposed ceiling, and because my shutter speed and aperture are dialed up to expose for the exterior, I was not getting a very natural glow from the lights. To combat this, I took a frame that was exposed for the home's interior lights, and in Photoshop, used a mask to brush back in some of the warm glow from those lights. I did the same with that ceiling outside - just a tad goes a long way to livening it up.
After all of these steps, I still wasn't 100% satisfied with the image. The outdoor infinity pool was a little bit overexposed, and the weather on that day wasn't perfect. I replaced the sky via a quick mask, being sure to cover my tracks and take care of the sky in the mirror as well. To fix the pool, I drew around the edge with the pen tool, made a selection, and applied a curves layer to give it some color and keep the highlights in check.
After I was happy with the flash lighting, the ambient lighting, the sky, the pool, and everything else, I merged everything to a new layer and corrected my vertical lines (when you try this, making sure that your vertical lines are parallel with the edge of the frame is a must for any serious architectural photograph), as they were just a tad off directly out of the camera. The finished shot can be seen below:
 Whew!
Whew!I hope that you learned something from reading about what it took to create this image. It's quite a bit of work, and involves nitpicking many small details. Shooting interiors is a great way to hone your lighting skills, as each shot is like solving a giant puzzle, and no two rooms will ever be lit the same way. Maybe you'll even be inspired to try some of these ideas on one of your shoots in a different genre.
If you want to try an interior or architectural image of your own, I'd be glad to offer feedback and help with lighting, staging and composition. Feel free to get in touch with me via the Fstoppers Facebook group, or by contacting me through my architecture and real estate photography website or Facebook page, which features many shots in the same style.
If you liked this post, let us know! I would be happy to break down more architectural and interior images in this style in the future. Everything from simple one-light shots, to entirely ambient shots, to more complicated setups like this one: it's all fair game, and I could talk about it for days.


![[Review] The Clever, Durable, And Simple Honl Lighting System Is A Must For Any Small-Flash User](https://cdn.fstoppers.com/styles/small-16-9/s3/wp-content/uploads/2012/05/Honl-review-strobe-flash.jpg)


One thing photographers often forget or don't consider when they're shooting a "luxury" interior is the amount of money and effort it has been put by a team of architect, interior designer and/or owner into lighting design inside the house. Meaning that every light source and shadow projected by them over any other object in the house matters, a lot. They have a reason to be there.
People often argue about HDR being "unnatural". I think much more unnatural is to take a few strobes and basically override all that many-thousand-dollars lighting setup with random, cheap looking light sources, creating shadows or brightness in areas that were never supposed to be there, flattening out all the original lighting design of the interior.
Screw the interior designer in favor of a "correct" exposure. That's a photographer thinking as a photographer. This is a classic example when HDR would do a much better job, respecting all that effort done by that team mentioned above. For those who think HDR is limited by 4 or 5 stops or for those with an opinion based on HDR pictures seen on goggle I'd warn you have a lot of more reading to do!
Except for the fact that you'd have to wait until twilight to have any of the interior lights register at all.
HDR would still yield a muddy mess here. I will bet my career on it. Also do remember that I layered in an ambient light layer, hence the golden light throughout the scene, which was cast by the light fixtures in the home, not my strobe lighting.
i laugh when I see people thinking HDR is nice. You will never beat a manual edit with properly exposed shots. Take a look at even the HDR software companies demo video's and even their shots are terrible. ha ha ha
this shot the writer has done isnt too bad but could be better. the sky's not real great outside he could of re-touch that much more carefully, not a real need for all the equipment for this shot in all honesty, but the theatric to charge more is essential. good work mate!
Mike, thank you very much for the article. I've been wondering what goes into interior photography setup...
without further 'ado'... not 'adieu' which is 'goodbye' in French and makes zero sense.
Ha, thanks, and I call myself a grammar Nazi. Won't make that mistake again.
Great article! This is the type of article that defines Fstoppers for me. Thanks!
Thank you so much for this informative post, I'm teaching myself how to shoot interiors by trawling the Internet for info and I really appreciate your time to write this post as your the only person I've found so far that really gets into this in depth and doesn't withhold any key info. Thank you so much
Out of curiosity, how did you learn interior photography, and how long have you been shooting for?
Thanks very much for posting this. It's really helpful to see how the lighting is set up and how you use it to balance the outdoor light. It would be great to see how you approach lighting interiors at night time.
Thanks Mike! The BTS was very useful. In my experience a lot of clients want the whole room and thus a small, long room is enormously challenging. I also have a lot of interiors with a load of mirrors that really limit light placement. The other constraint that others mention is that unless you let them know ahead of time they really think you should shoot a whole house in a couple of hours and still get awesome results. Moreover, if you tell them it will take longer and cost more they get antsy and respond by choosing the $150 guy who left the flyer at the office.
One other detail is that some designers get really touchy about changing the details to improve the photograph.
Great article. It's funny, I use the exact same method from start to finish with the exception of the Q-Flashes or 430ex's. I use an array of Einsteins for the interiors and exteriors. My PS workflow is the same. It took me about five years to figure out this setup for myself and another five to hone it and consistently get the results I had been looking for. But when I shoot editorial pieces - I shot a Dwell spread last year - they were adamant about natural light and limiting my use of artificial light. When I'm not shooting editorial work that does not limit my lighting setup, I revert back to my typical lighting workflow.
all HDR images!
http://touchofclass.ch/wordpress/projects/interiors/
Perhaps not the 100% perfect images, but if you have just 2hrs for each apartment/house I have to do the best I can. No additional lights, 3 to 5 images merged in Nik HDR Pro 2 with no presets, all necessary adjustments have been done in LR or Photoshop after HDR merge.
btw. I can't see the pictures from the post!