
I would like to wrap up my Secrets to Crafting Top-Quality Beauty Portraits series in a quick roundup on the most common mistakes I have been noticing beginner Beauty photographers make.
I will sure talk more about Beauty photography in the future, but I'd like to summarize a few things at this point.
From my own experience I've noticed that the elements and facts that my Australian photography teachers brought to our attention hundreds of times throughout the 2-year course, are those that became my second nature. By hearing our teachers repeat the same things multiple times, we could actually realize what's most important to remember and take them into account when shooting.
Sometimes hearing something for the third time would actually strike me and finally make sense. That's why some of the things I will mention today will be the things that I have already talked about in my previous articles. I am bringing them to your attention today again because I believe they are that important.
And of course, as usual, everything I write in this post is purely my personal opinion. You don't have to agree with every point I make, just take what you like and I hope it helps you to become a better Beauty photographer.
1. Thinking You Can't Do It On Your Own
I believe this is the biggest mistake a beginner photographer can make. And if you think of it, it's just an excuse that helps you rest in your comfort zone. You don't have access to beautiful models, experienced creative team, modern studio, expensive gear and lighting equipment? Well, very few of us have that when we're starting out.
In this day and age building your team is easier than ever. Social media, online groups, communities, Model Mayhem, etc. Yes, you may bump into a few people you won't be happy with, but you'll just have to keep looking to find your reliable, creative and determined art-partners. If no one in your team is experienced enough - doesn't matter! Shoot regularly, get together and analyze each other's work (you, your model, hair-stylist, makeup artist, wardrobe stylist) and grow together.
You don't have access to a studio? Well, you might find it interesting that a big part of work in my portfolio was photographed whether in my living room or in the basement. Luckily, we usually need very little space for Beauty photography. For closeup Beauty - just a little corner and a blank wall.
Beauty portraits for private clients can be taken anywhere - on a couch, on a balcony, on the floor, outside, just wherever you want. So practice shooting everywhere.
You don't have expensive lights, professional cameras and lenses? Shoot with what you have. Buy the cheapest light on a stand if you can't afford professional lighting. Your skills and the ability to see and "feel" light, frame your images beautifully and direct your models have nothing to do with popular brands and expensive equipment. But a lot of practice does.
So don't let all these excuses stop you from practicing like a maniac.
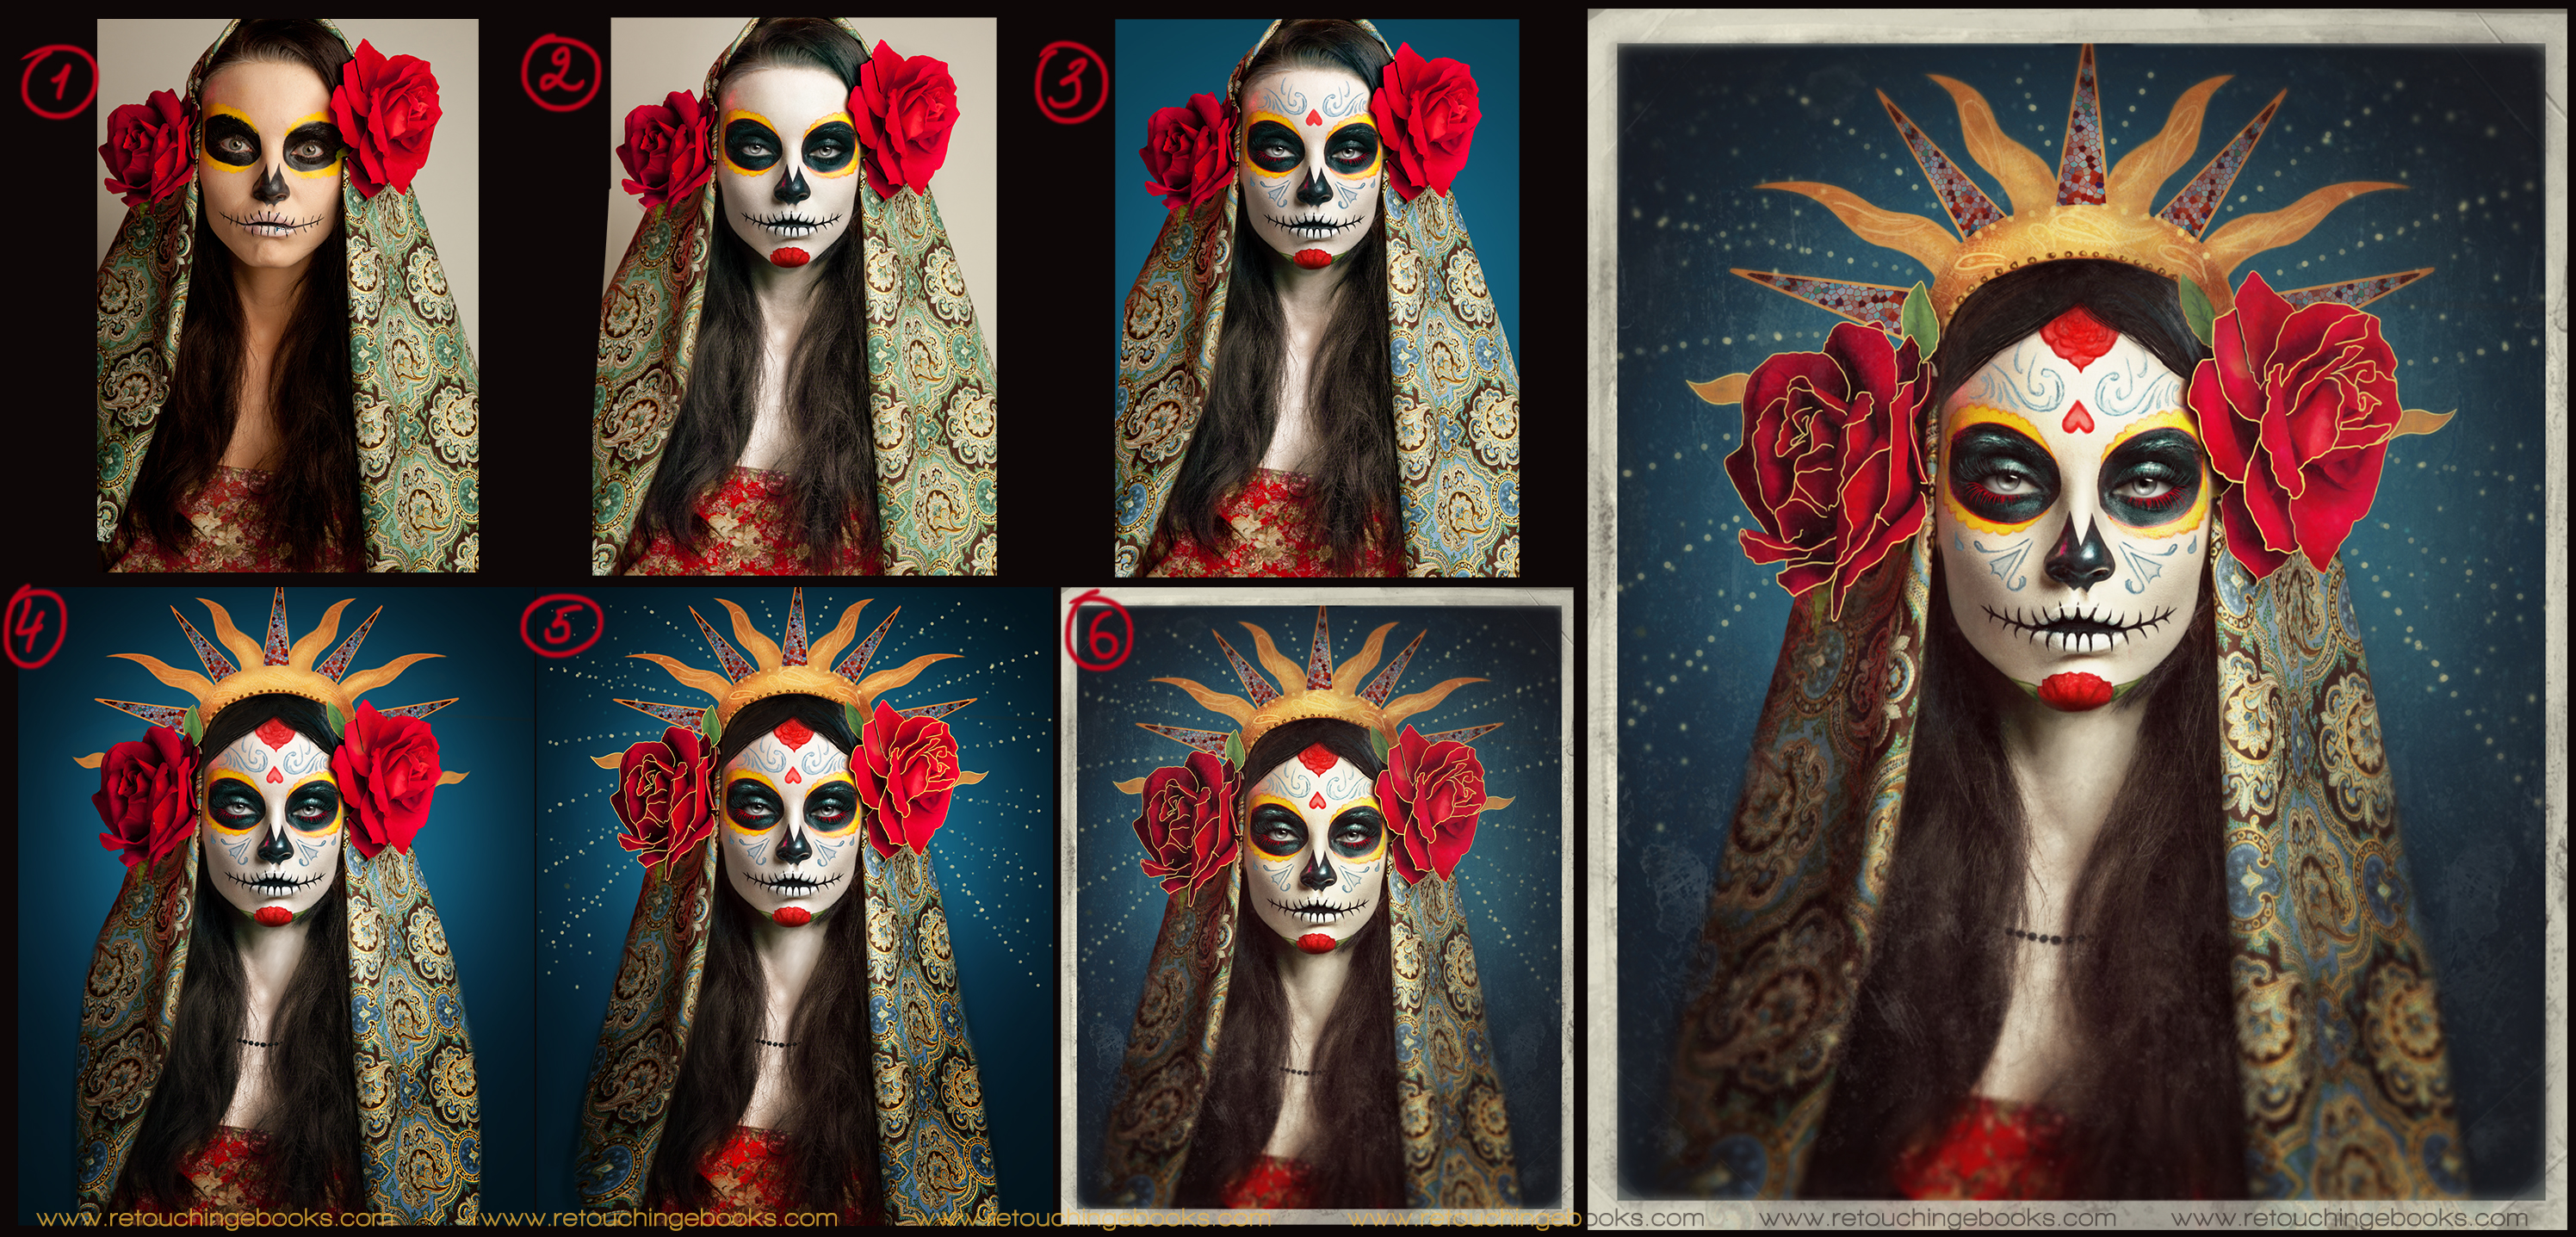
Here are some of my most favorite images to this day that were shot at home.

It's not exactly a Beauty portrait, but you get my point.

Click on the image to see the whole post-production process in a time-lapse video:
2. Using Inappropriate Lenses
When you are shooting Beauty, you typically don't need to include much of the surroundings into the frame, thus you don't need a wide angle lens. Moreover, anything under 70-100mm focal length distorts facial features and proportions the closer you get to your subject.
I personally notice that distortion even in images shot with 70mm lens. So, keep in mind that the more canvas space a face takes up in a photo, the longer focal length it is recommended to shoot with. If you are going for a very tight closeup (just the face), you will need a Macro lens.
3. Using Inappropriate Light Modifiers
Always remember that the more problematic or aged your subject's skin is the softer light you should use. Large softbox, diffused light, filled in shadows - those are the things that will make it easier to clean the skin up in post-production and make the portrait more flattering.
Side lighting will emphasize uneven skin texture, which is what we want to avoid in Beauty photography, so make sure your light isn't just soft, but it is also placed correctly.
If you only have a regular metal reflector for your light head, you can use parchment paper (baking paper) as a diffuser. It will soften the light and won't catch on fire from the heat of the modeling lamp.
I'm sure you know this, but I will repeat it anyway, because it is one of the most important things you need to know about the light behavior:
Direct light creates hard-edged dark shadows. The smaller the light source (relative to the size of the subject) or the farther away it is from the subject, the sharper and darker the shadows will be. The hardest light is created by a point source, a light small enough or far enough that its actual size is irrelevant. Think of the sun on a clear day, a spotlight on a performer on a stage.
Diffused light scatters onto the subject from many directions, creating very bright or no shadows. The closer the light source or the larger it is (in relation to the size of the subject), the softer and brighter the shadows will be. Think of a heavily overcast sky, when entire sky becomes the source of light, a big window on the northern side of a building.
4. Shooting With Camera Level Above Subject's Eye Level
Of course, this is not a rule for all types of Beauty images, but you need to always keep in mind that when you shoot down from a camera level above your model's eye level you will make her neck look shorter.
When my model is sitting on a stool during the shoot I almost always crouch or even kneel down. Looking slightly up (and slightly is the key word here) allows me to visually elongate my model's neck and also make her look graceful, elegant, and almost royal-like thanks to the perspective.
5. Stepping Too Far Back
In Editorial and Fashion photography we often include a lot of surroundings into the frame and use wide angle lens. With Beauty, however, we usually mainly focus on the subject's face and need to be closer to it.
Observe Beauty images in magazines and cosmetics advertising, you will notice how little negative space is usually left around the model's head in those images.
Check out my previous article on Framing & Posing for Beauty Photography to learn more about different types of Beauty and how much negative space is traditionally acceptable in each type.
6. "I'll Fix It Later In Photoshop" Mindset
Being alert and observant during your photo shoot is the best thing you can do for the post-production stage. Even if you are a Photoshop ninja and can do wonders with your retouching skills, you will save yourself a lot of time by fixing the model's flyaway hairs, smeared makeup, twisted shoulder straps and tangled necklace before you release the shutter.
If your makeup artist and/or hairstylist can stick around for touchups during the shoot - even better! They will see and fix much more for you, since they can stay right out of the frame near the model.
If you are shooting for a client and someone else will be retouching your images, you will do your client a huge favor and save them some editing expenses by getting things right in camera. And the retoucher will think highly of you for providing him or her with great and clean raw material.
7. Not Checking Your Camera Monitor Often Enough To Correct Your Mistakes
I've seen this too often to ignore at my workshops. A lot of photographers continue clicking away for too long without checking what they are actually getting. To me it seems like setting yourself up for a failure. Especially if you're not checking your monitor while still adjusting the light in the beginning of the shoot.
I've learned this the hard way. So many times my model was giving me a great pose, movement or a facial expression, and I took a bunch of photos praising her for doing a great job, only to later realize that my lighting was far from what I wanted it to be.
Or sometimes I was hugely overexposing or underexposing because I had just changed my camera setting and didn't double check my camera monitor.
Now it is my second nature to keep checking the back of my camera after each 4-7 shots. If I know my lighting is set up and everything looks great, I can sure go on without checking it for much longer, focusing my attention on the model and her movements.
8. Lack Of Communication
Talk to your model as you shoot. It helps her to feel comfortable and informed, which in turn helps you to get better poses and facial expressions out of her.
If you are trying to frame your shot better and not releasing the shutter for too long, keep communicating with your model. Help her to get in beautiful poses with your direction, encourage her and tell her nice things to make her feel good about herself.
My point is, great Beauty photography is created when there's a good connection and understanding between you and your model, which can be achieved with good communication.
And I will repeat my words of caution regarding touching your models: if you need to fix her hair, or her accessories, gently ask for her permission first, then touch. You will only show her your respect and come off as a courteous professional.
9. Over-Processed Skin
This point isn't about shooting, yet it is the element that can make or break your Beauty images. And I see photographers make this mistake more often then any of the ones I've mentioned above.
When retouching skin, our goal is to retain its texture while evening out its colors and tones. We want to make skin look healthy, even and fresh. If you are only starting out shooting and retouching Beauty, I would recommend that you first familiarize yourself with retouching guidelines and considerations for different types of Beauty photography.
 Photo & Post-production by Mikhail Malyugin
 Photo & Post-production by Mikhail Malyugin
Once you understand how much and what needs to be retouched, focus on practicing working with the essential tools for retouching face and hair. And after you got those tools under control, learn and practice the Frequency Separation technique, which will help you doctor colors and tones separately from skin texture for the best results.
My other favorite skin retouching technique is Dodge & Burn, but I will talk about it in one of my future posts.
Hope this summary was helpful!
And if you can think of other common mistakes you notice beginner Beauty photographers (or you) make, please share them with us in the comments below, so we can all learn from them.


Thank you Mark!
I came in here wearing my skeptical hat. Not going to lie. Guess what? I just ate my hat! Great article and easy to read. The information is spot on and you hit the key points succinctly. Definitely an article to refer back to time and time again.
Thanks Randy, that means a lot!
Excellent article. You post some of the best stuff on this site in my opinion. Ignore the remark from that guy about the Vogue logo. Myself, and I imagine a lot of others, immediately understood the point you were trying to make by the posting that image, that being that shooting something at home can still mean getting images of an extremely high standard.
Thank you! :) I really appreciate it.
I watched your time lapse video for the editing of the Dia De Los Muertos shot. Very impressive!
Great series, really enjoyed AND learned! would love to see more articles of this quality on Fstoppers.
Thank you :)
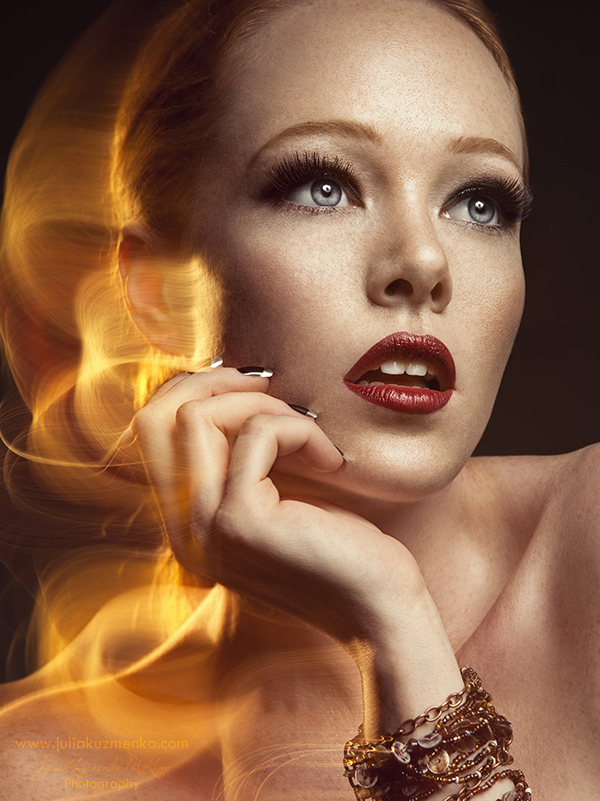
IMHO the picture above by Mikhail Malyugin looks over processed but, given the fashion industry's infatuation with unattainable perfection, I'm not surprised.
The eyes in particular look really flat.
lol, my eyes get flat when I look at Mikhail's beauty images :)
I totally agree. The eyes are flat and it's over-processed. Granted it's more stylized than just badly done but I'd still call it over-processed and I definitely find the eyes flat. I'd say the authors image that is used for the header of this article is a much better example of nicely retouched beauty work.
Love this Julia! Keep it coming these articles are gold!
Thank you! Also checkout www.99phototricks.com
Amazing article! Love what I've seen so far on this blog! I too often see photos over-retouched and it makes me sad! Let people be REAL!
http://www.sunnyfleurphotos.net/
RE: Item 7. Some of the greatest fashion and beauty photographers shot with Hassleblads and 120 film, The never had this luxury yet produced terrific images. Nor was photoshop around. They HAD to get it right in the camera! Today's photographers, it might be suggested, are lazy and sloppy (hence chimping and photoshop). My lighting professor in college (in 1971) gave us assignments and we just had to get it right! One should try shooting an not chimping and really learn lighting and posing - (not directed at you, but in general). Times have certainly changed, and perhaps maybe for the better...IDK.
Personally, I think that digital today translates into a much greater creative freedom for people to experiment. My father had a Hasselblad and used to have us pose for images and all of us hated it. It took forever for him to set up a scene, take light readings etc. Every click cost him money. I try to be as much the opposite in my shoots as I can and try different things and different settings constantly. Plus with photoshop, I can then do things that are literally impossible to do without a big budget or just plain impossible.
Awesome post! Thanks for sharing some tips that separate the "great" beauty shots versus the mediocre ones. Great post!
Louis Joseph
NYC fashion and beauty editorial photographer
http://www.louisjosephphotography.com/nyc-fashion-photographer-in-nyc-ma...
Excellent points :)