
One essential part of almost every wedding day is the rings. Not only are the rings a symbol of a couple's love and commitment to one another, they also usually cost a good deal of money. Capturing an amazing picture of the rings can not only wow your clients, it also adds great value to your portfolio. The best part is, getting a fantastic ring shot can be simple and quick.
To get a beautiful ring shot, all you need are these four things:
Macro Lens- Rings are, in general, very small and full of detail. It really helps your shots if you can zoom in nice and close to capture the detail of the rings while eliminating distracting background. Since I shoot Canon, my first choice is the 100mm f2.8 macro.
At least 1 flash- It really helps if you have the ability to keep your flash off camera, but if needed, you can get away with an on camera flash. For some examples I show, I used two flashes to help add some pizazz to the pictures.
An Umbrella or some other diffuser - Casting soft even light makes a huge difference when trying to capture the detail of the rings without having harsh shadows.
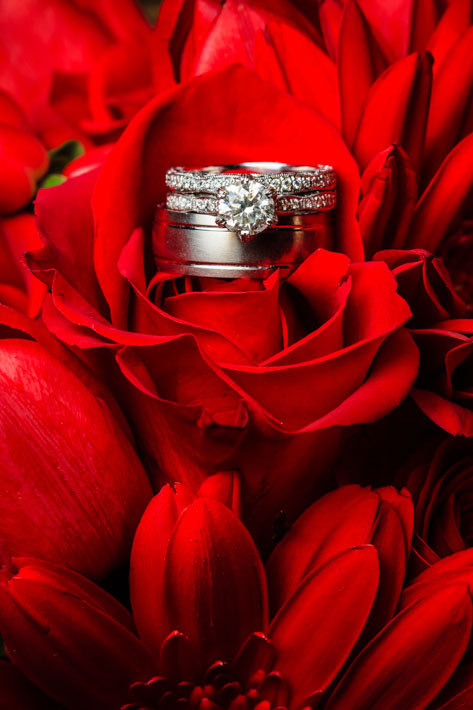
A pretty setting - A brides bouquet is usually an easy and beautiful place to put the rings. However, some flowers wilt throughout the day so getting creative with settings might be a better choice.
Here's your basic set up for a single light ring picture.
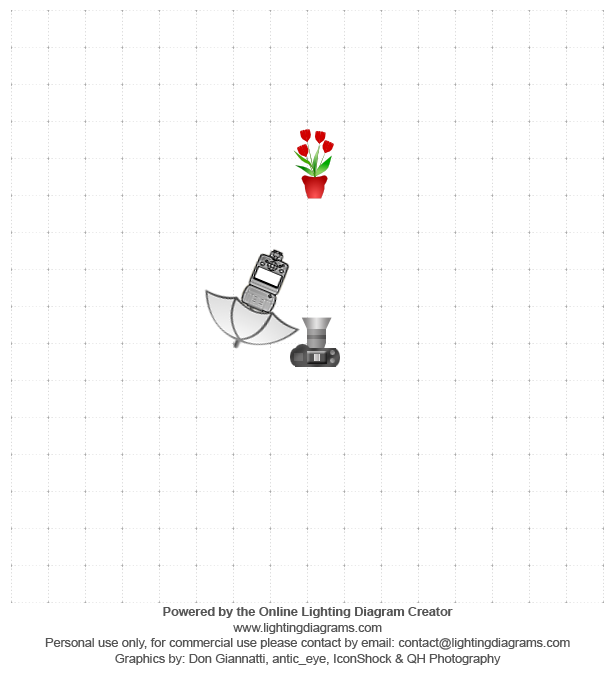
To get soft, even light on your subject, put your flash and diffuser as close to rings as possible without getting them in your shot. I often have my camera brushing up against the edge of the umbrella.
In general, I want to make sure the diamonds and details of the rings are all in focus. I also usually like to eliminate ambient light so I start with the following settings and adjust as needed.
Flash power at 1/4
Camera Settings: F 11, ISO 100, shutter 1/250th
Pick out a portion of the bouquet that has an interesting element to it and place the rings among the flowers. Depending on how much light your dealing with, you may find it easier to switch into manual focus mode.


When the brides flowers have wilted or just aren't very pretty, look for other wedding props that you can use instead that have some interesting element to them.


If you have two flashes and are able to get them off camera, adding a kicker light can really help add to some scenes, especially when dealing with reflective or opaque surfaces.

Adding kicker light to glass or to mirrors makes your scene match the sparkle of the diamonds.


Alternatively, kicker light can also make opaque material glow or make falling water in the background sparkle.


These kinds of shots are beautiful and simple once you get the hang of them. Try it out and see if you like the results!


Good Article! Although I don't agree with the flowers. Such a common trend. Why not create something creative with the rings like this image. I shot this at a wedding and every now and then do something similar.
Cool concept, Spencer. Well done and I agree its unique. The flower thing is too busy for my taste as well.
But... this image is SO DARK. Almost all the detail is lost in the shadows. If I didn't already know these were rings, it would be hard to even tell. Do you calibrate your monitor? Maybe your screen's brightness is cranked up like crazy and you don't realize how it looks on other screens?
...Just checked your website and your other photos look fine. Hmm. Maybe its just me.
Blake, The issue might have been a combo of Laptop Editing and Calibration of Monitor. I started to notice issues a few months ago and since then have been doing all editing on my Desktop. I might wanna re-work this at some point and see what I could do. What would you recommend to have done to show the shadows?
Glad that my website appeared fine. I've been working on many things to have that be near perfection.
Historgrams are your friend!
Just start by increasing the exposure (brightness) on a monitor that you trust. And ya, histograms like Pat said.
Def you need to reduce the brightness of your monitor.....if you buy a calibration device, make sure it's set to between 90 and 100 cd/m2.....
If your monitor is too bright, your images will be too dark on a monitor that is correct....i know iMac's will do like 300cm/m2, so you gotta set the brightness BELOW half way to get it correct....and even then their color accuracy isn't the best....
ColorMunki Display is your friend. It monitors the ambient as you work and auto-adjusts your monitor so you color is consistent. It is an excellent tool for on-location or on-the-go processing.
Dude, your images on your website are horrendous. Glad you got this one, but the rest are pretty below mediocre.
Uh, I think you need to pay for your lighting diagram app. ;)
Some good ideas, however, you can get better lighting easier by just having the flash unit attached to the camera or rig and cover it with white stop-rip nylon material, which I always carry with me on my "bat" utility belt when shooting (about 2'x2' does the trick.) while taking the picture, just hold the material out over the rings on whatever you have them setting on. When the flash goes off, the entire fabric will light up and give just amazing perfect defused even lighting over the entire area. After trying one or two shots the first time, you'll get the hang of it. Works even in the darkest reception hall room. Always get amazing shots and takes about 1 minute instead of 3 minutes. As a bonus, the fabric also works well as a blurry background when needed, or a defuser by a window, or a reflector too. I never go on a shoot without having it balled up in a pouch on my belt. Use it just about every shoot in some way or another.
Happy shooting!
Instead of a macro lens, I'm a big fan of bringing extension tubes to
use with my 50mm prime. It's a lot less bulk to lug around for the day
and the rings look great.
I haven't been able to invest in a macro lens yet and usually use either my 50mm or my 24-70. I will have to look into extension tubes; I really don't know anything about them. Thanks for the idea! :)
I love my Nikon 18-55 for macro shots. A dedicated macro lens is overkill for ring shots.
clearly you've never used a dedicated macro lens for ring shots.....
Clearly you've never tried a Nikon 18-55 for ring shots :D
All the example shots above could easily have been taken with it. Try it if you don't believe me!
I've got a 105 f/2.8 macro, thank you very much.
I use it for this kind of picture :
http://www.flickr.com/photos/eric_duminil/4358255929/
But I really don't need that much detail on the rings.
You're right, 1:3 is pretty good for a cheap kit zoom, but i don't have room in my bag for a cheap kit zoom.....my Nikon 55mm f/3.5 AI-S macro is half the size of the 18-55, cheaper, sharper, and goes to 1:2, or 1:1 with the extension tube...trust me, i used to try all the tricks, free-lensing with a 50mm, using a 50mm and flipping it over, but as soon as i spent $50 on a a MACRO lens, my ring shots got that much better....PLUS, at 55mm your kit zoom is an f/5.6....dim viewfinder, harder to manual focus for critical work, and if you WANT a narrow DOF, you cant hardly get it...
Thanks for your answer.
Good to know that the 55mm f/3.5 is smaller than the 18-55.
I agree with the dim viewfinder, but it's not a problem to get narrow DOF at macro shooting distances. I often have to close to f/8 or f/11 anyway.
It's actually an advantage that the zoom is so cheap. It's perfect for photobooth, and it's a great airbag for my camera if a drunk guest trips on the tripod! :)
I've got my 1.4 primes and 2.8 zooms for all the other pictures.
Cheap doesn't mean bad, at least in the case of the 18-55mm Nikkor. For DX this is a surprisingly great lens.
I think the whole point of this article is in the actual title 'EASY and ELEGANT' ring shots, and that's exactly what he demonstrates! I like those shots although I do agree flower shots are very common, but they still look good? I would love to see an article about capturing more complicated wedding ring shots!
"More complicated" would simply involve stacking multiple images focused at different distances, to get the entire ring in focus...that's what i've started doing with mine...start at the front of the ring, shoot, focus, shoot, focus, shoot, focus....moving the focal plane back each time....then you stack the resulting 8-10 images, and bam, awesome ring shot....
Here's an example...
Thanks Nathan, that is beautiful! I have read about focus stacking before, but you've inspired me to actually try it!
Yeah i actually used to think you needed special software to stack images like this....photoshop CS4 and up will do it no problem....basically, you load the images into a stack (under File > Scripts), and make sure you check "attempt to align images by matching features" or something to that effect....then you select all layers, then go to Edit > Auto Blend Layers, and make sure you check the box that is for images on top of each other, not pano type images, where the images are next to each other...simple as that.....
I always use my macro to shoot rings, I find the Canon 100 to be the
perfect focal length. However, very rarely will I use a flash to shoot
them. I prefer natural light in a diffused setting. I have however been
known to accent the rings with a highlight color as in the middle shot
below. Pretty simple concept, just find a flashlight app on your iPhone
and voila.
Flowers are very passe in my opinion, nothing
personal Dave. I try to find something more significant to the client
(like the skateboard in the bottom frame bc they both skate), or a
surface that will allow my clients to remember their day (the moss on the rock the couple stood on to get married)
or shoot it out of the norm... :)
C'mon, no one's place them on a pile of dogshìt yet? Jeez, no imagination...
I used a sunpak video light but im switching to a LED video light. The bouquet is pretty cliche' now and by the time I do ring shots ( which is during reception dancing) the flowers have wilted.
I like playing with interesting items from the wedding.. I made a ring kit from an idea from another photographer.. and added sparkly paper, wax, and a few other things and bring it with to the wedding.
I was asking myself 'where's the ring?' with a lot of these images - IMO simple, bokeh'd b/g's are the most effective in making the ring stand out.
Having been a professional jeweler for many years I can tell you it's not as simple as a five minute shoot, unless you don't care about faithful color reproducing in the diamonds.
These rings cost a lot of money and take a great deal of artisanship to make. The composition completely overwhelms the rings in every shot, stealing all of the work put in to them. The lighting is not elegant and the idea that jewelry photography can or ever should be easy is insane.
and of course the 20 grand rings they make the picture !!!