So, how do you shoot at the legendary Disney Concert Hall without breaking their rule of 'No Professional Photography'? You do it with finesse. Benjamin Von Wong was faced with the task of shooting the Trio Dinicu at the location without looking like a professional photographer. In this behind the scenes video he shows you how he accomplished that and also walks you through cleaning any distractions from your photo using Photoshop.
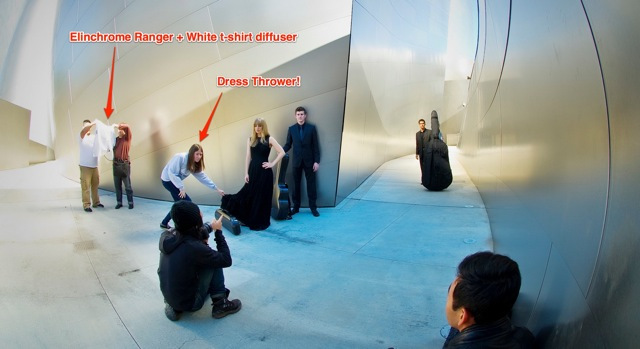
Photo by the lovely URFotogenik
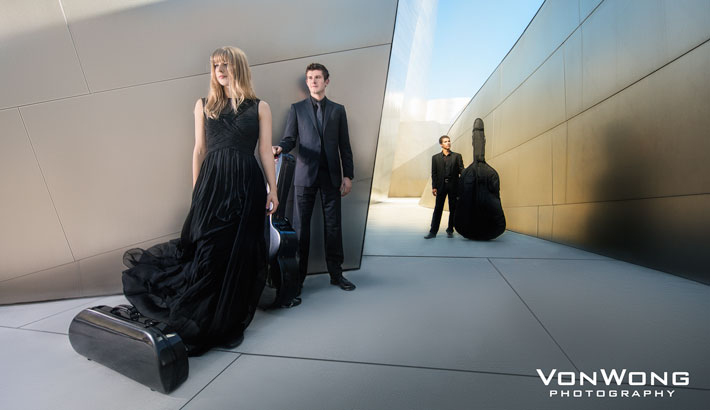
In the video he explains exactly what Photoshop technique he used to smooth out all of the unwanted imperfections that were distracting the viewer of the photograph from the trio and from the amazing lines of the architecture.
"The best way to smooth surfaces over (IMHO) is to use something known as the Frequency Separation Technique. Never heard of it? Throw it into google and you’ll find a bazillion different examples and uses for it. What it essentially does is separate a single file into two separate layers: A texture layer and a colour layer. This means that you will be able to smooth tones without affecting texture in an image.
Too lazy to search for one? Check out Sarah Kiesling’s detailed tutorial (specifically targeted to beauty retouching)here. She has a far sweeter voice than mine and goes into some great details you might enjoy.
The reason I use this technique is to smooth out distractions in an image. Too often, our eyes are drawn to imperfections in an image which I feel can greatly weaken your image. Of course, like all things, I recommend that you “perfect” things in moderation as the final result is still supposed to be a photograph!" - Benjamin Von Wong
If you want to read more into how he lit every shot that he did from this series and a more detailed explanation into his Photoshop techniques then head over to his BLOG where he breaks them down for you: Guerrilla Lighting and the Importance of Removing Distractions (Photoshop Breakdown) feat. Trio Dinicu


Join the Fstoppers community for free
-
Post comments and join in the discussions
-
Browse the site ad-free
-
Share your work and get featured in the community
-
Compete in the photo contests for fun and prizes
13 Comments
always fascinating to see what Benjamin is up to!
Guys like him are why photographers have a bad reputation... get a permit next time.
Gotta agree here. As an LA resident who deals with this on a regular basis, it's really not hard to get a permit or e-mail the place for permission. I've done it with WDCH, CSUN, and The Broad Stage in Santa Monica. They're usually more than willing to work with you to get it figured out.
How much would a permit there cost? I looked into getting a permit to shoot at Lake Mead in Las Vegas and it was about $2,000!
Ruben, if you are told $2,000 then you were being scammed and yes, some NPS Rangers are not above doing that, I have experienced it myself, when they refused to give me a figure, but made me guess at what the permit fee would be. They kept saying, "There is no established fee, you can pay what you believe is fair!" I asked, "How do I know what that is? It could be $50 or $500, what do you consider to be fair?" "We cannot tell you that, you have to decide." When I said $50 seems fair to me, they were clearly upset and told me for that fee, I could not land the helicopter anywhere in the park, which meant to change out the videographer and photographer, we had to jump out of the helicopter with it hovering a foot above the ground, a very dangerous maneuver, because it causes a slingshot reaction when you jump off a helicopter skid.
I felt as though I was being shaken down and did not like it at all.
BUT, these days are there published NPS RATES for photo shoots, STILL PHOTOS fall under the FILMING category in many government laws.
The NPS Lake Mead rate sheet is below.
http://www.nps.gov/lake/planyourvisit/permits.htm
Take the rate sheet with you next time and don't let them scam you.
I see this all the time and have to tell you, some of you are playing Russian Roulette. Just because you outwitted the Security Guard and nobody bothered to stop you from taking the photo on this location does not mean you got away with it.
Regardless of the permit, the owner of this property did not authorize the photo session and use of their property in your photos.
AT ANY TIME after these photos are published, if the owner sees these photos and decides to file CRIMINAL charges against you under Title 17 of the United States Copyright Act/1998 Digital Millennium Act, you can be fined up to $150,000 for not obtaining a PROPERTY RELEASE for this photo.
That $150,000 can be charged per image, per instance of use, so you publish three images or use one image three times, you could be looking at $450,000 in fines, PLUS jail time.
At the very least, the owner of the property could invoice you an established commercial rate for location rental, say $2,000, then TRIPLE that figure as allowed by Title 17 which would make the invoice for $6,000.
All they have to do is see the UNauthorized photo using their property as the background, find the photographer credited in the publication and invoice the photographer $6,0000 and if that bill is not paid in 120 days, they can pay $14 in Las Vegas, probably a similar fee in Los Angeles to post a LIEN ON YOUR NAME, which means you cannot sell your car, your home, anything with a title until you have paid off this lien.
Oh you can sell it, but the court will demand the first $6,000 you get from the sale go directly to the lien holder to pay off the debt.
THAT IS, if they do not file criminal copyright infringement charges.
There is a very famous case here in Las Vegas, where a local journalist wrote a book about Steve Wynn and his rise to fame and riches in the Las Vegas hotel/casino industry.
The writer stated in his book that Steve Wynn had mob ties and ran numbers for his dad when he was younger. Steve was livid and wanted to sue to stop the book from being published.
Some of those details were well known and in public record so Steve did not have a case. So Steve decided because the publisher used a photo of Steve Wynn on the cover of the book, he would sue for unauthorized use of his image. Unfortunately, Steve is a "Public Figure" so his privacy rights are not as strict as the average guy.
Pissed and by now wanting blood, errr... ink, errrr cash from the writer, Steve consulted his lawyers and one of them recommended that he sue them for copyright infringement for using a photo of the Mirage Volcano on the front of the cover.
Because the Volcano and Mirage Hotel did not authorize the use of the photos for commercial use, the lawsuit went through and the book was killed.
No! Just because you can see it from the street, does not mean you have a right to photograph it, except in the case of Federal and in some cases Municipal buildings, considered to be public property.
No! They don't stop tourists from shooting the same photos, because they are not commercial photographers.
When I was stopped from shooting the "Welcome to Las Vegas" sign at the end of the strip, which is photographed by thousands of people each week... I asked the City of Las Vegas if a Doctor with the same camera gear stood beside me and shot the sign, are you saying he is allowed to photograph the sign, but I am not? I was told, "Exactly! He is a tourist, you have been published and we assume photographs you take will at some point be used for promotion or commercial purposes."
I was threatened with a $1,000 fine if I took the same photo, a gaggle of tourists standing behind me took.
Property Releases are as important as Model Releases, without them, you may have turned your entire financial life over to some property owner, who when they see their property in your photo, go nuts and decide to act in a manner the law allows and sue you for copyright infringement and/or file criminal charges.
Yes! They teach this at Brooks, RIT, FIT, Winona all those other "OLD SCHOOL" as someone called them the other day... educational institutes of photography.
Might you get away with it? YEP! Until that day you don't! That's how life works!
Always appreciate the details in your work, Benjamin.
Nice video. I really liked the lighting portion. The only recommendation I have would be to mention the Apply Image settings for working on 16bit files rather than just the 8 bit settings.
Boo.
Will you also be posting a tutorial about how to prevent Disney from
issuing a cease and desist letter for the commercial use of those
photos? I hope the photo subjects didn't have to pay for this photo
shoot.
Private property owners are within their rights to restrict photography on their property.
You are right, either way (paid photoshoot or not) he's still responsible for having a permit or a property release. And having your bts and images on the internet is not a good way to keep this as a secret...if any of the Disney (or city of LA) legals is working to find exclusively things like this (and some really do have a team just for that), he'll get caught in a second. Whether they want to pursue this in court is a different thing.
There is a big difference between "not breaking the rule of 'no professional photography'" and merely appearing not to break the rule.
VonWong is a boss. Curious to see what Disney does. I wouldn't say VonWong gives photographers a bad name though. He is incredibly creative and shares his knowledge. I am appreciative of guys like him.
I like the video, he's a great guy and I love his stuff. However there is a reason why they don't allow people to shoot on location. I'm pretty sure that we all know, being a private property, you do need a permit...using the location for a commercial job requires a release and if they find out you did it without permit..well, it's basically not legal. If Disney really had time, they would take anyone doing this to court. They most likely won't do it but then posting your bts and images all over the internet is not what you want to do, if you've done it "in the dark"