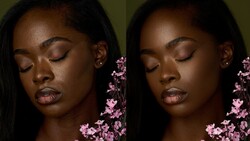
This might be an extreme take on the all-too-common client request of "get it done quickly," but it serves as an excellent benchmark of what can be done in a short amount of time. Odds are, you won't ever be asked to do a full post-production retouch in such a short amount of time, but the idea behind what Aaron Nace of PHLEARN is showing here is solid: with the right tools and knowledge you can streamline your workflow with extreme effectiveness.
Nace says, and I agree, that a major key to speeding up your processess is to learn keyboard shortcuts religiously. Check out what they started with and the final result after only 5 minutes:

For the full tutorial, head on over to PHLEARN and while you're there, don't forget to check out their Pro Tutorials.


Join the Fstoppers community for free
-
Post comments and join in the discussions
-
Browse the site ad-free
-
Share your work and get featured in the community
-
Compete in the photo contests for fun and prizes
18 Comments
Surely the image on the left is the final re-touched image, and the one on the right is the original?? FWIW, I prefer the original...
Same here. If he had left out the skin brushing it would have been a lot better.
Looks like the article has now been edited...
Image on the right is the edited one. Texture was gained if anything; not lost. Not sure what was posted before I looked at this page. Aaron *never* is a proponent of killing off texture in skin.
Sorry, gotta disagree. You watch the vid from 5:39 and when he turns off the layers, it shows the original image (the one pictured on the right in the article - you can tell by the 'blotchy' skin on the forehead that was retouched out). All I'm saying is that the article in its original, un-edited version was incorrect, and that, to my taste, I prefer the feel of the original (right). The retouched image (left) may be seen as more 'editorial' in the industry, but I can't help but feel its somewhat muted in comparison to the original.
You're absolutely right; I stand corrected. I just watched the video. I'm a huge fan of Aaron Nace and have learned so much but I would have to agree and say that the original photo is better than what it was edited to. I don't know what is more "editorial" as I'm not in that side of the industry but I think the edits muted the strong crisp feel of the original.
:-) And apologies if it seemed like I was banging on at you, it wasn't meant personally. It just frustrates me when you read an article that hasn't been properly checked and therefore has inaccuracies, and then readers take away duff information. As to the image edit itself, while the tips in the video are handy, I wonder if the inaccuracy in the article (possibly stemmed from the author's presumption as to which was the original and the final edit when the two images were placed side-by-side) suggests that Aleksandar's original edit is preferable to many people...? :-)
me too, we should watch the video backwards
I like the concept, the lighting and the final image is good. Hoever someone went overboard with the sharpening.
So what he did is lowered contrast, fucked up white balance and got rid of skin texture. The sharpening is also totally unnecessary for a already heavily sharpened image.
This is my photo :) I really appreciate Aaron doing this tutorial on my picture. My edit is on the right. I like some thing better on my edit, some on Aaron's.
Cheers for clearing that up Aleksandar. As I said, I prefer your edit (on balance), although that's not to say that some tips in the tutorial weren't handy to learn! :-)
Sure. Aaron is PS guru, I have learned a lot on phlearn :)
Ha ha what a happy crew here :) -- loved this Aaron and yes it's the kind of finish used in advertising. Everything is subjective of course but appreciate the post
Lately I've been using the frequency separation technique for my skin work . I keep a copy of the texture layer around and find that I duplicate that towards the end of my work and move the copy up top and use that as the sharpening and skin texture layer. I do some skin "painting" like Aaron does throughout the retouching and when you plop that original skin texture on top with a layer mask and reveal it slightly it looks about as perfect as can be.
The purpose of Phlearn is to use some user's pictures to show some technics ... on this case the picture is already really good and, for a lot of us, wouldn't seems to need to be re-retouched. But the purpose of the tutorial is to show us stuffs you can do in 5 minutes retouching ... for a short delay production for an editorial picture it's perfect ...
And, for example, i'm used to produce some really hard-contrast images ... and it's super difficult for me to obtain the smoothness of the edited version from Aaron's so it's really great to see his technics to get there ( even if it might take me more than 5mn to get there :) )
Aaron Nace seems to be the only one sharing even though he has a paid tutorial website. Now, who else is sharing? :)
The original image does need work, but Aaron's retouch isn't it. I don't get the point of showing a poorly executed, 5 minute retouch to photography enthusiasts or aspiring professionals. Istagram would do a better job. Anyone serious about retouching needs to know that there is no such thing as good retouching in 5 minutes. If you're serious about doing professional level retouching on your photographs, check our top retouchers like Gry Garness. http://www.grygarness.com/index.htm