Transforming one image look into a LUT can be a daunting process for people who don’t know much about LUTs (Lookup Tables). According to this video, Picture Instruments came up with something easy to help you give any of your pictures or footage the look of another image.
When retouching, it is not rare to come across color problems on a model’s skin. Whether it is from a sun tan, dodge & burn, spots or skin discoloration issues, it can be really painful to treat it in post. Despite being all about having it right in camera and doing as little as possible in post, there is an easy way to correct this in Photoshop -- a method that is going to make your makeup artist want to stop correcting redness, yellowness or under-eye bags. It is so easy to use you are going to wonder why you did not think of it earlier!
Last week I showed you how you can use just a DSLR and a few accessories to digitize your negatives. However, that article wouldn’t have been complete without explaining how to convert the scanned analog picture to a positive image. The process is quite easy and only a few steps are required to achieve a great result. Let’s dive in!
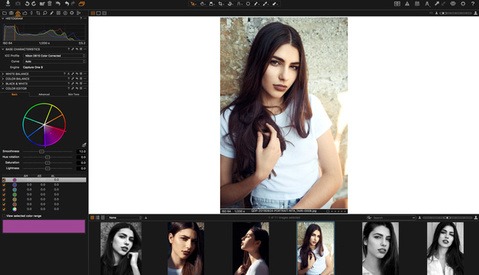
When switching from Lightroom to Capture One, I hear many users complain about not being able to bring their presets into their new photo editing software of choice. Well, thanks to Picture Instruments, it's now possible!
Elinchrom has been renowned for its light shapers for a long time. Many photographers have been using the Rotalux line of softboxes even on other, more expensive strobe brands such as Profoto or Broncolor. The Rotalux system was also known for its quick and simple way of assembling the boxes. A couple of months ago, the Swiss brand announced a new line of light shaping tools: the Litemotiv. They might look very similar to the Rotalux system, but they are very different in many ways. Elinchrom was kind enough to lend me both sizes — a 120 centimeter softbox and a 190 centimeter softbox — and give them a try. Here are my impressions after a month of use.
Color management is probably amongst the hardest things there is to understand and learn when it comes to retouching and photography. So many elements are to be taken into account to create the perfect final print that it can be extremely complicated and time-consuming. Part of that process is to have a raw converter software able to match your vision and your needs. Capture One is known for its modularity and customizable features. Let’s see how we can use it to help us get the colors we want out of all our raw files.
Whether you shoot portraits, still life, fashion, beauty, or even video, there will be a time when you’ll need to shoot overhead for some reason. Don’t ask me why, I’m just sure that one day you will. So while I can’t help you with when and why, I can share the latest video from Peter McKinnon explaining how. Watch this tutorial to learn all about setting up a secure, compact, and efficient overhead setup.
Broncolor is often referred as the top high-end flash manufacturer. Their units are all assembled by hand in Switzerland, and the Siros L is no exception to the rule. However, the latest addition to their product line is much cheaper than their other battery-powered flash, and it’s a monobloc unit, just like the Profoto B1. I had the opportunity to use one for a few weeks to give you my impressions!
Since its transition to digital, medium format has been thought of as bulky and heavy systems for high-profit commercial jobs or for wealthy photographers. Despite the attempt of Leica to create a smaller camera with the S series, no real alternative to the Hasselblad H and Phase One DF/XF has found a place on the market. However, this might change today with the brand-new Hasselblad X1D.
As photographers and retouchers, we are often required to travel. But travel eats up a lot of time and thus it is crucial to optimize one’s workflow. While gear is not everything in our industry, it still maintains a critical place, especially to help save time. Spending more and more time on the road, I recently had to take a look at my editing workflow and find new solutions to make it better and faster. In this article, I’ll share with you some of the accessories I use or have since discovered to cut my retouching and keep me sane.
When learning about retouching, selections and masks should be on top of the list along with curves and brushes. But each of these tools have so many options, and it is hard to know the in and out of each of them. In this article, I will guide you through different ways to create precise and refined luminosity masks to help you improve your retouching skills.
White balancing video footage is crucial to make it consistent between sequences of edits you are putting together. However, adjusting it by hand using color wheels can be quite cumbersome especially for those who don’t see colors all that well. Using DaVinci Resolve 14 beta you can, however, make this adjustment incredibly fast and easily. Let’s see how with Dave Andrade from The Post Color Blog.
Whether you are shooting film or have a large collection of negatives, chances are you will want to scan them one day. The process to digitize your analog pictures can be expensive and sometimes even disappointing regarding image quality. When I started playing with my Mamiya RB67, I wished there was a cheap and quick scanning method that would offer me a good amount of detail and decent colors. I found it using gear I already owned and that most of you actually also have at home. It even surpassed my expectations to the point that I decided to share the technique with you in this article.
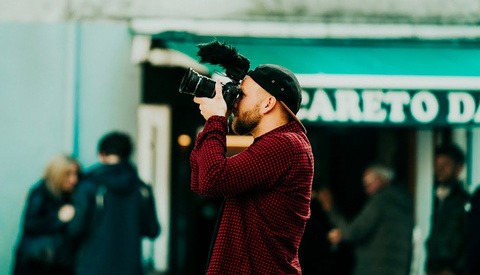
While photography and videography are different, they share many common aspects. Starting with one, and then also learning the other is an excellent idea to improve your craft and potentially open doors for more jobs by becoming more versatile. In a recent video Matti Haapoja released on TravelFeels, he explains to us why he believes shooting stills is crucial for videographers.
One of the benefits of using layers in Photoshop is to edit pictures in a non-destructive way. However, there are a couple of techniques and filters that will require you to flatten a file or create a merged layer. The liquify tool is one of them. To use it, you must create a merged layer of the area you want to edit. Sometimes it means a merged layer of the whole image. In this article, I will show how to avoid this problem using a simple, yet very powerful tool Photoshop offers. We are going to see how to use the liquify tool in a more efficient way than on a merged layer. This way you will be able to go back into your retouching process without losing anything and even edit your liquify.