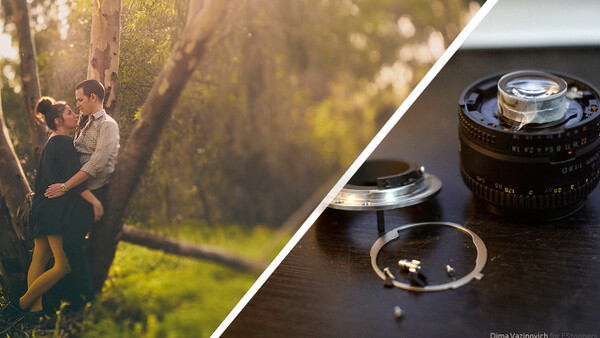
Israeli based photographer Dima Vazinovich is specializing in news, documentary and wedding photography. One thing that separates him from other photographers in the industry is the unique and creative look his photography has. Recently Dima decided to try adding a new kind of look to his portfolio, and the results are truly amazing. The idea: “Freelensing” / tilt shifting with a cheap broken 50mm 1.8 lens to create magical images.
Dima told Fstoppers about the idea and also gave us a step-by-step of how he hacked the lens:
"The free lensing technique was around for a while and i’ve been using it for a year or so. I tried it with many different lenses (35mm/85mm/135mm) and also couple of my old M43 55mm lenses.
"Some call it 'lens whacking' and some know it as 'free lensing,' but both use the same technique of detaching the lens from the camera, holding it close to the mount and slightly moving it to get the right focus.
"I remember talking to Sam Hurd about his technique of free lensing and he told me about his 50mm f/1.8G that he broke and took the mount off to get much more movement when you hold it near your camera body. He wrote a small article on his blog about his 50mm lens he's using. He glued the aperture so it will stay wide open at F1.8 since nikon lenses default makes the aperture closed, and canon lenses default makes them open. After my last shoot using the free lensing technique I learned that focusing at open apertures can be really hard so I decided to go the DIY route and build something to help me control it."

Steps:
1.
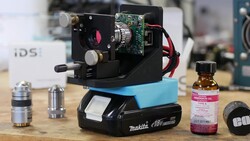
Take your old Nikon/Canon 50mm 1.8 lens, if you have a broken one its even better - if not - you can just get one on ebay for really cheap.
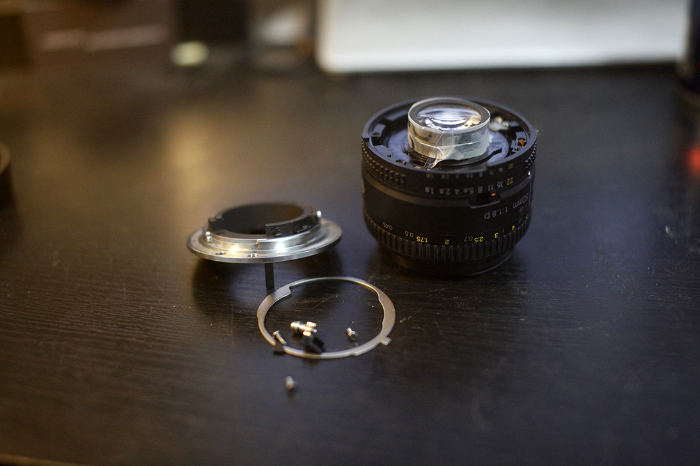
Take out the 3 screws from the back and take the mount off. When taking it off you will have to cut the cord (orange) that is connected to the lens.

2.
Get the mount and the aperture ring out to get the lens clear of parts that could fall apart.
The aperture ring is not connected with any screws in the Nikon lens, but might be connected in the Canon lens.

3.
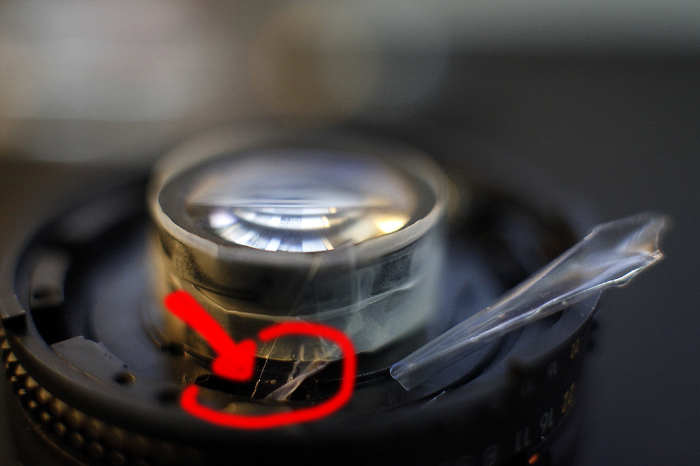
Take a small piece of an old AA battery plastic cover and glue it to the aperture ring so a part of it still sticks out and you can move it to control the aperture.
To make sure it stays in place use a small piece of duct tape around the lens mount (as seen in the picture), so by moving the duct tape to the side you control your aperture.

4.
To make it easy to move the lens next to your camera, use a chainsaw to cut the plastic on the sides of the lens. Thats not mandatory, but it helps later when using this lens. The removal of the plastic also helps more sunlight leak in to create very interesting effects.
5.
The easiest way to use this lens is to set the focus to infinity and move until you get your subject in focus. If needed, you can always use the focus ring to change it manually.

Examples:

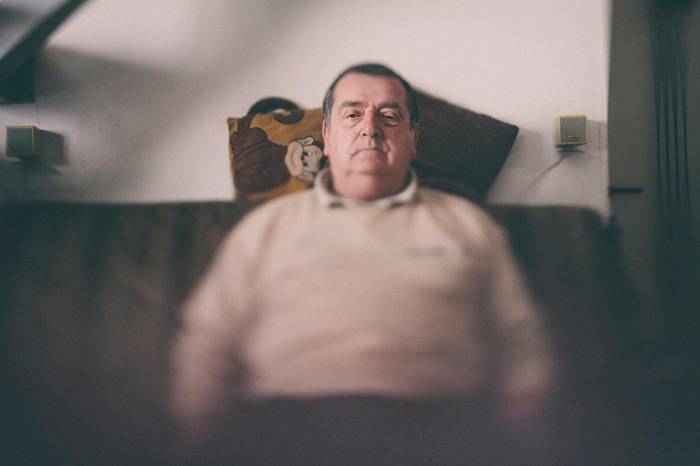


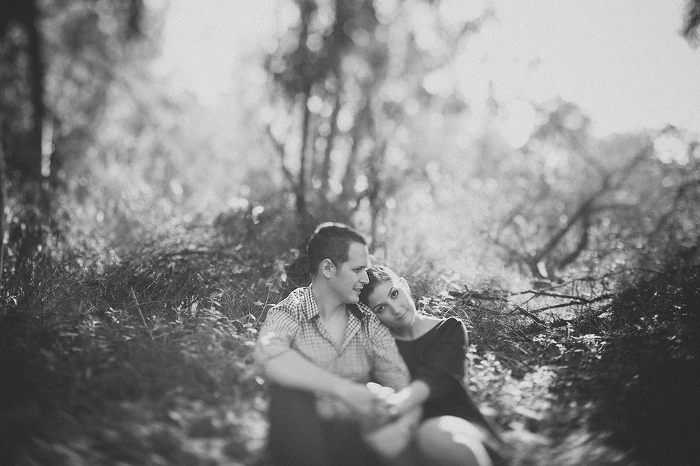


All Photos provided from Dima and are used with permission.


Join the Fstoppers community for free
-
Post comments and join in the discussions
-
Browse the site ad-free
-
Share your work and get featured in the community
-
Compete in the photo contests for fun and prizes
41 Comments
I havent had as much time as I'd like with freelensing the old 50 but its quite the effect when you can master it like Dima here. Now that I know its this simple to get an even further reach on that tilt shift effect I may have to pick up another 50 1.8. Very nice article! (WHY DID I SELL THAT SILLY FIFTY!!) Haha
Haha that's what I'm thinking!! I gave it away to my friend. DAMMIT.
Dang. I wish people gave me lenses...
Would have been easier to follow his pictures if he didn't free-lens them himself.
Why not using babylense? less dangerous for the camera sensor no?
But more expensive...
Couple of dust cleaning will cost you the 50 already, then what is more expensive?
I like the idea, but I'm not comfortable with free lensing and exposing the indside of my camera to the elements. That's a good way to damage it and by the time you spend the money to buy a new body you could've used the same money to buy an actual tilt shift or lensbaby.
check out some of the freelensing photos i did few days back http://500px.com/iklash/stories/77221/freelensing
nicely done :-)
Looks really good , i would try closing the F stop a lil bit to get more focus on the object your trying to focus on ,
I get what he's saying about glueing the aperture open on a nikon "G" lens, which has no aperture ring....but the photo you're showing is a "D" lens, which DOES have an aperture ring, and CAN be set with the aperture wide open, off the camera....i know b/c i do it all the time...you just turn the aperture ring to f/1.8, rather than f/22.....as far as taking the mount apart, the reason he's doing that, is so he can get the rear element closer to the mount, where it's supposed to be, and still be able to move the lens around....the problem with trying to free-lens on nikons (or any digital slr for that matter) is that as soon as the lens comes off the mount, even a FRACTION of an inch, your far focus ability goes from infinity to like 5 feet....it's drastically different. Like putting an extension tube on your lens....so your subject has to be CLOSE....so the only reason i can see why he took the mount off, is so that he can get the rear element back into its original position, and still be able to focus at normal working distances, while still being able to move the lens around. Smart. But please clarify the bit about nikon lenses being stopped down by default....that's only "G" lenses, which you didn't show in the photos.
Hi i do this for some time now, but more cleaner and safety way using diy tilt lens like this http://maciekpp.blogspot.ie/2012/10/how-to-give-old-nifty-fifty-new-lif…
its one way but when using the lens open like this you can get alot of nice light leaks that would get you that look that no other tilt shift lens will
Any solution on how to protect the rear element? Been trying to find something to cover the glass when transporting or having it in my pouch when I am at a gig.
I tried looking for bottle caps, but they are all slightly too small to cover the rear element.
im using a sock , small half size socks hold it just great ! , no dust at all :)
myself and a friend who is a cinematographer have been dabbling in this lately. it is a fun technique to use, and can be achieved on many lenses. the one thing we found is that you get some really greasy images if you open your lens to a light source, gives a phenomenal look. we tried to improve on that concept and now use our iphone to add different light sources. grab the flashlight app, and turn it on, point it to where you are moving the camera away from the body and check out the results. you can even intensify this by putting a small gel over your phones light. the only thing we have noticed is that it can tend to intensify or warp body parts the closer you get to the subject.
Awesome idea!! Don't think I really get how to do it though, need a clearer tutorial or video would be awesome!!
What am I missing as to not doing this same effect in post production...I mean, you can do this using pixlr free online, pretty easily. Is there something more to these tilt shift shots then blurring the edges of everything but the subject you want to be focused on...sure some tilt shift from above gives the cool "miniature" affect but these portrait shots are not going for that look...so all I see is blurring on the sides...am I missing something? Not hating, Seriously just curious.
Some stuff is just better done in camera than it is in post production. I can take a photo at f22, and in photoshop and plugins and try and blur it to look like f1.4. However usually the result looks fake, easily tell what is a fake bokeh rather than organic straight out of camera.
There is a reason why you buy a f1.4 lens (in addition to just letting more light in), if you want to go for the creamy bokeh as part of your composition, then that's the right tool for the job.
if any of these images had lights in the background, differences that are much more, if not impossible, to replicate in photoshop would be evident. freelensing or using a tilt-shift allows you to have focus spot on in a specific part of the image, while choosing which areas of the image you want to have out of focus. this effect allows you to put lights that are the same distance as the subject (and would be in the same focal plane with a regular lens) and place those lights out of the focal plane for creating nice bokeh.
summary: think about it as literally shifting or tilting the plane of focus in the image. you can have "objects" the same distance from you as your subject out of focus, and you can have "objects" in focus that are different distances from you than your subject at the same time!
Corey, in camera means less post, also means you're creating the image, not photoshopping it.
Rick,
but the end result is the same, right? Just wondering because I would prefer to not hack my lens unless there is something more then the blurring affect I am missing by doing this in post...which I personally believe I am still "creating" the image. Agghh, trying to avoid the post vs non-post discussion and trying to somehow ask if there is something more, no matter which way "created" that I am missing to these shots...dont think I am asking it clearly.
no i get it, it's just some people like to feel like they are a purist
and only make the image with a camera, not a computer program. it's
kinda like restoring a car, some people like to give it all original
parts while others like to use aftermarket parts to improve it, in the
end the car just ends up looking good both ways. in the end you get the
same results, the difference is my image i attached earlier in this post
came SOC with tones adjusted on import, where as photo shopping it
would take a few minutes to achieve. however, if you shoot a nice clean
image at a great moment, by doing the work in PS you will have both a
properly exposed image as well as a cool looking one
you don't
have to hack your lens, i do this with my daily use lenses, all brand
new sigma's. you just don't get the aperture control is all bc you lose
the communication line with the body. i never really thought about buying
an old lens with an aperture control ring, may have to shop around the
local pawn shops for one.
If you can use this technique to create actual BOKEH, then no -- you can't replicate that in post. Blurring, yes. Light leaks? With some artistic touch, maybe.
But if you know the difference between those and actual big juicy circular bokeh, then you know why techniques like this (and bokeh stitching composites) can't be replicated later. Photoshop can't replace what only optics can do.
Brian,
I see your point...it is difficult to get smooth Bokeh out of post production tools. The Light leaks are not so much a priority for me, though a cool affect as well. Still, I wonder if my clients would actually notice the difference in a Shallow DOF, a Tilt-shift, or a post produced affect that replicates the two....in fact, I wonder how many professionals would notice the difference....specifically on the straight portrait shots.
Wrong
Either way you ARE CREATING it.
Um...maybe a dremel tool would be a better choice to make modifications to the lens than a chainsaw haha. I might try with an old Nikkor 50 f1.4 I have lying around...would be cool to try out on my 5Dmk2
I'm not a fan of tilt-shift but I do have a Canon 50mm 1.8 that's broken if anyone wants to buy it from me, just twitter me.@Jimmy_Schaefer. The lens is spotless the ribbon inside is cut.
I use an old Canon 50 that a friend of mine's dad gave me on my D800. Works beautifully. What's great about the D800 when free-lensing is that the mirror doesn't come down when exposing the shot while in live view.
I love this notion that you snobs think that what you create manually is creation but what is created digitally is not. Utter nonsense.
Simple tilt adapter solves all the problems. No tinkering, no gaget master-yoda bla bla. 30$-80$ price range.
What's to stop the mirror from smashing into the rear element, since you removed the metal mount?
Seems like A LOT of work for "Ehh" results.
chainsaw?
what's the best way to recreate this in post? I have used lightroom and the brush tool...heavy desharpening and some de-clarifying... Also graduated filter tool using desharpening gradients...declarifying..
Alien Skin Bokeh plug in?
I tried for a while, but can't seem to get AS pretty results as this. Not sure if I should change my technique or actually try to free-lens. I'm not so worried about the cost or the dust....but, I would like it more if I could just recreate it in post and not have to spend time while on the shoot to focus the way you want..
dochyolaptop @ gmail if you can reply. I'll subscribe to this thread also :) Thanks!
I use this method with soviet Helios 44) it can be disassembled into 2 parts without the risk of breaking something
I have a perfect candidate of a lens, but I can't for the life of me get the screws out of the mount. Those things are seriously in there. I have a 50mm 1.4 Nikkor
No kissing in class.
I still dont get it: ( could you do a viedo on youtube.