Back in October I posted a portrait of myself that quickly became the most popular photo on my entire Facebook feed for 2015. The image was never meant to be anything other than a test shot for a few lenses we were reviewing but people kept asking how I created it. In this Fstoppers video, I will show you a common lighting setup every photographer should know and how you too can achieve this simple look with your clients.
The image below was literally one of maybe two images shot with the Nikon 85 1.8mm lens. I was testing the effects of lens compression on the human face and shooting a bunch of lenses with Kenko Extension Tubes. The idea was that by decreasing the minimum focusing distance of some of my favorite lenses maybe I could find an interesting look that would warrant more exploration. I crafted up a very simple and common lighting setup in the studio and had Lee Morris take one test image with each of my 50mm, 85mm, and 70mm - 200mm lenses. Each lens was tested both directly mounted to the camera as well as mounted with a 12mm extension tube between the camera and lens. The overall conclusion of my test was that the extensions really didn't produce anything worthwhile, but I figured I'd post my favorite image from the test session which happened to be taken with the 85mm lens.
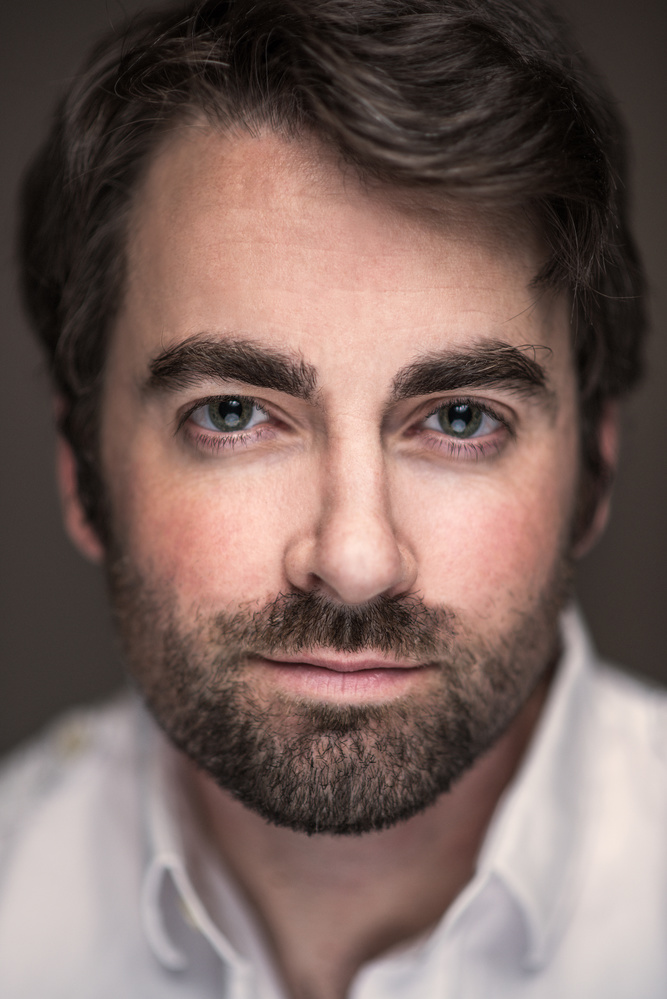
Original Test Shot that inspired this article
To my surprise, the image above received a ton of likes and dozens of comments. That week my inbox was hit several times a day asking exactly how I shot the image, what lens I used, and what was my lighting setup. So instead of replying to everyone one at a time, I figured I would film a short tutorial on how to use clam shell lighting (also known as butterfly lighting or sometimes paramount lighting) in your headshot work.
The Camera Gear
The camera I used for the portrait was a Nikon D810 but you could use any DSLR and get the same results. I also used the Nikon 85mm 1.8 lens which some of you might find a little shocking. The 85mm lens is a common lens people use for headshots, but instead of buying the much more expensive 85mm f/1.4 lens, I actually bought the cheaper 85mm f1.8 lens. Most of my work is done with the 24-70 and the 70-200 and I don't typically like to fill my camera bag with bulky lenses that I don't use often. Both 85mm varieties are amazing and unless you are one of those compulsive types who has to have the absolutely best lens, you might want to opt for the cheaper 1.4 version if you don't already have an 85mm (or are holding out for the Sigma Art 85 1.4mm).
Either way, you do need a lens that will open up faster than 2.8 if you want to get the same shallow depth of field as I have in this image. Keep in mind, many close up portrait photographers like Martin Schoeller actually have MORE depth of field than most photographers think. You can always shoot at f2.8 or f4 on your lens and still get a cool looking image; it will just look slightly different than mine in this article. As you can see from the final portrait of David below, the depth of field is so shallow that the tip of his nose is actually quite out of focus with only his eyes falling in the "in focus" area of the depth of field.

Nikon D810, f/2.2, ISO 50, 1/160th at 85mm
The Lighting
Recently I posted an article titled How to Take a Portrait With Shallow Depth of Field and Studio Strobes. The article focused on using your strobes' modeling lamps so that you can shoot wide open without blowing out your subject. In this lesson we will be using my favorite light ever, the portable and battery operated Profoto B1. One of the reasons I like this professional strobe so much is that it can power down low enough to allow my lens to open up to f/1.8 without having to use a neutral density filter. My other more powerful studio strobes are far too powerful even at their lowest level to accommodate f.2.8 or faster so it's nice having these around the studio for the shallow depth of field look. Keep in mind, the Nikon D810 does go down to ISO 32 which helps contain the strobes even more, and hopefully more DSLR manufacturers will start offering extremely low ISOs in their future camera models.
For this particular headshot, I used two lights. The light above my subject was fitted with a Profoto Beauty Dish and Grid. Since this light is the main light and the brightest light, it will be designated as my Key Light. The second light was set much lower in power and therefore acted as a fill light. I used a 1'x4' Strip Box to soften this light but in the original photograph I did use a small 3' Octabox. The overall affect will basically be the same especially since this light is just filling in some of the shadows. I've also used a small 12"x16" softbox on the lower fill light as well so feel free to mix it up depending on what you already own.
Setting Up the Lights
Whenever I am using a beauty dish, I always position it pretty close to my subject. My standard distance is about 2-4 feet from my subject's nose and maybe 1-3 feet above my camera. If I want a little bit more mood and shadows, which I usually like when shooting men, I will raise the beauty dish up higher. If I want a more flat light with less shadows cast down from the nose, usually a good idea with women, I will lower the light closer to the camera. Keep in mind, if you want a lot of light and color in the eye, you may want to lower the Key Light so that the light itself can be seen in the top of the iris. For this portrait I did of David I decided to raise the light so that the reflection was just above his eyelashes which caused his eyes to go a little darker making his portrait a bit moodier. Positioning your beauty dish is a personal preference but if you want the most light fall off (more light on the nose and cheeks and less light on the jawline, ears, and hair), you need to keep your beauty dish super close to your subject.

The second light, my fill light, was jammed up as close to my tripod as possible. I wanted to created a super shallow depth of field on David so I had to make sure my aperture was close to wide open and my lens was focusing very close to his face (two key elements that exploit the shallow depth of field look). Therefore, since my camera and tripod were so close to my subject, I had to position the front two legs of my tripod so that I could get my fill light as close to the camera as possible. If you place your fill too far forward your fill light will start acting like a kicker from under your model's chin which usually isn't a very flattering look. Since I was using a softbox on my lower fill light, the lighting was much more forgiving than if I had used a bare bulb strobe which would cast very harsh shadows. I typically like to use soft light as my lower fill for this very reason, but if you want an edgier image with more specular highlights and contrast, feel free to experiment with a fill light that has no modifier on it at all.
Since people are going to ask about the light stands used in this video I'll go ahead and outline those here as well. Last year we invested in a few Avenger Rolling C Stands that I absolutely love! They make positioning your lights so much easier because they easily roll even when sand bagged. If you get a boom arm you can also easily mount your lights in front of your subjects without having a light stand in the way of your shooting. If you go the C Stand route, I'd highly recommend getting the Kupo Boom Arm with the Hex Grip on the end so your lights don't twist down with gravity.
For the fill light, I recommend having a few Manfrotto 5001B stands in your studio because they will allow you to mount your flashes low to the ground while having a wide and stable base. These stands are also great for shooting wedding receptions when you need lightweight stands for your off camera lighting. Of course any light stand will work so use what you already have but keep in mind you will need some way to boom the key light over your subject so you can shoot straight on without any stands getting in the way.

Final Things to Consider
As I said before, butterfly lighting technique is a very common lighting setup that photographers have used for ages. You can vary the overall look of butterfly lighting by changing the light modifiers out, changing the lighting ratios between your two lights, and also varying the distance each light is from your subject. I typically like my lights close and just out of the frame when I shoot but many fashion photographers prefer setting their key light far away so that the light is more harsh but more even (less light fall off, inverse square law). In these two photographs my main key light was set two stops brighter than my fill light. If you want even less fill light, you can completely remove the fill light and use something like a tri fold reflector to bounce just a hint of soft light up from the bottom. Keep in mind, the larger the fill light from below, the less shadows and light fall off you will get on the side of your model's face so don't over do it.
My favorite method of adding additional fill light is by using the foam core technique I showed in the video. By placing a large piece of foam core or white insulation panel from Lowes/Home Depot behind your camera, you can essentially emulate a large, soft window directly in front of your subject. You can barely fire a third strobe into this panel to add just a hint of fill to your image or you can blast the light into it and completely remove all the shadows on your subject's face (and produce a much more boring looking image in my opinion).
All in all, this butterfly lighting technique is something every photographer should know how to setup and use at any given time. This lighting style is a classic go to setup for many, many situations, and if you haven't taken some time to experiment with it then you really should. No matter if you are shooting clients in the studio, trying to produce something unique on a wedding, or are having to shoot an editorial portrait in a tiny hotel room, this sort of lighting always delivers and can easily be pulled out when you find yourself in a pinch. Feel free to change the lighting modifiers on the two lights to whatever you want and also experiment with different lenses and apertures to completely customize this technique to your own photography style.


Love this video. Simple with great results. Thanks so much for sharing.
This is one of my fave lighting setups. I use it quite often for portraits.
https://fstoppers.com/photo/83327
It's a great setup to mess around with in a controlled environment because the slight variations really make a difference.
For a female I might drop the beauty dish a touch just to get more lights in the eyes but for a guy it gives a nice "tough" or masculine look as-is.
Great video - thanks for sharing!
Interesting results. Very different? I've been shooing headshots with clam-shell lighting for years. I prefer a more high-key look with mine.
Yes, shooting studio at greater apertures is cool ! I usually used never to go below f8 when I was doing studio work except for boudoirs. I had a similar clamshell light setup only with some extra light behind the model. You can see examples of what it does there : http://www.thenomadphotographers.com/Studio_photo_work-25-1.html
Looking at the eyes, and the reflection on the metal you had a light either side of the model? which is rather different than a clam shell.
sorry my mistake !
Content like this is why I follow Fstoppers. Great shot, great tutorial, 10/10, would fstop again!
Thank is David, we like to vary it up. It is important to us that the content we make never gets stale and we always want to do things for us first and foremost and hope others dig what we are doing. We should have more lighting videos like this coming down the pipeline soon!
Nice feature, Patrick. I like this popular lighting style, but when I use it I'm not always crazy about the lower catchlight.
An alternative to the Lupo arm with hex grip is a baby drop down pin.
You can actually lower the fill light even lower to remove the catchlight.
HAHA! The Miley Cyrus doll on the stand is epic!
Great article!! And very timely for some family head shots this weekend! Free models...and certainly a different take on holiday family photos.
Patrick,
What is the cable on your B1, that is shooting to the background?
Is that a power cable? I thought it was not possible to power a B1 directly. Would be nice to have that option.
I'm not sure what you are referring to. The light I used at the end for additional fill was a Profoto D1 since that light is bouncing it isn't need to be at the lowest power possible.
I'm toying with making a modified battery for the B1s that would allow them to be plugged in to a charger for studio use but Profoto claims it can't be done. I think they can be if the battery enclosure was modified to allow the charger plug to face outside instead of inside.
Thanks for this tutorial. I used it to create this image of my son yesterday. PP done in Exposure 7.
Clamshell lighting is a fantastic staple setup that I use all the time.
I've been shooting with continuous lights lately, but it's basically the same thing. I like shooting with a high key background and a kick light. Here is a shot from a recent shoot.
Thanks for a great article.
I think this lighting will only work with certain shape of faces.
Really great video! On that final step (the 'window'), what size foam core were you using, and how far behind you is it? I'd love to use that, but I'm a little restricted in terms of studio space. Thanks for sharing!
May I copy this tutorial onto my lighting website? I will give atribution and link back to this page.
Is this similar to how David Notes lights his subjects? www.davidnoles.com
Thanks for this tutorial. I copied your technique for my annual middle-school-theater head shots, and these came out MUCH better than my usual f8/tons of light shots. Now my fellow parents think I'm some kind of photographer, and it's all thanks to you!
Awesome! It's a great lighting setup to have in your back pocket. I pull it out quite often.
Guys..... thank you! We were bored in-studio one night and we did our best to replicate this technique. It's been by favorite self-portrait ever since.