
Color grading is a science, and it can take professionals years to perfect. With so many variables in the mix, is this something that you would want to try for yourself? What if there was a plugin that could take out the time involved in the matching of colors over a series of images using a reference image, and in doing so, allow you to get the results you are seeking without as many hoops to jump through?
In fact, by simply adjusting four sliders, you can get the results you are seeking in next to no time and apply them to a whole host of images. This is what the new AI plugin from Retouch4Me, Color Match, will allow you to do, not only for images but also for video as well, and I can't stress how quickly and effectively it does it.
In no way does this detract from the professional color grading that goes on behind the scenes, and I wouldn't even say that it comes close to what professionals can achieve, but it does bring the entire process of superfast color matching to us end users and allows you to achieve in a matter of minutes what would normally take some considerable time.
The User Interface
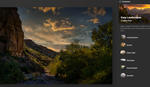
The results you are looking for with this plugin can be easily achieved thanks to the simple approach of the UI, and each one does exactly what you need it to quickly and efficiently. The panel is launched via a shortcut on the desktop for me, as I'm running Photoshop Beta, and provides very clear instructions. Once the image is selected, it's time to load your reference image, and that is it. If you are happy with the results at this stage, simply Save As, but in all honesty, how often does that happen?
The interface is uncluttered, which is a benefit, as you are simply looking to focus on the edited color grade instead of faffing around trying to get a finished result. The left-hand side of the window consists of four tools.
- Pan and Zoom: once engaged, it allows you to zoom into your image with the roll of a mouse wheel and move around your image without the need for a hotkey.
- Masking Brush: allows you to mask in or out certain areas of your image, depending on which mouse button you are pressing. The right mouse button removes the applied colors from the reference image, while the left mouse button applies them.
- Mask Eraser: removes areas of the mask.
- Invert Mask: does exactly that.

At the top of the plugin window is the Blend option, ranging from 0-200 in terms of the adjustments you have made to the Luminance, Color, and Smoothing on the right panel. Each of these sliders will apply your chosen adjustment amount from the reference image to your image. Smoothing allows for a better transition between adjustments made. It's at this point, if you are happy with the final results, you can hit the Save As button. There is also a Save button beside this, which I never used due to the fact that I knew after a couple of days I would go back and adjust things slightly anyway.
Using the masking brush and eraser brush perform the tasks that you expect them to: apply a mask to a particular area and remove the mask from a particular area. Doing this allows you to edit each individual image to your own particular taste, or you can opt not to use them and simply apply your Color Match edit to the entire image.
Exporting LUTs
This is another simple yet great feature that will allow you to add your adjustments via a LUT to all your sequences of images. If you prefer, you can take a still from one of your created videos, edit it in Color Match using perhaps a graded reference image from a film, save it as a LUT, and then apply it to your entire video in a matter of minutes. Doing this would also allow you to build a library of LUTs for yourself. 
LUT Manager
Within the LUT options window, there is a LUT manager which will open an online Library of LUTs for you to download and use, some of which are free and others at a low cost. You can save your own LUTs to a folder on your HDD as .cube files, and there's also the option to share your own LUTs for other users to download and use. I would definitely spend some time here browsing, as there are many more options here than I could show in the article. There may be the exact LUT here that you are after.

Simple to Use
The Retouch 4 Me Color Match plugin is really easy to use. Simply open the plugin and load your image plus your reference image. Using AI to analyze the color scheme, it will then apply it to your working image, matching the colors. You can then fine-tune the results to your own preferences. It is as simple as that.

Final Thoughts
Retouch4Me has created a whole host of plugins for Photoshop, and you can watch a recent review of another one by Fstoppers' Lee Morris here. All of the plugins have a free trial, so you can give them a go to see if it's for you before spending your cash.
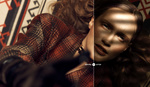
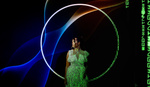
Color Match does exactly what you expect quickly and simply, and it's then just for you to fine-tune to get the final effect you are seeking. For the examples above, I used various screengrabs of movie stills as reference images and was surprised at how quickly I could fine-tune them to the desired look. Yes, they are not exact, as a whole host of variables, lighting, etc., and the professional skill set of the colorists come into play. And yet, if you want great results in a fraction of the time for your images and videos, I don't think you would go wrong with Color Match. It's not color grading per se, but it will allow you to match colors over a series of images or videos to create a particular look or mood.
This is a great option for photographers, creative professionals, and videographers who want to match the colors in their images or create LUTs for their videos. At $124 for a single-user license, it isn't a steep cost at all considering what it does. You can download a trial here to see for yourself.


I am using those plugins regularly. Especially the color match plugin for composites.
If you like you can get any of the retouch4me plugins with 20-30% discount.
I am not a bot. Just a user who paid for all the plugins and I have a discount code from the developer. ;)
Just visit the link in my bio.
Does this work in RGB only? What about CMYK?
The plugin only works in RGB. But I rarely have plugins that work in CMYK.
Why do you need it to work in CMYK?
I do prepress work for my clients since for ever. It's a very profitable added income.
I understand. I also do prepress sometimes but my workflow is mainly RGB until the last stage when it goes into print. Then I convert it either in PS or via InDesign export.
I rarely have the case that I get files that are already CMYK converted.
That is why I asked.
I don't know why most 3rd party plugins do not work in CMYK mode. But there are a few in PS as well that do not work in CMYK.
Just out of curiosity:
Do you get a lot of already converted CMYK files that have to be edited in your workflow?
I used to but that greatly slowed down about five years ago. About 25 years ago I worked as photographer for a prepress house where they trained me on anything they had, including image setter first on film, then direct to plate. I did drum scanning, file preflight, laminated proofs, Iris, wide format... If photography was slow they had something for me and I loved to acquire all the knowledge. Clients would also send CMYK files for corrections and when the place closed, I went on my own and kept doing the image service for those clients. I actually like working in CMYK more than RGB. I've seen many times images scanned that were then turned to RGB, then cmyk, jpg... what ever they needed. Most people don't understand color space and profile so destruction would be really bad. I fixed a lot of those files when a manufacturer would supply them to my clients. I learned a lot of trick to give them a second life. Copying them to a new file in RGB color space or gray scale and crazy curves or else could often help revive them enough that I would then merge parts of those back into the life less and desperate working cmyk file and make a proof.
But for my files, I tune my raw files so they are neutral and will convert properly with my cmyk profiles. The idea is to not get rid of values that would affect the image when converted as these would no longer be available since cmyk's color space is tiny. Most clients have more limited use to cmyk today, but it is nowhere close to be gone. For "practical" reason, we will convert back to RGB and srgb. I'm not a fan of this but since most images will be used for the web and half the time on phones, we get some level for color consistency in the output. If needed, I can reprocess the RAW files for dedicated RGB use. Today, I mostly do image capture (photography), conversions, color corrections, silo, shadow for consistent income, and charge hourly for alterations. My work is very consistent and clients trust me with their last minutes shoots and requests. That's a win for both parties.