
If you're tired of struggling to get the "right" look on your still images, Dehancer is coming to the rescue with a solid plug-in for Photoshop, Lightroom Classic, Affinity Photo, and Capture One. It's available for Mac and Windows.
The company also has a wide array of solutions for the video industry, and it's frequently used for commercial and motion pictures. In fact, my colleague Christopher Malcom reviewed the video version recently, and a couple of years ago, we looked at the still image version too, but it's evolved quite a bit since then.
So What Does Dehancer Do?

According to the company, "the Dehancer target customer is any photographer or videographer who values the aesthetic qualities of film and seeks to integrate these characteristics into their digital workflow. Dehancer appeals to those who appreciate the nostalgia and mood of film but require the flexibility and convenience of digital tools."
So what we get is a plug-in that offers 63 film profiles with tools for getting color-accurate printouts.
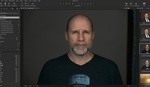
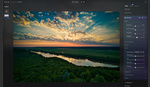
Basically, you load an image into one of the supported editors and launch Dehancer. On the left of the screen, you get the collection of film emulations and a preview of what the final product will look like. But the emulation, whichever one you choose, can also be a starting point for editing, because on the right-hand side of the screen are a collection of controls that allow you to tune and adapt your image with whatever emulation you selected as a starting point for your own edit.
So here's an image taken with a Sony a7 IV on the left, and converted to a Kodachrome emulation:

Or to Fujifilm Velvia:

Dehancer can be a final edit or, as I said, a preliminary edit that can be further adjusted in Dehancer or back in your usual editor. This makes for a very open workflow, and each photographer can adapt Dehancer to their own way of editing.
Using Dehancer
I tried the software on a variety of images. The software is easy to use. Just glancing at the GUI will get you going.

As noted, the emulations are on the left. You can scroll through them and apply them to a preview of your image. While Dehancer works with TIF and JPEG files, you'll do better with a RAW file, giving Dehancer more latitude with which to work, and your final adjustments to the emulation will work better with the complete data that a RAW file provides.
You can stop at the emulated film render, but in my testing, and I think most photographers will use Dehancer as a starting place for their edit, adjusting and tuning the look to taste. Dehancer also allows you to save any emulation you've enhanced as a preset, so you can use it again.
When you have what you want, back you go to your native editor and finish up.
Is Dehancer Useful?
In a word, yes. It's not the only plug-in that offers similar results. The newly released Nik Collection 7 provides a tremendous variety of tunable presets and some excellent black and white emulations with Silver Efex. It's a collection of tools I use frequently and give it high marks.
Dehancer has a slightly different take. It's not a sharpening tool or an HDR tool, but rather started at very accurate film emulations. You can get the complete list here. You'll find several Kodak, Fujifilm, Konica, and Rollei emulations to name a few. They look realistic (at least they seem to be a good emulation of films I used in the past) and are not glaring or over the top.
Having used the Fujifilm X100 series of cameras, I have to say that got me interested in film emulations, and I stopped thinking of them as a gimmick but something that could enhance my work. Fuji builds their emulations in, and you can see them in the camera viewfinder or LCD display.
Now, Dehancer brings accurate Fujifilm emulations to non-Fuji cameras, along with all the other films that the software emulates.
I'm liking using it, but I'm not a point-and-click editor who usually gravitates to presets. I have used Dehancer as a starting place, and then tuned it further, usually back in my main editor. I think one of the main benefits is the ability to see any image in a new way, often in a way you had not imagined, and that's always a good creativity enhancement.
What I Liked
- For something so powerful, it's easy to use.
- Installation was easy and straightforward.
- I like the ability to create or import presets.
- I appreciate the undo commands and history feature.
- With thoughtful use, most images can be improved.
What Could Have Been Better
- Thumbnail previews are small. I'd like to see a bigger presentation on screen.
- No built-in help. Although Dehancer is easy to use, questions always arise. Yes, I can go to the material on the website, but give it to me in-app.
Buying Dehancer
You can purchase Dehancer from the company website. There is a free trial and various levels of commitment. 3 months for $69.00, 6 months for $89.00, a year for $129.00, or a lifetime subscription for $199.00. If you're going to use the software, the lifetime option seems clearly the best deal, because even a 1-year renewal would cost more than the lifetime subscription. Purchase includes 2 seats.
Summing Up
Dehancer works, and works well. It's easy to figure out, and most photographers, advanced or beginners, will get going right away. I was a bit skeptical if this was software I needed, but after many days of using it I'll want to keep it in my workflow.
Some say that they don't want any software presets getting in the way of their editing, and it's a valid position. Still, I like being able to see, with a click, some other approaches to my personal vision. And, I love the look of film, and Dehancer can get my digital images darned close to a filmic look, which you may want in some or many of your images. At the same time, you're not stuck with any of the provided emulations; you can enhance and morph the look into something unique to you.
I see Dehancer as yet another arrow in my digital quiver, and it's a welcome and useful tool.


Do not take this wrong way! I know photographers in the end are artist making an image taken to a scale of what they think looks best in their eye. We all do it, I for one have done many images of Astro Milky Way's that no one can really see at night but the camera can see due to a longer deeper look with a slower speed and gather more light than the human eye and capture colors the human eye can not see in a very dark environment. The first time I saw the MW on the back of my A7S and then looked back at the dark sky with blinding light from below and around side to side and could only see some stars.
The point here, is for me, is to capture an image and get the colors most like what was seen for I have invested in many true color tools. But in the end even if editing on the spot of capture due to light changes it is your memory that helps some get it right.
Like going to the Grand Canyon the colors way down at the bottom you see in the twilight before the sun lights it up with speed of a fighter jet but doing a bracketed image where the brightest image helps the HDR program bring it about where the images on the postcards have varying shades of blue.
Oh well, I am back at settings and white ballance selections as well as selecting in post a programs selection of profiles to use that I could have used also, a best guess by a programer to edit a profile of the camera makers selection of a profile to use.
And as we look back at our old film photos they even with the film used depended on the develop chemicals used also.
Again, Oh well, we just have another brush to use to get that pleasing image for our walls and possibly many walls.
1. A film print with objects taken with a digital camera a finale image I edited to get the best of!
2. First sight of Milky Way using the glasses of my camera with very little processing due to it being 2015 and using then C1 as a program like Lr today but very few options at the time for it was a studio program and just $30
3. A smoke filled Grand Canyon using a bracketed capture, I saw it this way but a single image could not capture.
4. Just a tourist shot with a new 12mm and A7RM2 getting a single image panorama style from in front of hotel room window, the best view of a morning sunrise the eye sees with peripheral vision added for wideness of view.
The last two I used the Datacolor Spydercube in one image and then these images to edit in post, does it help who knows but worth a try.
Does using film profiles help also! It is the photographers brush of choice that matters!
That beach shot is sublime. I do also like how the image colors look 'separated', like they are tuned independently (vs universal shifts).
Nice work, cheers.