
With just a few simple ingredients and a couple of camera hacks, you can make these otherworldly photos at home on a budget. From the comfort of your own living room, you'll be able to capture images reminiscent of those famous iPhone wallpapers.
The beauty of nature is astounding. The same physics principles that apply here on earth also follow through the entire universe, with everything bound to the same laws no matter where you pick. You can observe the same behaviors on Earth as you can in say, Jupiter, for instance. Take a quick look through a telescope and you'll notice the swirling storms of the gas giant, the most famous of which is the Red Storm. These gas and fluid dynamics can be observed here at home, as well. In fact, from the comfort of your own living room, you can make photographs that look like the planets in our solar system.
This is a great camera hack to try at home on your own or with the kids, and it's a lot of fun. All you need are some simple ingredients you may already have in the cupboard and a couple of camera hacks to make the most of the shoot. For the whole shoot, you'll probably only need an hour, but this tutorial is so fun you'll probably want to keep shooting longer. We'll be mixing up the ingredients and blowing bubbles in a small dish or lens cap and capturing the results. So, let's take a look at what you need and how you should set up to get some incredibly interplanetary images.
Prepare Your Ingredients

By adding washing up liquid and glycerin to water, you can create excellent bubbles with long-lasting properties and a wonderful wash of colors.
There are three things that need to come together in the right amounts in order for you to make bubbles that look like planets: water, washing up liquid, and glycerin. Combining the washing liquid, (or any kind of liquid soap) will allow you to create the bubbles, whereas the glycerin makes the mixture more viscous and allows bubbles to hold their shape for longer. I actually found that the glycerin also improved the swirls and gave vastly different colors, too.
Mix up one part liquid soap with three parts water in a jug, then add a teaspoon and a half of glycerin to the mixture. Stir it around with the spoon (but try not to froth it up) and pour into a small dish or ramekin. Since most photographers reading this will likely have a lens cap, you could use that instead, as it's roughly the right size, and because it's black, it's less likely to cause reflection issues when lighting the bubble.
Make a Simple Backdrop

By placing black foam in a cardboard box behind the lens cap, the foam is shielded from the light of the flashgun up above and remains dark throughout the shoot without the need to place it much farther away.
Since we're going to be lighting the bubbles from above, you'll need a backdrop that's either far enough away or dark enough to look black. The black background makes the bubbles stand out strongly and look more impactful. Since I didn't have much space in the living room, I placed a piece of black foam in a cardboard box and put it against the back of the table. I then put a lens cap down on the front edge of the table from which to blow the bubbles. I found that because the lens cap was so short, the table was visible in the scene, so I propped it up with a chopping board.
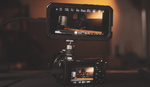
Place a Light Above

The light must be above the bubble to give that crisp finish to the edge of the bubble. It also enhances colors on the surface as well. Use the largest, most diffuse light source possible.
This step is crucial. The bubble photos only work well if you place a diffused light up above the area where you're shooting the bubbles. The bigger and softer your light, the better the photos will be. I used a big, rectangular softbox and placed a Yongnuo YN685 speedlite inside. This was all held in place using a C-stand with a boom arm that hung the softbox above the table.
I think if I were to shoot this again, I would set up a big, wide sheet of tracing paper and place one or two lights above it to make an even wider diffusion of light, as it's the size of the light source that will light up the bubble and make it look impressive. Alternatively, I may also attempt this in a lightbox/tent, but I think the unidirectionality of the tent might spoil the perceptibly sharp edges of the bubble.
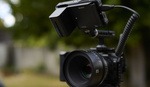
Push in Close

A macro lens is useful for getting close focus to the bubbles to fill the frame with them; however, you could also just use extension tubes on a standard or telephoto lens to achieve similar effects.
A macro lens is ideal for this shooting situation because the bubbles will be relatively small. By using a macro lens, you can focus up close on the subject and fill the frame. However, if you don't have a macro lens, you could alternatively use extension tubes, as I did and pair it with a telephoto lens. Though any kind of close-up filter or even just reversing the lens will work in a pinch.
Nail the Focus
This is possibly the hardest part of the entire photoshoot because it's so hard to see where you need the focus if not using continuous lighting like me. I'd recommend placing a straw halfway across the lens cap and focusing on that. Now, when you're ready to shoot the bubble, most of the front half of the bubble will be in focus. But to make sure it's not just a small slice of focus you'll need to use some specific settings, and that's why I recommend using a flashgun, as you'll see in the next step.
Stop Down Your Aperture
The narrower your aperture, the greater the depth of field. Since this is a macro task, you'll want to use an aperture of f/16 or narrower to maximize the depth of field and get sharp results. I used an aperture of f/22 because I was using the long end of my Nikon 70-200mm f/2.8 VR II with extension tubes, and as such, the depth of field was extremely narrow. Generally, I would advise against stopping down this far due to diffraction from the narrow aperture causing images to be soft, but in this case, I was pretty happy with being a bit more creative.
Dial in the Settings

I used a Yongnuo YN685 with the YN622N wireless transceiver and corresponding transmitter to trigger the flashgun.
I used a shutter speed of 1/200 sec, the sync speed of the flashgun, and set the flashgun to 1/16 power. I didn't want to go much higher with the flash power because this would increase the recycle times. When you're photographing the bubbles, you'll find that they disappear within a minute or two and change very quickly, so getting as many shots in as possible is the best method. I simply boosted my ISO to 640 to compensate for the lower power of the flash.
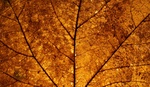
Blow Your Bubbles

This is what the bubble looks like when you accidentally blow up two simultaneously. Also, this colored banding is what occurs before you let the bubble settle for a few seconds, so to avoid this, wait for about 20 seconds and then gently blow on the bubble to remove it.
In the lens cap, I poured some of the mixture and blew into it at a shallow angle using a straw. Once I got one bubble going, I kept the end of the straw within that single bubble and continued to blow. I made them quite large, about the size of my fist, and then took the straw out. The technique for me here was to wait for the mixture to settle a little first and then blow softly on the bubble to generate turbulence.

Occasionally, I would use the straw to blow in small, specific areas on the bubbles and create this iridescent turbulence that you see here.
It's this turbulence and time elapsed, which causes wonderful stripey patterns to ebb and flow over the surface of the bubble. Colors can range from gray to yellow, bright green and blue, or even purple. No two are ever the same, and it's increasingly fun to try different blowing techniques to generate odd turbulence on the surface. Alternatively, though, you could use a fan as long as it's placed far enough away so as not to pop the bubble.
The combinations of colors and patterns are almost limitless, so every bubble you blow will look different. I'd have liked to have shot this on a camera with a vari-angle screen so that I could blow the bubble and see the shot at the same time, but because I was on the Nikon D750, I had to either use a friend to blow the bubble or simply fire the camera without looking while I blew on it. Overall, it is a fun DIY experience that takes a little patience and time to set up, but with spectacular results, right from the comfort of your own home.


Creative and fun - great article!
Ok, this is pretty cool.
I might need to try this.
OK, What is a Part, If I mix 3-parts water to 1-part dish-soap, and then add 1-1/2 teaspoons of glycerin, Sorry that makes no sense? How much of a part? 1 quart soap, 3 quarts water, or 5 gallons soap and 15 gallons water? LOL!
Get some and work it out for yourself, easy
Yeah I never understood why "Parts" is a form of measurement. Why not ML. L. and KL? Even the imperial measuring system is better than "Parts"
because its a ratio, and can be scaled up or down for however much you need. never mixed a cocktail before?
One part bourbon, one part ice.
Parts isn't the issue. The issue is that some of the formula is in parts and some of the formula is in specific measurement units forcing the audience to try to figure out how to conform it.
Cool shots but what exactly are the hacks? Normal equipment, normal lighting, normal aperture.
I tried this formula and I got lots of bubbles but they were all clear, no surface swirls. I changed lighting and camera angles and tried a few other rations and got clear bubbles. Suggestions?