
Shooting bodies of water is both fun and challenging. In this article, you'll learn five techniques that will rapidly help you to improve your images of oceans, lakes, and rivers.
I grew up near the beach in Sydney, Australia and have spent the best part of my 40-odd years in and around the water, be it surfing, swimming, or taking photos. Every major life decision I've made has revolved around my proximity to the water, so it's only natural that I would gravitate towards taking images of water. However, there's a lot to learn if you want to consistently get images you're really happy with, and I went through years of making mistakes before I developed trusted techniques that have brought me to where I am today. So, let's dive in and examine some of those techniques so that you can improve your waterscape imagery as well.
Timing Is Key
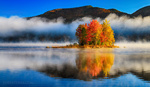
When you're out near bodies of water, there are a lot of elements that come into play. You need to be aware of what they are in order to maximize your chances of getting shots you're happy with. Some of the elements that will heavily influence you when you're out shooting water include tides, wind direction, and the position of the sun. For example, I can't count the number of times I've seen photographers go to a spot at high tide and picture a gorgeous image in their mind's eye as they're scouting the location, only to return at low tide and be greeted by drab, dark sand or uninspiring rocks devoid of interest. The tides change every six hours or so in most places, so it's crucial that you understand where the water will be when you plan to shoot. There are a number of apps that will help you with this.

In this image above, the tide was pretty much bang on dead-high. That meant that the fishing poles in the foreground were submerged, as well as the poles in the middle-left part of the frame. Had I come here at low tide, I would have met nothing but a sea of sand. I wouldn't have got the lovely orange hue on the water nor the subtle reflections of the poles in the foreground. Also, I walked around to about four different spots before I settled on this one because I wanted the sun to fill the center part of the frame and the river. Using apps such as The Photographer's Ephemeris can be extraordinarily helpful here.
Stay Longer Than You Think You Should
This was one of the harshest lessons I learned very early on. As long as there's light, there's always an opportunity to get something special. When I first started taking images, I'd arrive for sunset, set up, get my shots, then pack up and leave as soon as the sun had disappeared. It wasn't until I consistently saw amazing light from the unfortunate position of my driver's seat that I realized I'd erred on exiting too early. Nowadays, I stay until it's pitch black every time. I mean, what's an extra 20 to 30 minutes to hang around? Sure, you might be able to sink yourself into the sofa and crack open that first beer a little earlier, but if you've taken the time to go out into the wild and get your shots, is an extra 20 minutes going to hurt? I can't count the number of times the magic has really happened well after the sun has set.

In this image above, the sunset on that day wasn't particularly spectacular, but I could see the clouds gathering above. There'd been nothing of interest in the sky, as the sun had set, but in the intervening 30 minutes, a nice little bank of clouds formed above, and the sky turned a rich shade of reddish-pink. Had I packed up earlier, as I did when I first began taking photos, I would have completely missed this shot and cursed myself for being in such a rush to get home.
Look Around You
Sometimes, it's very easy to get caught up with the star of the show, such as a sunset. At those times, you can pace up and down and back and forth like a madman trying to find the right position to get the sun in your image and do the composition justice. There's nothing wrong with that, but it always behooves you to actually turn around and look the other way, especially if you are near the ocean. In the two images above, I shot the sun setting in the west over the mountains in the background. However, I also know from my years of living and surfing here that when the sun sets over the mountains, it often provides a wonderfully soft, pinkish-blue hue over the horizon. Thus, I always take some time to look behind me, even if it's not what I came with the intention to shoot.

In the shot above, there wasn't much happening above the mountains in the west. However, the tide was in a good position, and the pinks were glowing gorgeously in the distance. When that happens, you have to seize the opportunity and forget about what you might have originally wanted to shoot. If you've got something good staring at you, grab it and photograph it. There's no point worrying about what the sun might or might not do; just look around and be thankful you've got other options. When I first started out, I never looked around, because I was always so determined to get the shot I'd envisioned on the way. Time has taught me to be far more flexible and aware of my surroundings.
Shoot in Black And White
When you're out shooting the water, particularly at sunrise or sunset, it might seem counterintuitive to think black and white. But when you think about what makes a good black and white image, waterscapes can often give you great opportunities to ditch the color. Contrast, subtle shades, reflections, and texture are all parts of good black and white imagery, and there are times when all of these are there for you when you're shooting near water.

In the image above, there were a lot of the elements I like to look for if I'm considering a black and white shot. You have the interesting shapes of the fishing poles and their clean reflections in the water. You have a number of different shades over the water itself with the reflections of the clouds and the bridge. And the silhouettes of the mountains seep into each nicely. All of these parts drew me quickly into the idea that this would make a good black and white image. Again, it wasn't my original intention when I got here on this day, but when you see something staring at you, you need to be willing to change. There are always other days to come back and get your originally intended shot.
The Gear You Use
Yes, gear matters, especially when it comes to waterscape photography, not so much with regards to the camera body or lens you choose, but more so in terms of other necessary parts. You will need to use a tripod. It gives your camera stability and prevents any kind of shake, which in turn allows you to keep the shutter open for extended periods of time. Sometimes, that might be a second or two, other times it might climb up over a minute, depending on the light and the look you're going for. I tend not to use expensive tripods for the most part, and in all these photos here, I used the Manfrotto Be Free travel tripod, which runs at just a shade under $200.
Perhaps more important is the need for filters. If you want to smooth out moving parts like the water or the clouds and remove any kind of ugly water ruffle created by strong winds, then you'll need to use filters over the front of your lens. Lately, I've been using the Tiffen variable neutral density filter, which I love, because it is designed with a built-in rotating ring that controls neutral density ranging from two to eight stops. That allows you to adjust the stops of light with a simple twist of the filter on the front of your lens. All of the images in this article used that Tiffen filter. Any filter that allows you to keep your shutter open for extended periods of time so as to smoothen out clouds and waters will do the trick. Whichever brand you go for, they are essential for getting quality waterscape images, especially when the wind is not cooperating.
In summing up, waterscape photography is by far my favorite genre. Numerous scientific studies have been done around the world that clearly indicates how humans positively react to the sight, sounds, and smell of the water. If you take the points in this article into consideration the next time you go out shooting water, I am confident you'll come away with many images you'll love.
What are your thoughts? I'd love to hear from you in the comments below, including anything you think should be added.


Some of my best beach pics were taken at low tide with the sunset making the wet beach glow like fire, half tide seems to be the most boring.