
Just like most photographers, my off-camera flash journey began with the purchase of a speedlight and some inexpensive triggers. Many photographers will tell you that as soon as you get a speedlight, you need to acquire proper off-camera flash units. However, there are still many things you can do with a speedlight, and in this article, I will show you some of them.
A single speedlite is sometimes all I have on a shoot. While these times are rare, and often, if I do have a single light, it’s a Profoto B1X. There have been times when an A1 was all I had. Not to worry, my friends. If all you have in your kit is a speedlight from Amazon, you can do most of these setups anyway. In fact, I angled the article in a way that enables as many photographers with a speedlight to do these setups. To create these setups, you will need: a speedlight, a remote trigger, a light stand, and possibly gels. It’s that simple, really. If you’re interested in the gear I am using, here it is: Profoto A1, Profoto Connect Pro, Profoto Clic Gel Teal, Manfrotto MLHHS-2, Avenger 40” C Stand kit.
Bad Light
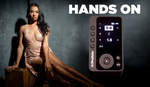
One of the most popular looks nowadays is the so-called bad light. You see, back in the day in the 80s, all you had was a point-and-shoot with a small point flash. Everyone looked ugly in those photos, and as soon as softboxes and lighting knowledge became more accessible, people started classifying this light as bad, and soft as good. However, it seems like the aesthetic is coming back to this very real and raw-looking hard light. This setup is super popular with event photography and is often done with a phone as well. Your iPhone camera is not that different from what I captured here.
The technique here is simple: I just point the flash at the subject, overexpose the subject, and voila. The key is to overexpose. You can have your light set to TTL mode but make sure to turn up the power by a stop or so. This will give the signature look. I say don’t be afraid of this look, as it is gaining popularity. The aesthetic has shifted from pretty and clean towards raw and real.
Creative Light
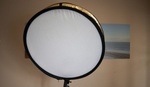
 By far the most creative setup out of these, which you can use to get interesting long-exposure portraits. Some speedlights nowadays have a built-in modeling lamp, which allows photographers to light up their scene in multiple ways. The Profoto A1 is no different and features such a light. You can even zoom it! Anyway, here is how I did this setup. First, I made sure to use a long exposure. The idea was to have the flash be a different color from the constant light. This can be done by placing a gel over the flash just as it is about to fire. Hence, the exposure time was around 1s. It is important to mention that this is only possible in a dark room, as you want to make sure that there are no other light sources hitting your subject. Ideally, have a friend do the gel part. To make things even more fun, you can move the light around as the shutter is open. This technique is quite difficult, which is why after a few tries, I settled on the image of placing the gel on the light.
The Close Background Way

Simple, one light pointed at the subject from the top, however, the subject is placed right at the background. This way, you get almost no shadows, and your lighting is reminiscent of how a ring light would behave. Since I was alone doing these images, I had to trigger the camera remotely. However, to better this setup, you can take the light off-camera and place it right next to the lens. Some photographers use a bracket for this. While a very 80s technique, it does give off very good high-quality hard light that brings out detail in the subject. Use with caution, as this is probably not the most flattering technique.
Backlight


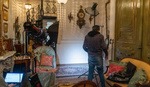
If flattering is what you are looking for, then the next two setups are for you. In the first one, I place the light overhead but sit behind it. As such, the speedlight is lighting the background, and not me directly. What this does is turn the background into a massive light source, thereby giving a backlit effect. This is excellent for highlighting facial structure as well as hiding bad spots on one’s skin. This setup can work well on its own or be a great foundation for adding more lights and crafting the image further. Another way to build on this setup is to place the subject behind a black piece of fabric in a way that only covers the subject and nothing else. This way, you will get a rim light going all around the person.
The Classic Bounce


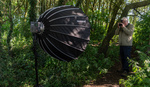
The last setup is perhaps the one you already know, but for those who don’t, here is how to get soft light fast. Essentially, this is one of the first techniques photographers learn when starting their flash journey. Still, I see so many people do it wrong. While the concept of bouncing light is fairly easy to explain: big light = soft light, the right way can be a little tricky. Most photographers, myself included, will either aim the speedlight straight at the ceiling or at a right angle away from the subject. These are not the best ways to bounce light, as you are creating a top light and shadows under the eyes with the first method, while the second method may leave people behind you blind for a minute. The right way to bounce light is to aim the flash head at a 45-degree angle away from the subject. This way, you will be wrapping your subject in light from both the ceiling and the wall. As such, there will be no dark shadows under the eyes, and the people behind your camera won’t get blinded.
Are there any cool one-speedlight setups that you know? Share with us in the comments below!


"The right way to bounce light is to aim the flash head at a 45-degree angle away from the subject."
If a wall is unavailable, or even if it is, bouncing off the ceiling a few feet to either side of the camera can create a nicer effect, making one side of the subject slightly brighter than the other side and giving the image a more 3D feel.
Also, putting a bounce card on the flash can fill shadows under the chin and in the eye sockets.
And, if there's a usable wall right behind you, swiveling the head to point backward can make very soft light.
And that's considering that the walls are white and won't add a color cast to your image